This version of the Ed-Fi ODS / API is no longer supported. See the Ed-Fi Technology Version Index for a link to the latest version.
v3.0 Tech Preview - Installation Guide
This section describes how to set up the Ed-Fi ODS / API v3.0 Technical Preview on a development machine.
The steps can be summarized as:
Detail on each step follows.
Step 1. Install and Configure Windows Components
Ensure that the following components are installed:
- PowerShell 5.0. PowerShell is used to initialize the development environment.
- Microsoft Message Queue Server Core. MSMQ Server Core is used to manage asynchronous messaging for the Bulk Load API of the Ed-Fi / ODS API.
- .NET Framework 3.5. The .NET Framework 3.5 is required for Microsoft SQL Server.
- .NET Framework 4.62 Developer Pack. The .NET Framework 4.6.2 Developer Pack is required for compiling the solution.
PowerShell 5.0
Verify that PowerShell 5.0 or above is installed:
- Press the Windows key
on your keyboard, type PowerShell, select Windows PowerShell, and press Enter.
- Type $PSVersionTable.PSVersion, and press Enter.
- If the required version is not installed, download Windows Management Framework 5.0, which includes PowerShell 5.0.

Microsoft Message Queue Server Core
Verify that MSMQ Server Core is installed:
- Press the Windows key
Alternately, open Control Panel, click on the Programs items, and then click on Turn Windows features on or off under Programs and Features. - If not already selected, select the Microsoft message Queue (MSMQ) Server Core check box as shown below, press OK, and reboot your computer if prompted.
Only MSMQ Server Core is required, as shown below:

.NET Framework 3.5
Verify that .NET Framework 3.5 is installed:
- Press the Windows key
on your keyboard, type Windows Features, select Turn Windows features on or off, and press Enter.
Alternately, open Control Panel, click on the Programs items, and then click on Turn Windows features on or off under Programs and Features. - If not already selected, select the .NET Framework 3.5 (includes .NET 2.0 and 3.0) check box as shown below, press OK, and reboot your computer if prompted.
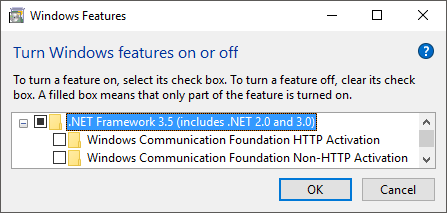
Alternatively, download the .NET Framework 3.5 installer.
.NET Framework 4.6.2 Developer Pack
Download and install the .NET Framework 4.6.2 Developer Pack.
Step 2. Install and Configure Required Software
Ensure that the following software is installed and configured:
- Java Runtime Environment 8 or Higher. The Profiles feature of the Ed-Fi ODS / API ships with integration tests that generate a version of the Ed-Fi ODS / API SDK. This generation step requires Java Runtime Environment version 8 or higher.
- Microsoft SQL Server 2014. Microsoft SQL Server is used to store the data for the Ed-Fi ODS / API. Local installation of Standard, Developer, or Enterprise Editions with Service Pack 2 or higher are supported. Using a remote instance of Microsoft SQL Server is not currently supported.
- Visual Studio 2015. Visual Studio 2015 Professional is required for a development environment.
Java Runtime Environment
Install the latest version of the Java Runtime Environment.
Microsoft SQL Server 2014
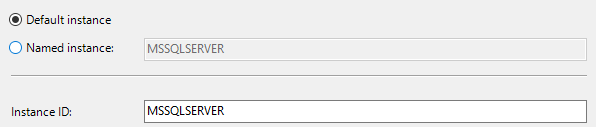
Install Microsoft SQL Server 2014:
- When prompted, select the following features:
- Use the default instance named MSSQLSERVER.
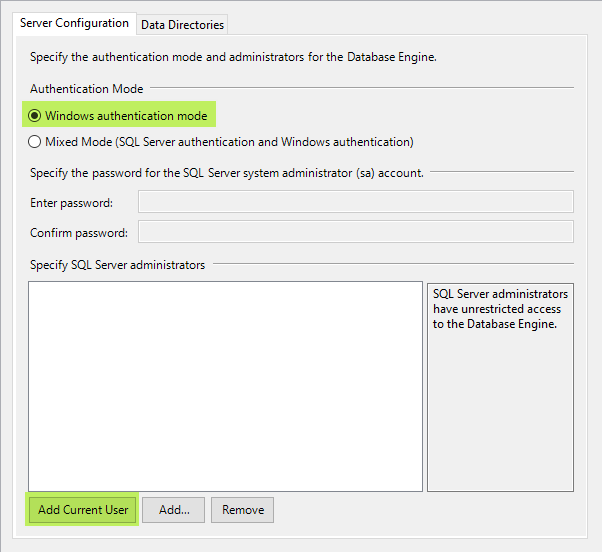
Select either Windows Authentication Mode or Mixed Mode.
Mixed Mode may be preferred if you also intend to install the Ed-Fi Dashboards. Mixed Mode can be enabled later by following the Change Server Authentication Mode instructions.
- In Specify SQL Server administrator, click Add Current User.

Visual Studio 2015
Install Visual Studio 2015:

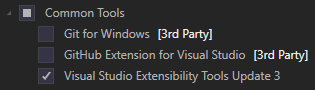
- Web Developer Tools is used by some of our user interface projects within the Ed-Fi ODS / API.
- Extensibility Tools is Visual Studio 2015 SDK and is required for the Modeling SDK.
- Modeling SDK is used in later steps by our build script to set up the development environment.
After installing, check the Visual Studio Start Page and Windows Update for Visual Studio updates.
Step 3. Download the Ed-Fi ODS / API v3.0 Tech Preview Code
Before you begin this step, make sure you have a /wiki/spaces/ODSAPI23/pages/21561781 and a login to access the Ed-Fi Alliance source code repository in GitHub. The Ed-Fi ODS / API source code is contained in three Ed-Fi repositories hosted by GitHub.
Tech Preview Source Code Links
The Tech Preview Release of the Ed-Fi ODS / API can be found in the repository links below:
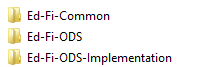
Use a Git client (such as GitHub Desktop) or a Git command line tool to Git Clone each of the repository links described above. It is important that all three repositories are extracted to the same root directory (for example C:\). When all repositories have been cloned, there will be three folders for the ODS / API source code as shown below:
When you clone a repository, ensure that you have the correct tag or branch checked out in your client before proceeding
Accessing Daily Source
The links above are for the stable release of the ODS / API v3.0 Tech Preview. You can download the links to the very latest daily source code in the development branch:
Alternate Method for Code Download
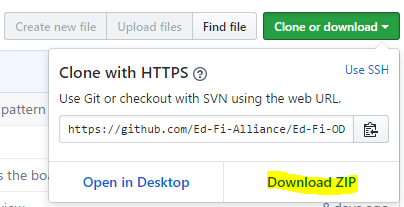
Some developers prefer simply to download the code rather than perform a Git Clone. You can do so by following these instructions:
Navigate to each of the repository links described above (for latest release or daily source) and use the Download ZIP button to download the repository to your local drive.
In Windows Explorer, right-click on each of the downloaded ZIP files and select Extract All… Enter C:\ for the target folder. (You can extract the files to any directory, but these instructions assume you've extracted to C:\.) The ZIP files contain an embedded folder ending in "-v3.0.0-preview.c" (or "-development" or "-master" if downloading latest daily source). For example, the "Ed-Fi ODS ZIP" archive contents will be extracted into C:\Ed-Fi-ODS-v3.0.0-preview.c.
After the extractions are complete, rename the folders to remove the -v3.0.0-preview.c (or “-master" or "-development") from the folder names. For example, change C:\Ed-Fi-ODS-v3.0.0-preview.c to C:\Ed-Fi-ODS.
When the extraction and renaming is complete, there should be three folders for the ODS / API source code as shown below:
Troubleshooting the File Extract
The steps above work for most users. However, depending on your Windows security settings, you might get a warning or error when attempting to extract the downloaded ZIP files. If this happens to you, the fix is easy:
In Windows Explorer, right-click each of the downloaded ZIP files and select Properties. On the General tab, check Unblock to allow the contents of the contained scripts to execute properly.
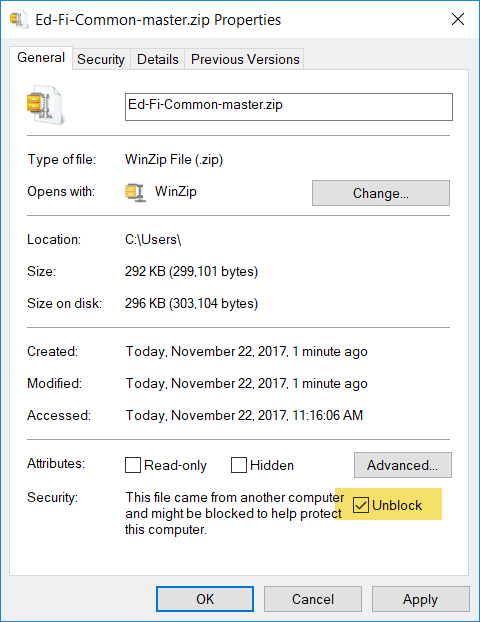
The dialog box above is from Windows 10. Previous versions of Windows have an "Unblock" button in the same location.
Step 4. Prepare the Development Environment
To prepare the development environment, you'll need to follow the procedures described below.
Configure MSBuild
Packages compiled from some of the projects are used during the code generation of later projects, and there is a potential for earlier packages to be locked if the solution is recompiled in rapid succession. This is due to the way that MSBuild caches build processes by default to minimize compile time. Build processes are normally held for reuse for approximately 10 minutes. To turn off this default behavior when compiling in Visual Studio, the "MSBuildDisableNodeReuse" variable must be set.
To set the "MSBuildDisableNodeReuse" variable globally:
- Press the Windows key
- Under User variables, Select New...
- For Variable name, enter MSBuildDisableNodeReuse
- For Variable value, enter 1, and press OK.


To turn off this behavior when compiling the solution using MSBuild, include the following compiler flag: /nr:false.
Verify PowerShell Script Permissions
When opening PowerShell, ensure that Run as Administrator is selected. You may need to change the execution policy for unsigned PowerShell scripts to run on your machine to run the scripts. This may be accomplished by opening a PowerShell console and typing the following command:
Set-ExecutionPolicy Unrestricted
Initialize PowerShell Scripts for Development
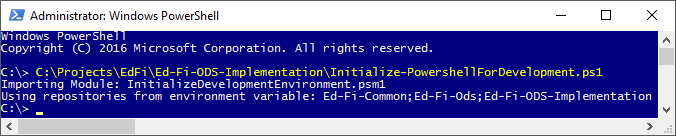
There are several databases that must be successfully deployed. PowerShell scripts that initialize all necessary development databases are included in the Visual Studio solution. These scripts are enabled for use within Visual Studio when the Ed-Fi-ODS solution is opened. They may also be loaded for use within a PowerShell console window by running the initialize PowerShell for development script located at:
C:\Ed-Fi-ODS-Implementation\Initialize-PowershellForDevelopment.ps1
When the scripts are loaded, you should see the results shown below:
Initialize the Development Environment
Once the PowerShell scripts for development have been loaded and a development certificate has been installed, the development environment may be initialized by typing the following into a PowerShell command prompt:
initdev
This command creates databases, generates code templates, and compiles projects in the solution. Some considerations while running the script:
- The
initdevscript may not finish with a command prompt when it is automatically loaded with the solution in Visual Studio in some circumstances. Simply press Enter, and ignore any messages that appear in the console window. - Initializing the development environment will take several minutes to complete. Some developers report encountering an error during the initialization process the first time it is run. This is due to an intermittent timing issue. The issue generally resolves itself when the
initdevprocess is run a second time.
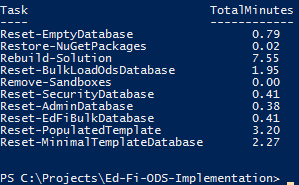
A successful initdev execution will display the tasks executed and their duration as shown below:
Step 5. Build the Visual Studio Solution
To build the solution from within Visual Studio:
- Ensure that the MsBuildDisableNodeReuse flag is set (see Configure MSBuild, above).
- If the above flag has been set globally, start Visual Studio normally. Otherwise, open Visual Studio from the Visual Studio Developer Command Prompt (where you set the flag value by typing
devenv). - Within Visual Studio, open the “Ed-Fi-Ods.sln” solution file from the C:\Ed-Fi-ODS-Implementation\Application directory.
- Select Build > Build Solution (or press Ctrl+Shift+B).
Code Generation During Build
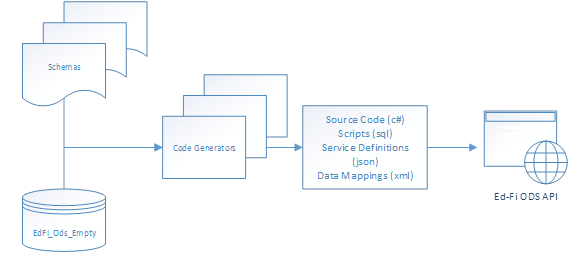
The following diagram shows how the XML schema and empty ODS Database are used to create the API for the Ed-Fi ODS using code generators within the solution. The presence of the “EdFi_Ods_Empty” database is necessary because the code generation uses the database to understand the structure that it uses to generate data access code.
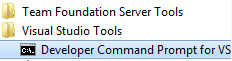
Alternatively Building from the Developer Command Prompt
When the “EdFi_Ods_Empty” database has been created (by running the initdev PowerShell command in the previous step), there are two ways to build the solution. The solution can be built from Visual Studio, as described above, or from a Developer Command Prompt for Visual Studio using the Windows start menu.
To do a clean build from the command prompt:
- Open the Developer Command Prompt for Visual Studio.
- Navigate to your C:\Ed-Fi-ODS-Implementation\Application directory.
- Issue a command similar to the following:
Msbuild /nr:false /t:clean;build Ed-Fi-Ods.sln
Step 6. Set the Startup Projects
The Visual Studio Solution for the Ed-Fi ODS / API consists of several "Startup Projects" that work together. Each of these projects needs to be running for the system to be fully functional.
To set the Startup Projects:
- Select the Set Startup Projects… context menu by right-clicking on the solution file in the Solution Explorer.
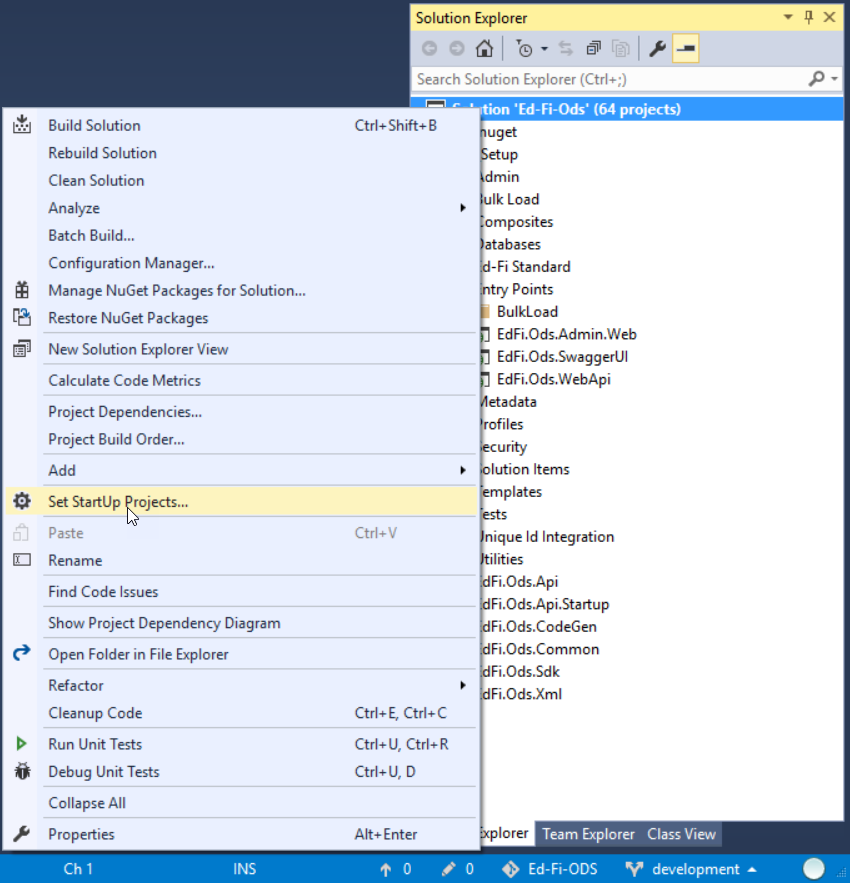
- Within the Startup Project property page, select the Multiple startup projects radio button and enable the following projects:
- EdFi.Ods.Admin.Web
- EdFi.Ods.SwaggerUI
- EdFi.Ods.WebApi
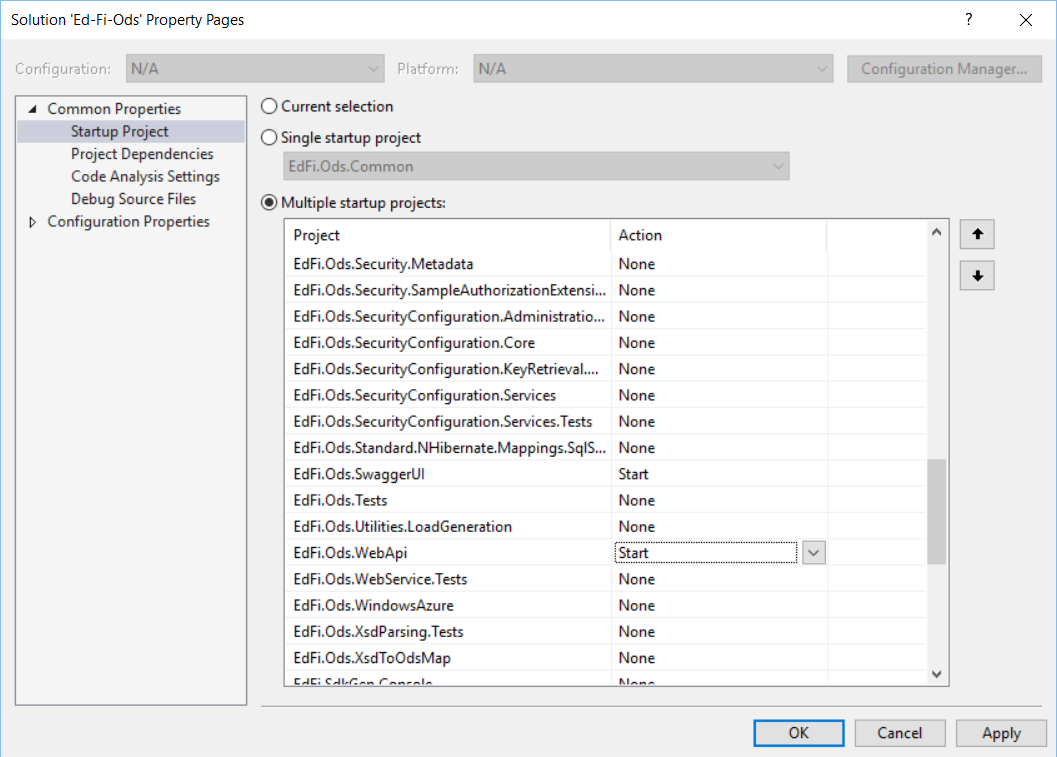
The Upload and Bulk workers work in conjunction with the bulk load API. They monitor message queues containing instructions to asynchronously reassemble the uploaded file segments and process the assembled bulk data. If you will be performing bulk operations, you may choose to set the startup project action to Start for the following projects:
- EdFi.Ods.BulkLoad.Services.Windows.BulkWorker
- EdFi.Ods.BulkLoad.Services.Windows.UploadWorker
Alternatively, you can start these projects on demand after loading the files.
3. Click OK to accept the changes to your local development settings.
Step 7. Set the Start Options for EdFi.Ods.WebApi
- Select Properties context menu by right-clicking on the EdFi.Ods.WebApi project in the Solution Explorer.
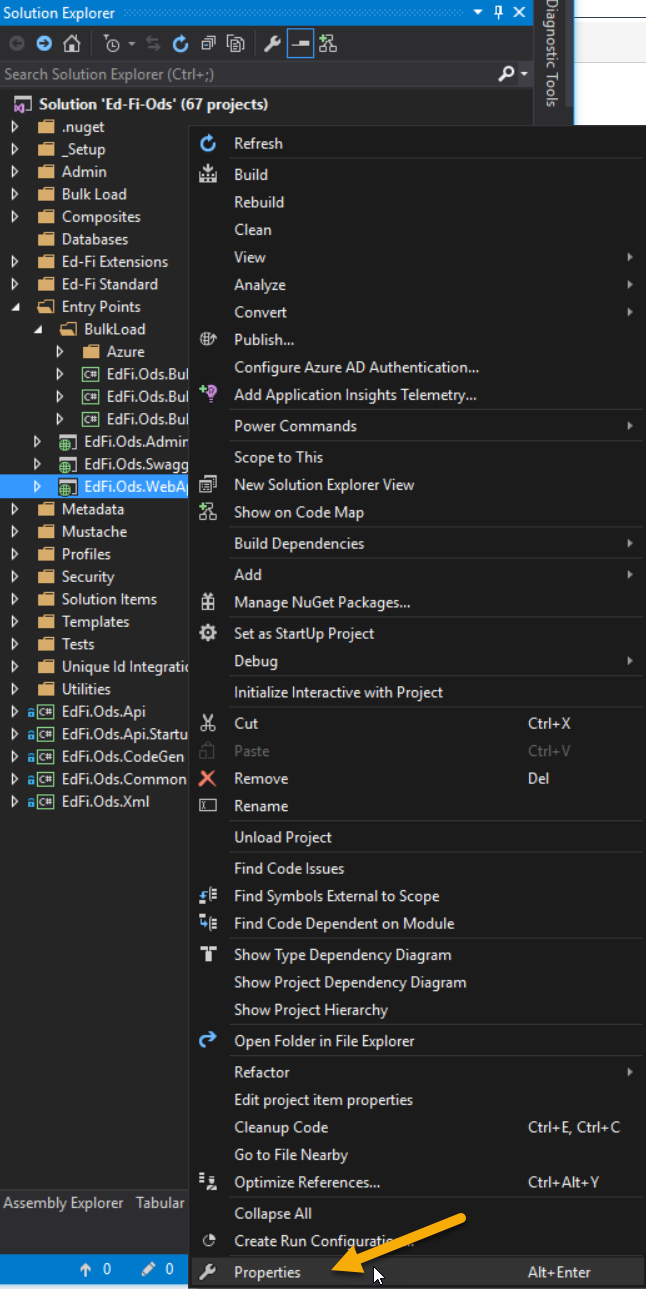
- Within the Project Properties page, go to 'Web' tab and change the Start Action to 'Don't open a page. Wait for a request from an external application.'
Step 8. Build and Run the Solution
The projects in the Ed-Fi-ODS-Implementation repository are configured to run the desktop version of Internet Information Server (i.e., IIS Express). This server is installed with Visual Studio and facilitates easy debugging with minimal configuration. After the startup projects are set, you are ready to run or debug the Ed-Fi ODS / API.
- To run the Ed-Fi ODS / API without debugging, press Ctrl+F5.
- To interactively debug the Ed-Fi ODS / API solution, press F5 (or press Start in the Standard Toolbar).

The first time you build the solution, you may get a build error related to the Ed-Fi-Common project. If this occurs, simply building the solution again will generally result in a successful build.
The solution builds and starts each of the projects that were added to the startup projects list. Each web application starts an instance of IIS Express. By default, the websites are configured according to the following table:
Website | Project | URL |
|---|---|---|
Ed-Fi ODS API | EdFi.Ods.WebApi | |
Sandbox Administration | EdFi.Ods.Admin.Web | |
Ed-Fi ODS API Documentation | EdFi.Ods.SwaggerUI |
At this point, you're ready to explore the system.
Follow these steps to finish configuring the solution:
- Visiting the API Sandbox Administration Portal
- Logging in with the Test User Account
- Reviewing the Ed-Fi ODS API Documentation
The Sandbox Administration Portal
The Sandbox Administration Portal is a web application used to create sandbox databases containing data that can be accessed through the Ed-Fi ODS / API.
Login to Sandbox Administration Portal with Test User Account using email address "test@ed-fi.org" and password "***REMOVED***". We recommend that you change your password as soon as you log in.
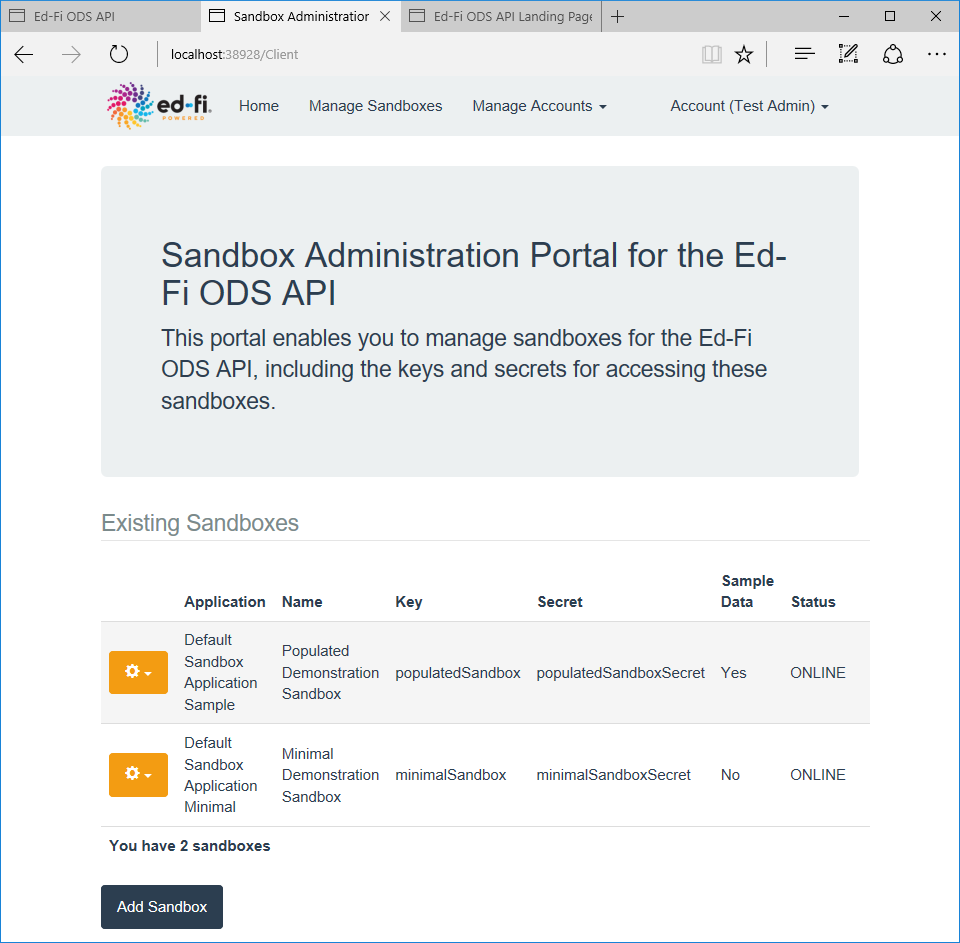
As the name implies, Sandbox Administration Portal is useful for development machines and sandbox instances of the ODS / API, but should not be present on production instances. See the /wiki/spaces/ODSAPI3/pages/20480716 section for details.
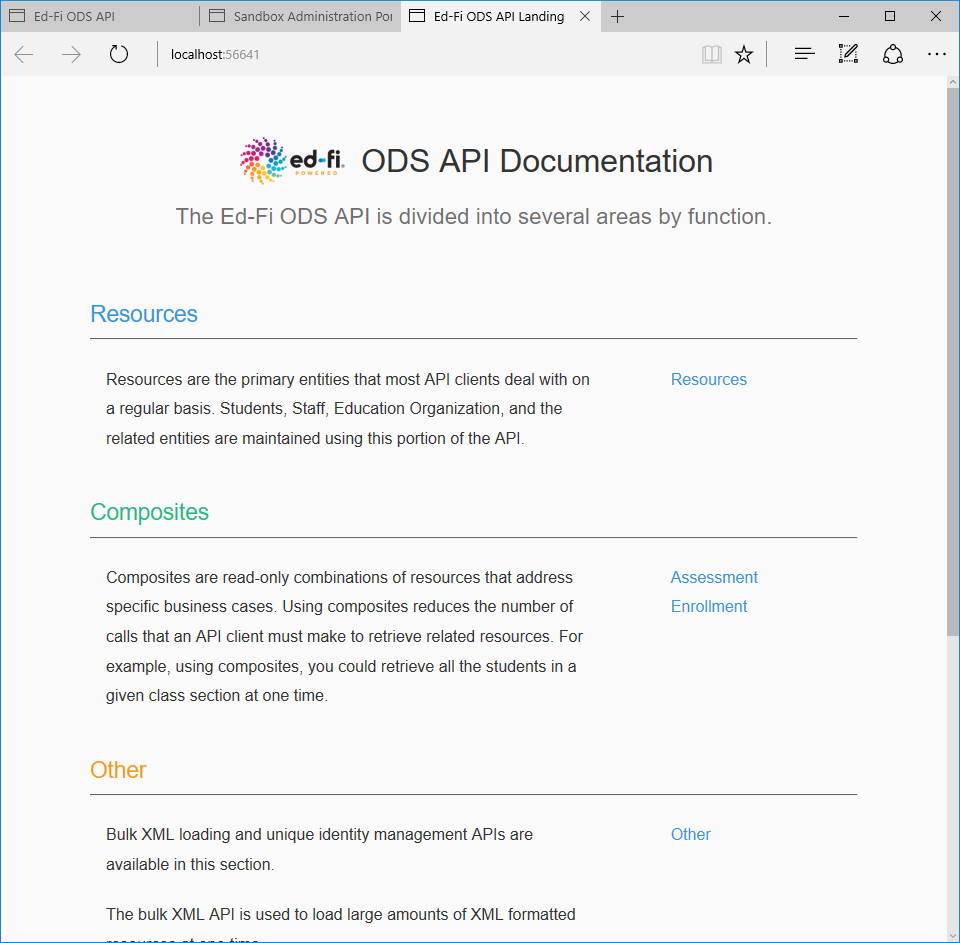
The Ed-Fi ODS / API Documentation Web Page
The REST interface to the Ed-Fi ODS / API exposes metadata describing the exposed resources as well as the inputs, HTTP verbs, and schema of the exposed entities. This metadata enables a user interface (based on the Swagger framework) to display API documentation.
The Ed-Fi ODS / API Documentation web page uses a key and secret (typically the same one used for the Sandbox Administration Portal) to access the data that has been placed in the corresponding sandbox.
To view the data in your sandbox, enter the key and secret in the appropriate fields and retrieve a token. This token is used throughout your session to access your sandbox. This is the same process used by other applications to access their data.
Similar to the Sandbox Administration Portal, the ODS / API Documentation Web Page is useful for development machines and sandbox instances of the ODS / API, but is generally not present on production instances. See the /wiki/spaces/ODSAPI3/pages/20480716 section for details.
Contents
Read more about the ODS / API v3.0 Tech Preview: