SEA Modernization Setup Guide
Step 1. Develop Data Specifications
To use the Ed-Fi Data Standard, states must re-express, in Ed-Fi language, the data specifications they have provided to their technology providers and school districts.
The data specifications comprise elements that your state needs to collect in order to meet your reporting needs (using the Ed-Fi Operational Data Store (ODS)).
The elements needed in your specifications depend on your data collection need for reports you intend to service. Defining a data specification generally means mapping between the state elements and those elements in the Ed-Fi Data Model. This mapping exercise will identify where the elements are 1:1 aligned, where they are not 1:1 aligned, what elements need to be omitted, and what elements do not exist in Ed-Fi and need to be included as Ed-Fi Extensions; more on this below.
The data mapping exercise can be done using our published MappingEdu tool or an Excel spreadsheet. Many agencies are most comfortable with a spreadsheet and want to start there.
The MappingEdu tool has the advantage of allowing for greater collaboration, as data specifications are hosted online and it is a web-based application. Ed-Fi Licensees have access to download and to use the tool. However, to be productive, business analysts first need to learn to use the tool.
State-Specific Code Values
As part of the data mapping exercise, you also need to express code sets in Ed-Fi, which are called "Descriptors." These values need to be imported in the Ed-Fi ODS so that technology providers submitting data can reference them. Note that the ODS / API will reject values if Descriptors are not present; this is an important safeguard to improve data quality.
The Ed-Fi Data Standard ships with a set of default Descriptors which are available out-of-the-box in your ODS / API. States often use custom descriptor values either in addition to or instead of the standard set provided by Ed-Fi specifications. We recommend reading Descriptor Guidance to understand where you are likely to find more value in staying within the Ed-Fi descriptor value sets.
Note: When values are added, they must always be added in the SEA namespace to provide a technical means of identifying new values and should be given a definition.

Reminder
For a successful Ed-Fi implementation, we recommend states start small and move one or two collections online as a starting point.

More information
Most state data specifications are shared openly online, because states need a broad vendor community to engage with and use them. Some use case examples are below:
| State | Data Specification |
|---|---|
| AZ | Use Case 7.0 |
| IN | Data Requirements |
| NE | Vendor Resources |
| WI | |
| Template | DataRequirements.xlsx |
Step 2. Develop Model Extensions (If Required)
When considering the use cases your agency is pursuing, some gaps may surface during the mapping exercise, particularly between the data you need to realize your use case and the data elements that are in Ed-Fi. To resolve this, the Ed-Fi Data Standard can be "extended" to accommodate these missing entities. The data elements are added to the Ed-Fi Operational Data Store by a business analyst or a developer using the MetaEd tool.
It can be very tempting to ask for aggregate data when extending the Ed-Fi APIs. As an example, if a state needs to know the number of days a student was in attendance for a grading period, why not just extend the model to ask for this aggregate number?
The Ed-Fi model is built on the notion that granular data is inherently more useful and informative, and also on the vision of establishing industry-wide data exchange models where all systems benefit from standardization. Aggregate data makes both more difficult. In the above example, different states may have different ways of counting absences; does a medical release or home-bound day constitute an absence? How about a student early release?
Aggregate fields often require specific business rules that result in complex, state-specific logic falling on the Student Information System providers, and this reduces the reusability of their application code across state boundaries. As a result, the ecosystem does not enjoy the benefits of standardized data exchange, and this means lower data quality for your agency.
How to Avoid Imposing Business Logic onto SIS SystemsThe below shows you an example of how to avoid imposing business logic requirements onto SIS systems by analyzing granular data. Use Case - As an agency, you want to know the number of instructional days for a school in a school year. The best-practice approach is to calculate this information from the granular data in the Calendar model. This example use case has a constraint: You MUST NOT collect the "Total Instructional Days" as an aggregate value via the API. In this scenario, increasing the burden on the vendors will incur an additional expense — but the vendor has supplied the granular calendar date data to make the calculation. Total Instructional Days for a School in a School YearSchool X has a school calendar to hold all of the dates associated with the school year. These include instructional days, holidays, teacher-only days, and so forth. At the end of the school year, School X needs to calculate the total number of instructional days for reporting purposes. Business LogicTotal Instructional Days = SUM( CalendarDate.Date ) WHERE CalendarDate.CalendarReference → Calendar.SchoolReference → School.SchoolId = ${ Selected School Id } AND CalendarDate.CalendarReference → Calendar.SchoolYear = ${ Current School Year } AND CalendarDate.CalendarEventDescriptor IN ("Instructional day","Make-up day","Student late arrival/early dismissal") Assumptions:
|
State-Specific Extension - Dos & Don'ts
| Do consider Ed-Fi Data Model extensions when... |
|---|
| Your API is asking for data not in the Ed-Fi data model. |
| Your API is asking for granular data. |
| You just want the database field to be in the ODS, but the API specifications will not require systems to submit this data. |
| Don't extend the Ed-Fi Data Model when... |
|---|
| Your API is asking for aggregates of data you already have in a granular form. |
| You are replicating the local data domains in Ed-Fi data model to simplify other local processes (e.g., keeping local names, etc.). |
| You have not consulted the extensions with others in the community. |
| Question your approach when... |
|---|
| Your API is asking for a value that is not in the source system. |
| Your API is asking for an aggregate value that is not in the source system. |
Your API is asking for an aggregate value simply to avoid asking for a whole lot of other data. |
| Your APIs will force business logic downstream onto SIS systems. |
Extensions add elements to the Ed-Fi Data Model. If you think a missing element represents a common community need (as opposed to only or overly local conditions), please open a ticket on the Ed-Fi Tracker and provide detailed information. The Ed-Fi Alliance will consider the addition in future versions.
More information
Examples of State Extensions
| State | Extension Link |
|---|---|
| AZ | AZ Extensions |
| DE | DE Extensions |
| IN | IN Extensions |
| NE | NE Extensions |
| WI | WI Extensions |
Reminder
When extending the APIs, ask for granular and not aggregate data.
Step 3. Install the Ed-Fi Solution
In this step, you will install all of the components of the Ed-Fi solution using the recommended Binary Installation method. The basic list of Infrastructure items that you will need to be successful at this guide are provided below. Follow your institution's best practices for maintenance and backups.
At its most basic level, the Ed-Fi ODS / API platform consists of two logical servers: a database server (for the ODS and related databases) and a web server (for the ODS / API and Admin App). The following diagram shows a typical configuration:
Hardware Recommendations
Server | Web Server | Database Server |
|---|---|---|
CPU / RAM | 4 Core / 16+ GB | 4 Core / 16+ GB |
Disk Configuration | SSD | SSD |
| Disk Size | 60+ GB | 100+ GB |
Note: These are recommendations, not requirements. They are based on field practice. You should consider the specific needs of your implementation. We also recommend consulting with other Ed-Fi SEAs directly for their input. We will gladly arrange these introductions. Due to the database-intensive nature of the Ed-Fi ODS, the ODS Database server is typically much more capable, in terms of memory, disk, and CPU than the ODS / API.
Software Requirements
Server | Web Server | Database Server |
|---|---|---|
OS | Windows Server 2016-2019 | Windows Server 2016-2019 |
Software |
|
|
For more details on setting up required components and software, refer to Ed-Fi ODS / API Installation Instructions.
Install the ODS / API and Admin App by following the instructions in the Year Specific Installation Steps. Most states choose YearSpecific database partitioning strategy. See Platform Dev Guide - Extensibility & Customization for more on database partitioning strategies.

Time to complete
Installing the Ed-Fi Solution usually takes a few hours to a day, assuming you have access to the hardware and software prerequisites, and are comfortable working with Windows Server, IIS, and SQL Server.
The time to configure and coordinate data flowing from a certified SIS system typically takes anywhere from a couple of hours to a week or two of calendar time, depending on the type of SIS.
Connecting and Securing SIS systems in the Admin App
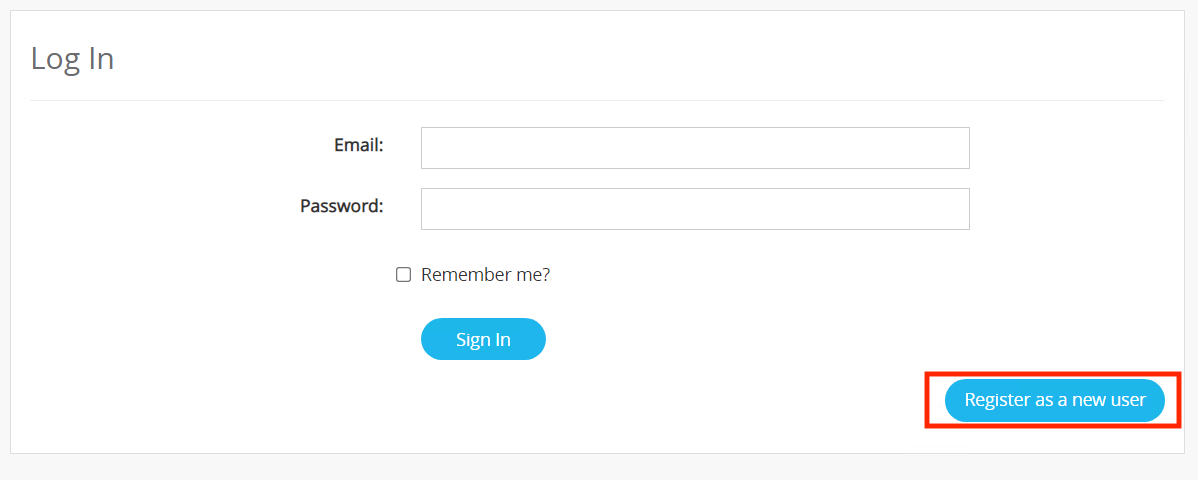
Now that the Ed-Fi Solution is installed, it is time to complete initial configuration steps in the Admin App so that you can connect and secure your district Student Information Systems. When you start the Admin App you will land on a login page. Since it is the first time in the app, you will need to register an Admin user for the app. Click on the "Register as a new user" button in the bottom right.
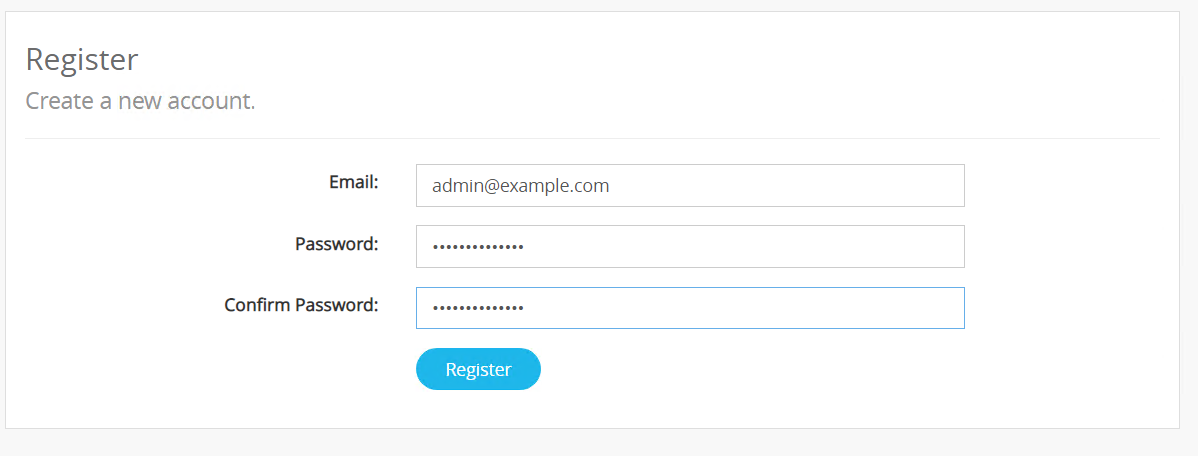
The registration is a simple form with email and password fields. Fill the form and click on "Register."
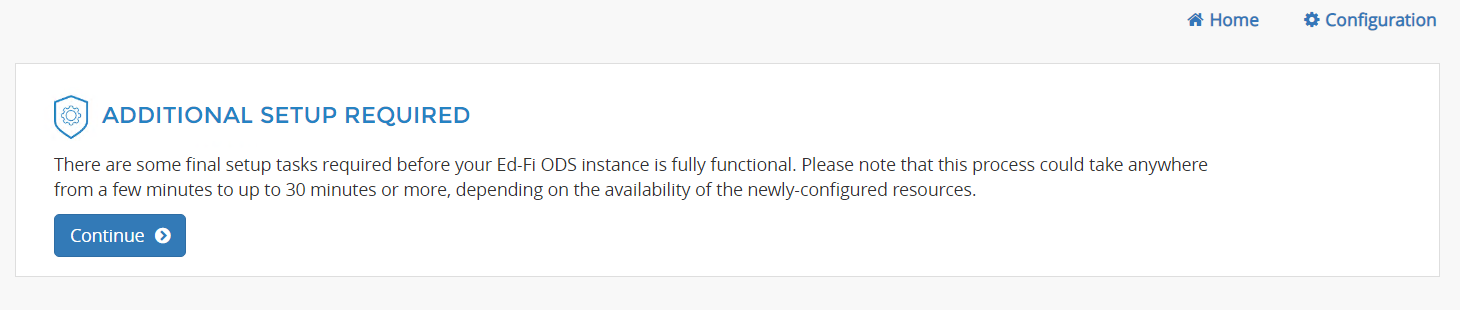
The Admin App will then inform you that some additional setup steps are required. These are automated steps, so just click "Continue" to proceed.
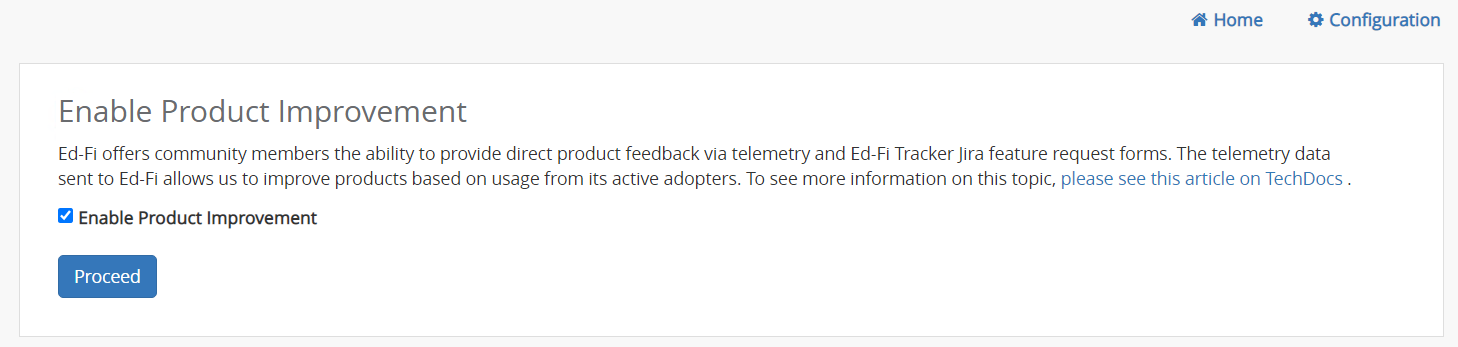
Once the automated additional process is complete, the Admin App will ask if you'd like to Enable Product Improvement by allowing telemetry data to be sent to Ed-Fi to help with ongoing improvements. If you agree, leave the "Enable Product Improvement" box checked, otherwise deselect it. Click on "Proceed" to continue.
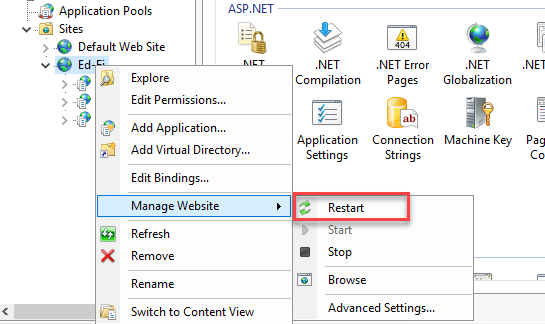
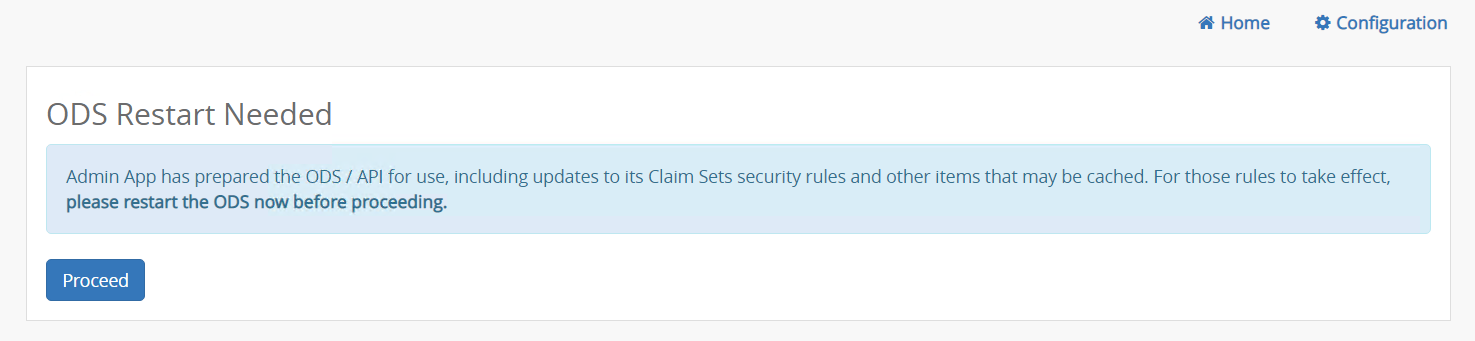
Setup will require a restart of the ODS / API to have configuration settings take effect. Restart the ODS / API from the IIS.
Click on the "Proceed" button to continue.
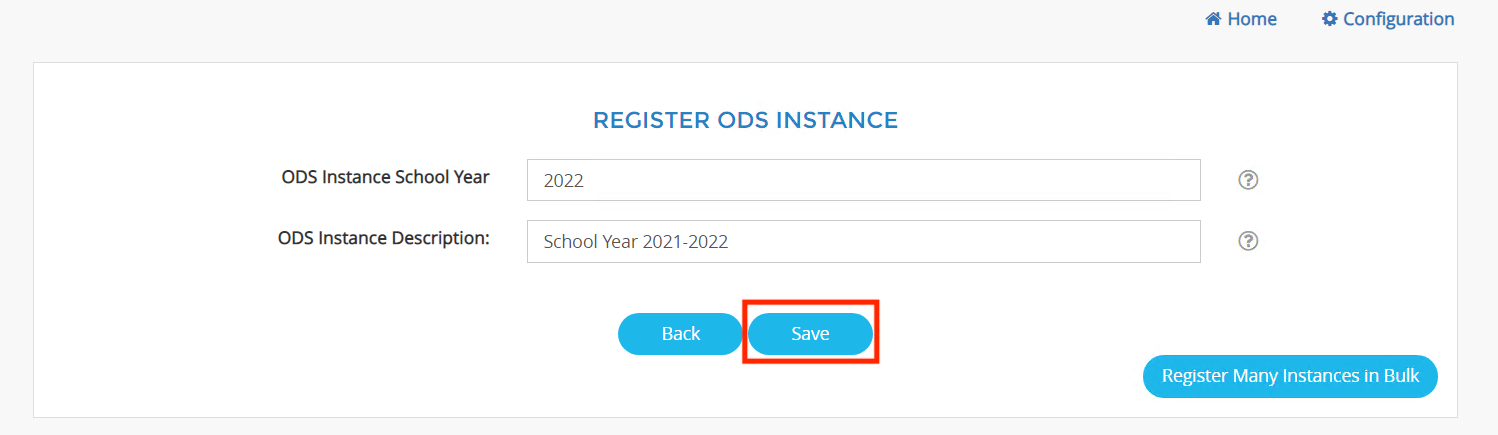
The Admin App will guide you to register an instance of the ODS. Enter the school year and a description for your ODS as shown below. Click on "Save" to register it.
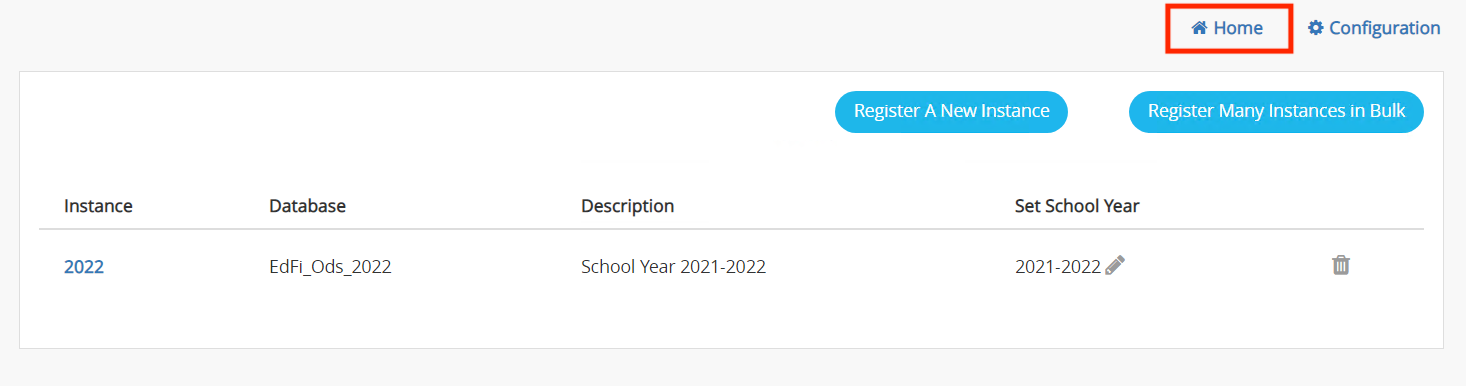
After the ODS instance is registered, you will see the instance details as shown below. The Admin App is now set up and ready for use. Click on the "Home" link at the top right to get started adding your first vendor and application.
Now you'll configure your first Vendor and Application for your first Student Information System. At the home page of the Admin App you will see the options below. Select "Global" to proceed to adding a vendor.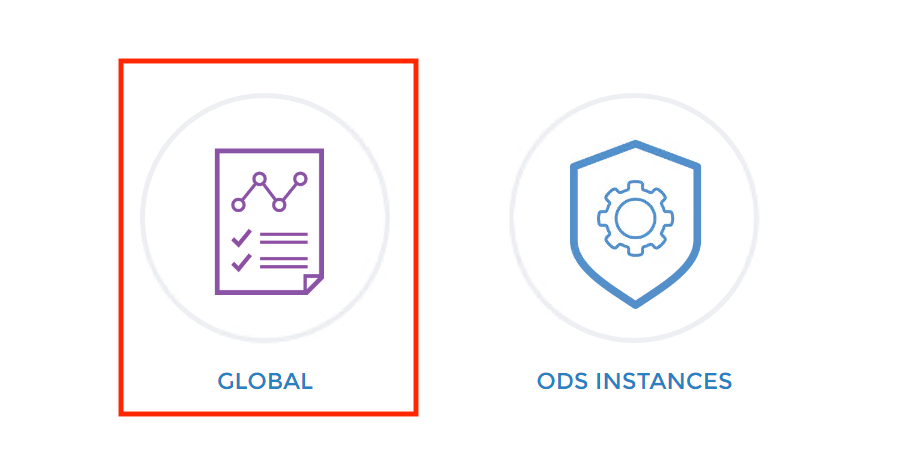
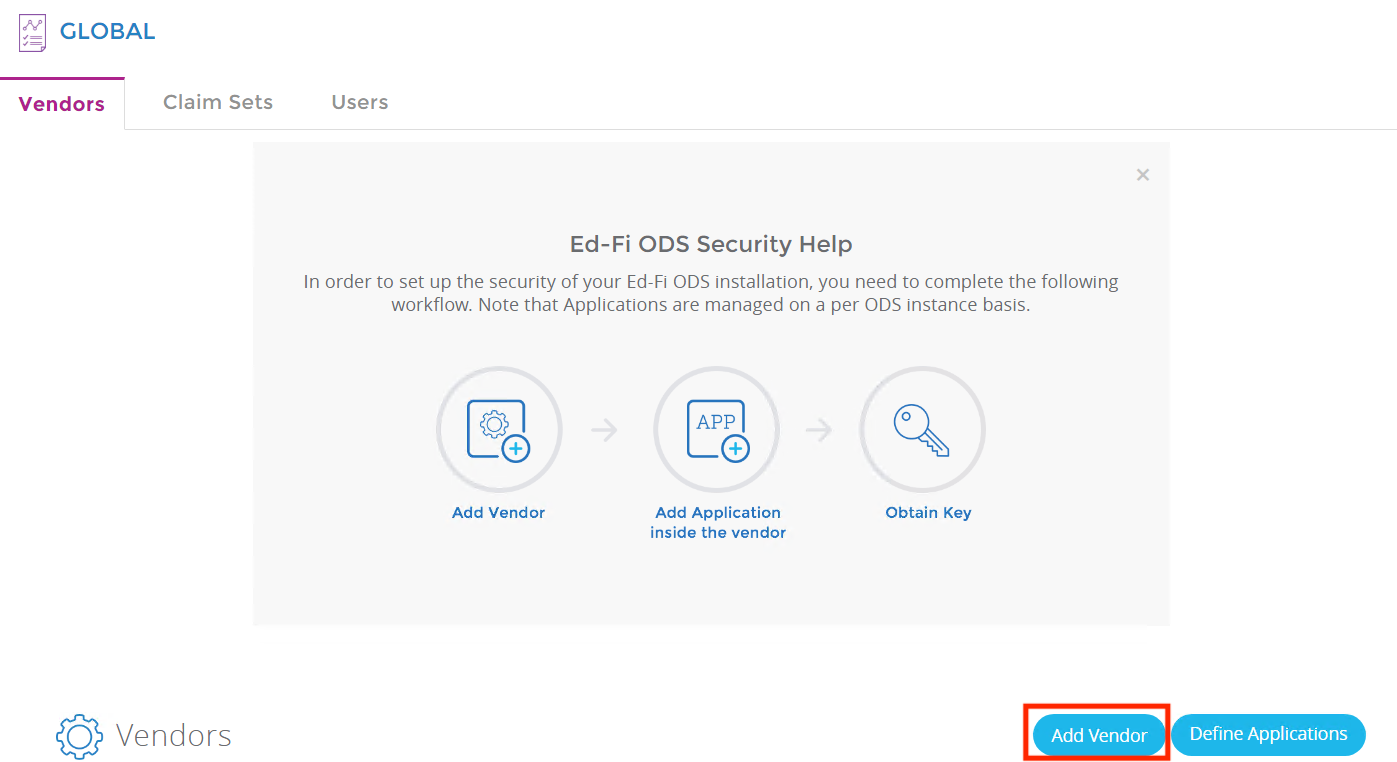
The Global page provides an overview of the process for adding and securing a vendor in the Admin App. Click on the "Add Vendor" button in the bottom right corner.
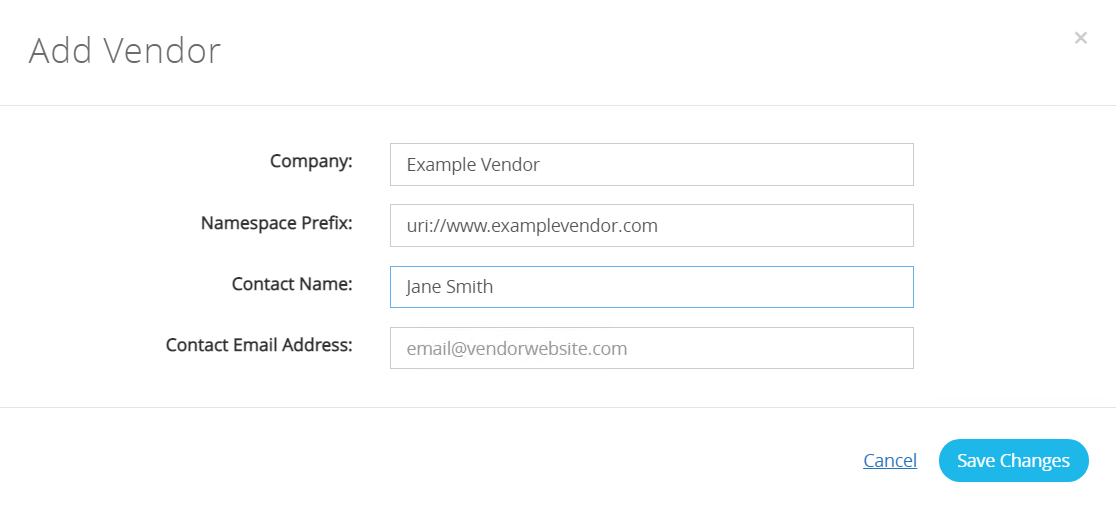
Fill out your vendor information in the Add Vendor page. The Namespace prefix should be a URL which includes the domain of the Student Information System (SIS) you are using.
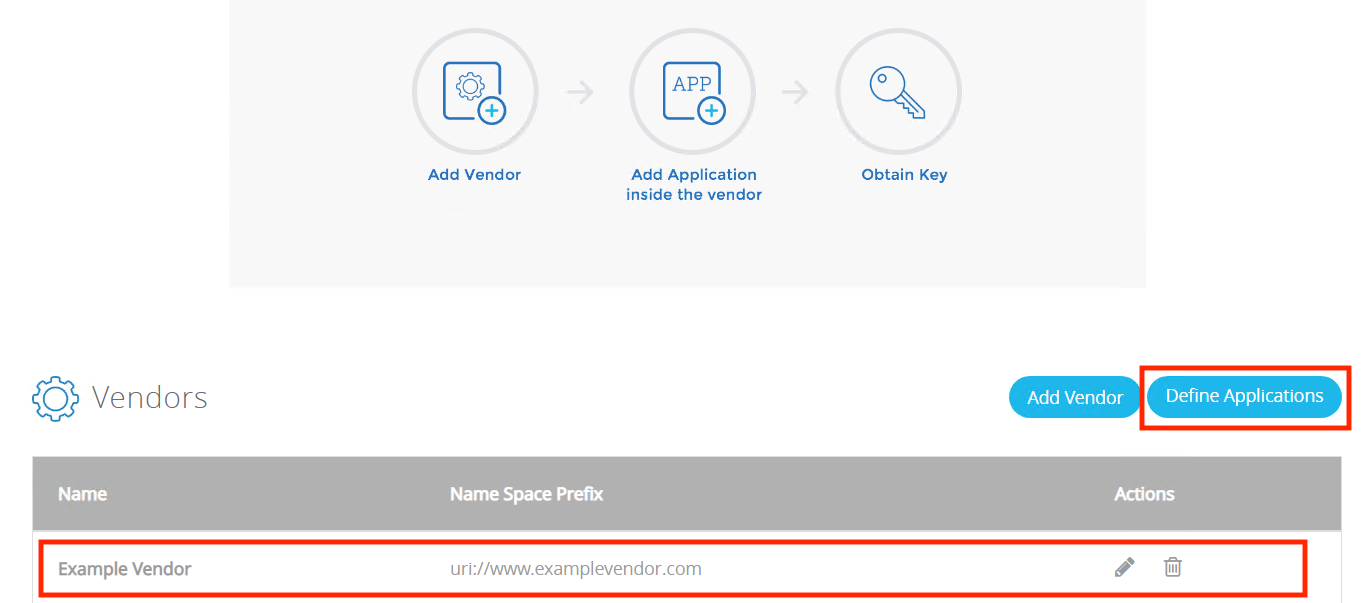
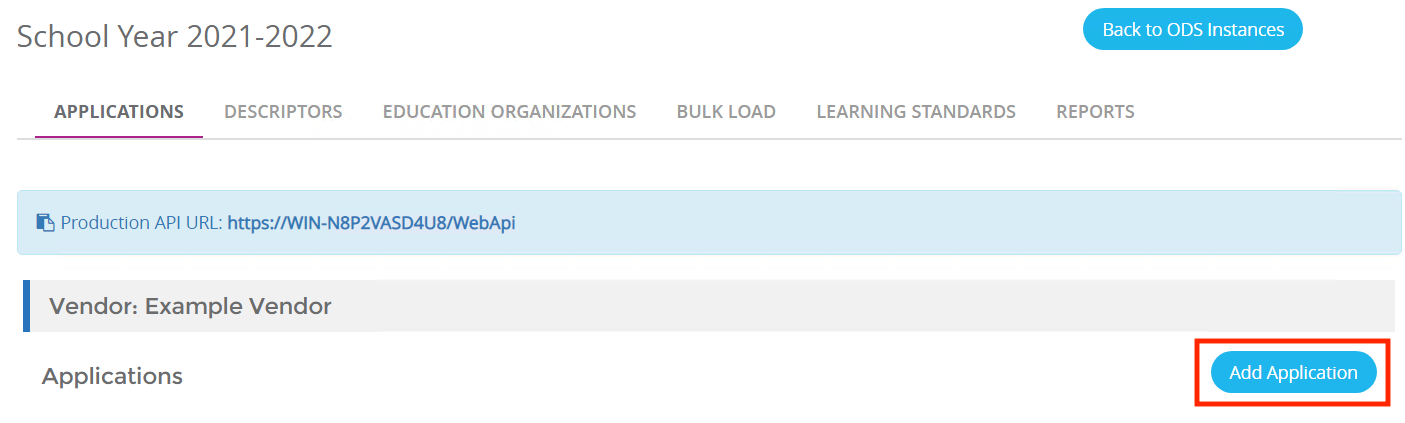
Once you hit "Save Changes" on your Vendor details, you should see the new Vendor in the vendor list as shown below. Now that the vendor is created, the application needs to be added. Click on the "Define Applications" button to enter the Vendor and Application list.
You will see the option to add an application under each Vendor that you've created. Click on the "Add Application" button to initiate the process.
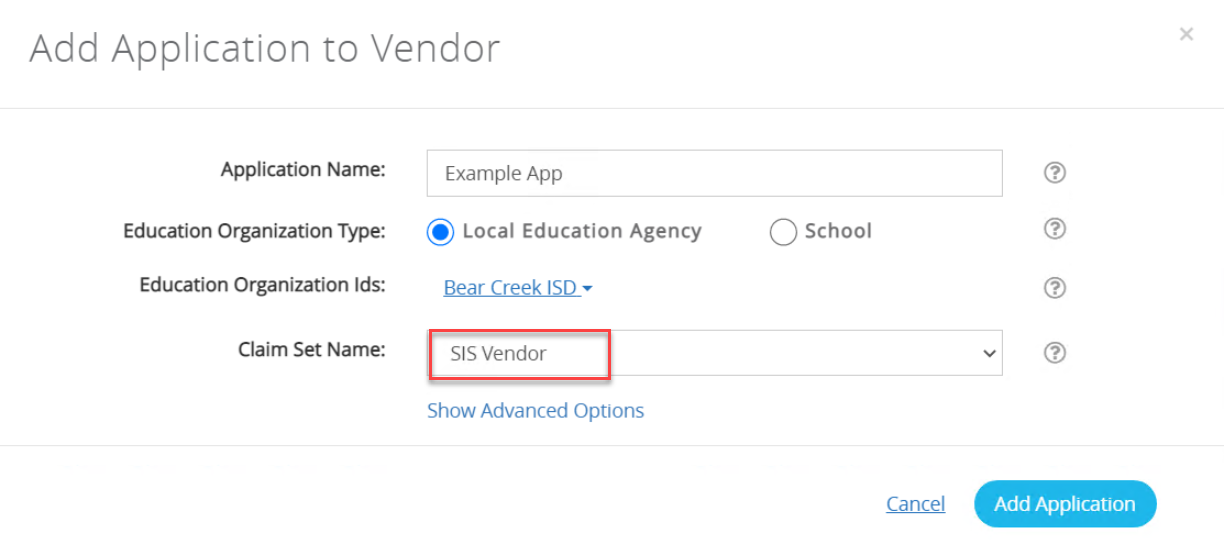
The application form sets how a vendor will be used. Below is an example of setting up a vendor application with a SIS claim set for an LEA. Note: "SIS Vendor" is a preconfigured claim set designed to allow vendors to load all the SIS related information to the ODS / API. Click on "Add Application" to save the application.
In order to set up a connection with your SIS vendor system, you must generate a key and secret with the correct claim sets for the data that the source system will be providing. You should review the domains that your source system is sending and verify that the key and secret have the correct permissions. The 'SIS Vendor' claim set shipped with Ed-Fi ODS platform is sufficient for most SIS integrations, however Admin App comes with /wiki/spaces/ADMIN/pages/25238340 for fine-grained control over permissions if default claim sets that ships with Ed-Fi ODS platform are not sufficient for you needs.
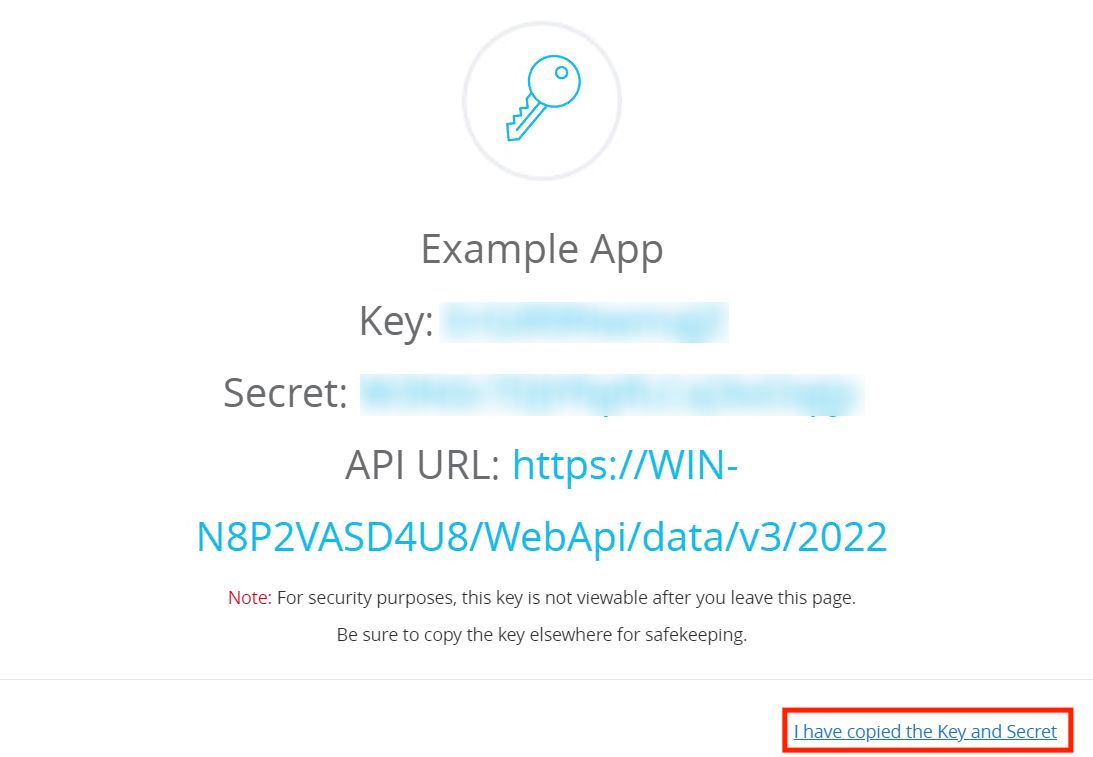
Next, you will be provided a key and secret to be used with importing data. Note: Treat the Key and Secret as secure information for your organization (because it will control student data exchange from SIS systems). Store it according to your local IT Security policy. Often this will be in a password keeper app, on a secure file server, or a similar method. Click on "I have copied the Key and Secret" to proceed.
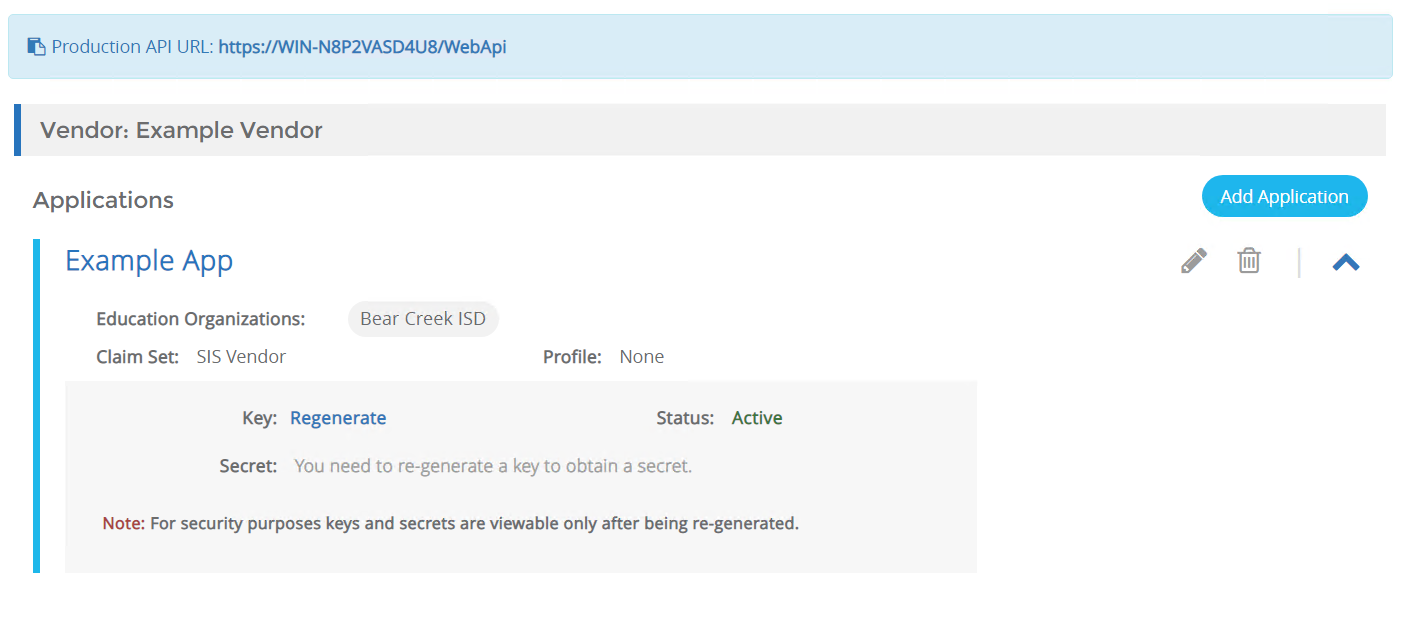
You will now see the newly created application listed under the vendor as confirmation that you have successfully completed the process.
Once you create values for "Key" and "Secret", verify API connectivity by authenticating with Key/Secret pair as described in Authentication. Once you have verified the URL and the Key/Secret pair, it is important to check with your vendor to see if they have a specific process and/or utilities for verifying connectivity to vendor application.
Note that you may add other SIS vendors and other applications to this vendor over time, each have their own "key" and "secret".
Additional useful tools for testing API Connectivity and Functionality
- Postman
- Swagger
- SQL: Tooling for Verifying API Claimsets
- API: /oauth/token_info endpoint to review namespace prefix and education organization associations

More Information
If you would like to learn more about the technical implementation of authentication and authorization in the ODS / API solution, check out the Authentication and Authorization sections of the API Client Developer's Guide.
Link: API Client Developer's Guide
If you would like to learn more about internals of Security in the Ed-Fi ODS / API, visit the Security section of the Platform Developers' Guide.
Link: Platform Developers' Guide - Security.
Step 5. Load Agency Data
In this step you will load Agency or "Seed" data into your Ed-Fi ODS to prepare for the loading of student data from technology partners.
Seed Data
Before you can receive student information data from your district's SIS, an initial set of data needs to be loaded into the Ed-Fi ODS (i.e., "seed data"). This includes Education Organizations (schools, LEAs, SEAs) and Courses. Some states load program information as well. Always follow the data dependency order when you are loading this data into the Ed-Fi ODS. The recommended approaches to load seed data is to use either SQL scripts or the Ed-Fi bulk load utility to process using XML files containing the the education organization and course information. In the steps outlined below you will see how to utilize bulk load client utility to load your agency seed data; you can then choose to create a backup/package for repeatability.
Download Scripts and Setup Bootstrap Seed Data
Download and Extract Ed-Fi-SampleDataLoad.zip provided in the panel to the right to a local folder. We recommend C:\Ed-Fi-SampleDataLoad. Ed-Fi-SampleDataLoad.zip contains all the scripts and directory structure needed to load your data. Place all your Descriptors.xml files, Standards.xml, EducationOrganization.xml in C:\Ed-Fi-SampleDataLoad\Bootstrap. Since Ed-Fi core descriptors are already loaded in your ODS during installation, you will be adding your custom descriptor values with agency namespace in addition to Ed-Fi core descriptors in Ed-Fi namespace. If there are any core Ed-Fi values that should not be used by your district's SIS, you could either exclude them by external documentation and downstream validations or remove from the ODS database as an additional step.
Install the Ed-Fi Bulk Load Client
Next you will install the Ed-Fi Bulk Load Client utility.
- First ensure .NET 6 SDK is installed.
Add Ed-Fi package source by running the following command in PowerShell:
if (-not [Net.ServicePointManager]::SecurityProtocol.HasFlag([Net.SecurityProtocolType]::Tls12)) {
   [Net.ServicePointManager]::SecurityProtocol += [Net.SecurityProtocolType]::Tls12
}
Register-PackageSource -Name Ed-FiAzureArtifacts -Location https://pkgs.dev.azure.com/ed-fi-alliance/Ed-Fi-Alliance-OSS/_packaging/EdFi/nuget/v3/index.json -ProviderName NuGet
Install the Ed-Fi Bulk Load Client from a PowerShell prompt using the following command. We recommend C:\Ed-Fi-SampleDataLoad\BulkLoad
Install the Ed-Fi Bulk Load Clientc:\>mkdir {YourInstallFolder} c:\>dotnet tool install EdFi.Suite3.BulkLoadClient.Console --version 6.0.13 --tool-path {YourInstallFolder}
Create API Client for Loading Bootstrap Data
Next you will create API Client for Loading Bootstrap Data. Execute C:\Ed-Fi-SampleDataLoad\SqlServer\CreateApiClientForLoadingSeedData.sql by opening the file in SSMS and clicking Execute. This will create claims needed to load Bootstrap data.
Run the Bootstrap Script to Load Descriptors, Standards, and Education Organizations
Next you will run the Bootstrap Script to Load Descriptors, Standards, and Education Organizations
- Open a PowerShell session.
- Navigate to Ed-Fi-SampleDataLoad directory (e.g., C:\Ed-Fi-SampleDataLoad).
- Open the LoadBootstrapData.ps1 file in notepad and update the $apiLoaderExe variable where you installed EdFi.BulkLoadClient.Console. Example $apiLoaderExe= "C:\Ed-Fi-SampleDataLoad\BulkLoad\EdFi.BulkLoadClient.Console.exe"
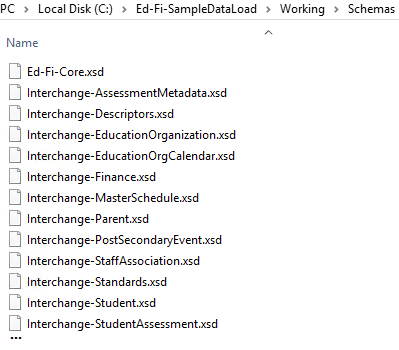
- Copy Ed-Fi Core and your extensions schemas (if any) to C:\Ed-Fi-SampleDataLoad\Working\Schemas
Update LoadBootstrapData.ps1 with your WebApi host
$options = @( "-g", "https://{your host name}/WebApi/metadata/data/v3/2023/dependencies", "-a", "https://{your host name}/WebApi/data/v3/2023", "-m", "https://{your host name}/WebApi/metadata/2023", "-o", "https://{your host name}/WebApi/oauth/token", "-y", "2023", "-x", "C:\Ed-Fi-SampleDataLoad\Working\Schemas", "-d", "C:\Ed-Fi-SampleDataLoad\Bootstrap", "-e", "{Your extension schema name}", "-w", "C:\Ed-Fi-SampleDataLoad\Working", "-k", "empty", "-s", "emptySecret", "-r", "1", "-l", "1" )- Save LoadBootstrapData.ps1 file.
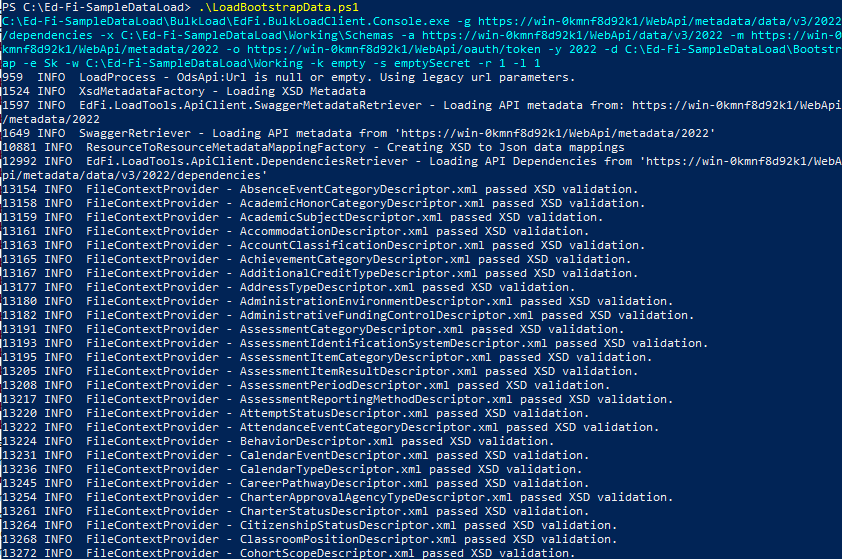
- Execute LoadBootstrapData.ps1 to load your bootstrap data to ODS.
- Verify that the scripts ran successfully without any ERRORs.
Remove the Claim Set used for loading Seed Data
Now you can remove the Claim Set used for loading Seed Data. Execute C:\Ed-Fi-SampleDataLoad\SqlServer\RemoveApiClientForLoadingSeedData.sql by opening the file in SSMS and clicking Execute. This will cleanup the API Client you created earlier.
More information
The following link contains the scripts and directory setup used in this how-to article.
The following GitHub links contain the sample XML files and the as-shipped Ed-Fi Descriptor XML.
In the previous steps, you loaded the ODS with your agency seed data. This may be all you are looking to do with it, but there are some additional options you might want to consider if they meet your use case. One such option is to create a back up of your ODS to be used in the staging and production environments. You also might be considering automating the deployment of your ODS backup along with Ed-Fi installation. In the next steps, we will be walking through the creation of a backup in SSMS, and creating a NuGet package using that backup and uploading it to a package repository. You can alternatively upload your backup to cloud storage / network share without creating a NuGet package. In this example we'll be storing it in Azure blob storage.
First create ODS Database Backup by running the following script in SQL Server Management Studio (SSMS) to create a backup of your ODS containing the seed data. You may change the location and the name of the backup file to suite your need.
Then compress the backup file and store in secure place. In this example, we assume the backup was uploaded to azure blob storage as EdFi_Ods_Tempalte_v60_20221207.7z.
Now you can deploy your agency seed data along with your database deployment as described in Ed-Fi Installation.
First create a new script called AgencyTemplate.ps1 and place it in your C:\temp\EdFi.Suite3.RestApi.Databases\Ed-Fi-ODS-Implementation\DatabaseTemplate\Scripts\. This script will house the logic to download your backup to C:\temp\EdFi.Suite3.RestApi.Databases\Ed-Fi-ODS-Implementation\DatabaseTemplate\Database folder which can then be deployed as your ODS. Use the following code snippet and modify for your package.
$params = @{
sourceUrl = "https://odsassets.blob.core.windows.net/public/seeddata/EdFi_Ods_Tempalte_v60_20221207.7z"
fileName = "EdFi_Ods_Tempalte_v60_20221207.7z"
}

& "$PSScriptRoot\..\Modules\get-populated-from-web.ps1" @params
Update configuration.json, as described in Ed-Fi Installation and make following additional changes to load your agency seed data.
"OdsDatabaseTemplateName": "Populated",
"PopulatedTemplateScript": "AgencyTemplate"
Run Deployment.psm1 as described in Ed-Fi Installation.
Import-Module .\Deployment.psm1
Initialize-DeploymentEnvironment
When the process successfully completes, you would have your ODS deployed with your agency seed data.
Configure Your Student Information System
After you have loaded your agency seed data you are ready to receive student information data from your district SIS systems. Each SIS provider has its own vendor-specific configuration tool and steps to connect to the Ed-Fi API, perform basic data mapping, provide descriptors, and to enable you to begin loading data into your ODS API.
The SIS administrator will connect their SIS to state ODS API using the key and secret you generated in the Admin App.
- Verify that the SIS supports Ed-Fi data interoperability, and is certified to use the ODS API: Registry of Ed-Fi Certified Products - Student Information Systems API v3 Certification.
- Verify that the SIS being used is the version that has been certified by the Ed-Fi Alliance or state certification program.
- If the current version of the SIS is not the certified version, plan an update/upgrade to the certified version of the SIS.
- If the SIS is not listed as an Ed-Fi certified SIS, use the Vendor Request Form to get our help in making the request and conveying your requirements to the vendor.
- Request Ed-Fi enablement and configuration from the SIS vendor's product support team.
- Log into the SIS vendor's customer support portal or knowledge base to find the most current help documentation to guide you in the SIS configuration steps.
- Follow the SIS vendor's configuration guide to configure the product to connect to your ODS API and prepare for loading your data.
See the General Reference page for a list of publicly known vendor configuration guides.
Map SIS Codes to the ODS API
Once the SIS is configured to connect with the Ed-Fi API, the next step to getting data to the ODS / API is to map "code sets", or Descriptors, as they are known in the Ed-Fi data standard, from the data elements and codes used in the SIS to those you will use in the Ed-Fi ODS / API. To do this:
- Refer to the SIS vendor configuration guide you used above to locate and use the data mapping tools in the SIS application.
- Proceed with the SIS vendor's data mapping instructions, referring to their configuration guide and the dependency chart provided above to work through the data mapping and loading in the right sequence.
Reminder
There are multiple options for making seed data available to all your environments (e.g., test, stage, pilot, production) without reloading from the XML on each environment. You can choose one of the following options:
- Create a backup and manually restore in environment
- Create a backup and upload to a secure network share / cloud storage and deploy it along with ODS deployment
- Create a backup and upload as a NuGet package to a package repository and deploy it along with ODS deployment
Step 7. Running Validations
In this step you will setup validation process for your Ed-Fi SEA solution.
L1 & L2 Validations
ODS / API applies certain validations like schema validations (e.g., referential integrity validations, required field validations, and data type validations) when the data is submitted and rejects invalid data along with validation message before it can be stored in the ODS. These are called Level 1 (L1) validations. Certain other validations cannot be run by the API as they need additional context not available for the API processing. So, you might want to analyze the data your LEA SIS’ submit for accuracy through real-time/nightly/on demand validation cycles where data is processed through your custom business rules and errors are logged.
The second round of validations that happen during validation cycles are called Level 2 (L2) validations. Depending on the quality of the data, validation messages can be generated to give your LEA feedback (typically via a state error portal) on data that needs review and/or correction. The LEA then fixes the errors, the data is re-transmitted to the API (generally in near-real-time) and the data quality improves.
Typically, SEAs periodically move data from the Ed-Fi ODS to an Ed-Fi ODS that is multiyear. This environment generally has some additional columns to allow for multiple years of data to be compared. In this context, you can run validation rules that apply to multiple years of data and report those validation errors back to LEA as well (e.g., Student In Grades K–8 Without Enrollment Record Exit Code Who Do Not Appear In Following School Year).
More information
Examples of State Validation Rules
| State | Extension Link |
|---|---|
| AZ | |
| WI |