This version of the Ed-Fi ODS / API is no longer supported. See the Ed-Fi Technology Version Index for a link to the latest version.
Sandbox Deployment
This section describes the particulars of deploying a Sandbox instance of the Ed-Fi ODS / API. Although a Sandbox instance should mirror a Production environment as closely as possible, the Sandbox is different from a Production deployment in a few important ways:
The data accessed is test data that is fully disconnected from production data
The API documentation resides on the Sandbox instance
- The Sandbox instance includes a Sandbox Administration Portal which should not be part of a Production deployment.
The hardware and platform requirements are generally lower than with production
A Sandbox environment is generally used to support API client developers in developing client applications. It is not intended to be a staging environment for the platform host.
Sandbox Fundamentals
This section outlines the basic information you’ll need to know to get a Sandbox instance up and running.
API Sandbox Components
There are several websites and databases that work together to provide primary and supporting functions for a Sandbox instance:
Websites
Ed-Fi ODS API. The REST endpoint for client applications.
Swagger Documentation UI. A working Ed-Fi ODS / API client that allows a user to interactively explore the API and read API documentation.
Sandbox Administration UI. This website provides administrative functions for managing sandboxes, including the keys and secrets for accessing sandboxes.
Databases
EdFi_ODS_*. Databases used as templates or as sandboxes for a sandbox installation of the Ed-Fi-ODS / API.
EdFi_Admin. A database containing authentication information for API clients.
EdFi_Bulk. A database containing bulk operation storage.
EdFi_Security. A database containing authorization information for API clients.
Services
Upload Worker. The windows service that joins uploaded bulk data for the Bulk Load API.
Bulk Worker. The windows service that loads bulk data for the Bulk Load API.
Sandbox Security
The Sandbox system is, by definition, a test system so has a different security profile than a production system. The following are a few guidelines applicable to Sandbox instances:
- Applications should be assigned different OAuth key/secret pairs for the Sandbox than are used in production.
- Use test data. If you plan to use a copy of production data, scramble or otherwise de-identify the data before use in the Sandbox.
- The use of HTTPS and SSL certificates is required for production application instances, so the Sandbox instance should mimic that approach.
- Similar to production systems, Sandbox instances should use non-default service accounts configured for minimal privilege. However, note that Sandbox instances create and drop databases as part of administrative operations which requires elevated SQL privileges.
- It is not recommended that production platforms or servers share hosting duties with Sandbox instances.
Logical Configuration
At its most basic level, the Ed-Fi ODS / API platform consists of three logical servers: a web server (for the ODS / API), a database server (for the ODS database), and a bulk worker server (for the bulk worker services that handle bulk XML loading). A diagram showing a typical configuration follows:
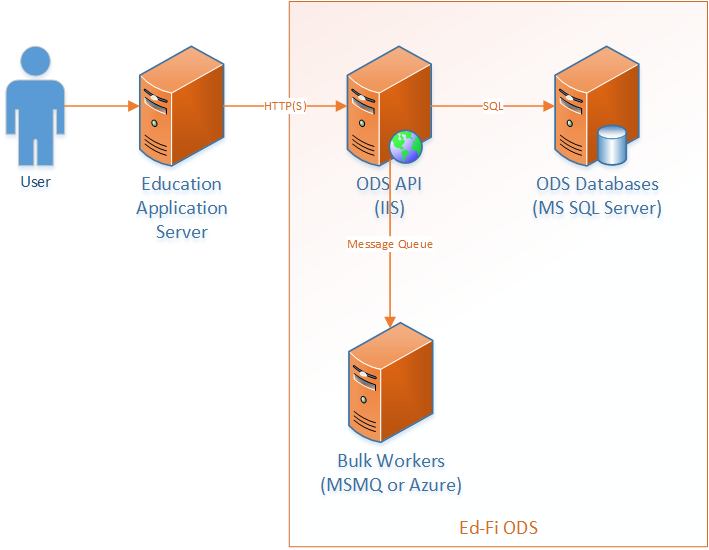
These logical functions may be combined into one or more physical (or virtual) machines depending upon the scale and preferences of the hosting organization.
The ODS / API is the only component of this system that interacts outside of the firewall, and only over HTTP(S) (ports 80 and 443). The database and bulk worker servers only use local networking, and should not be exposed to internet traffic.
A single-server configuration does not violate the logical design of the system. Internet Information Server (IIS), SQL Server, and the Bulk Worker Services may all be installed on a single machine; in this case the internal network traffic becomes communication between services on a single computer.
ODS / API
This logical server requires Internet Information Server (IIS) to be installed as well as the .NET 4.5 Framework.
Bulk Workers
This logical server requires the Message Queueing component and the .NET 4.5 Framework. Combining bulk workers with the ODS / API on the same physical server is a typical configuration for Sandbox instances. If this function is on a different server from the ODS / API, or multiple ODS / API servers exist in a deployment, MSMQ requires that the servers belong to a Microsoft Active Directory domain and that the message queue be registered in Active Directory for message queue access.
ODS Database
Microsoft SQL Server 2012 Standard Edition is required for this logical server. Logins to the database may use either Windows authentication or SQL authentication. If the SQL databases are on a single server with the ODS / API and Bulk Workers, or the servers are on the same domain, Windows Authentication is the recommended approach.
Sandbox Hardware Requirements
Single-Server Deployment
In a single-server deployment of an Ed-Fi ODS / API Sandbox, all components are installed on a single server. This configuration is typical for a small school district or test installations with a low expected load. While a single disk configuration is possible, a dual raid configuration is recommended for use in live sandbox deployments. A typical single-server specification follows:
Server | OS / Apps | SQL Data |
CPU / RAM | 4 Core / 28+ GB | |
Disk Configuration | SSD RAID 1 (2 Disks) | SSD RAID 5 (3+ disks) |
Disk Size | 2 x 250 GB | 3+ x 500+ GB |
Two-Server Deployment
A diagram of a simple two-server deployment follows:
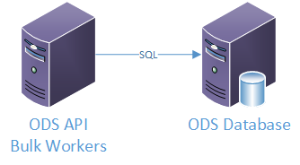
The two-server deployment of an Ed-Fi ODS / API Sandbox provides greater security and performance than the single server configuration. This is a common deployment configuration for very large installations. Due to the disk-intensive nature of the Ed-Fi ODS, the ODS Database server is typically much more capable, in terms of memory, disk, and CPU than the ODS / API + Bulk Worker server.
Server | OS/Apps | SQL Data |
CPU / RAM | 4 Core / 16+ GB | 4 Core / 16+ GB |
Disk Configuration | SSD RAID 1 (2 disks) | SSD RAID 5 (3+ disks) |
| Disk Size | 2 x 250 GB | 3+ x 500+ GB |
Other Deployment Variations
Similar to Production deployments, components of an Ed-Fi ODS / API Sandbox may be segregated to individual servers for security or performance considerations; likewise, components may be duplicated across multiple servers to improve reliability.
The platform host should find the cost / benefit ratio that makes the most sense for their particular Sandbox environment.
The remainder of this document describes the steps for a two-server deployment for the Sandbox deployment configuration. For this configuration:
- The ODS / API + Bulk Worker server is named WEB
- The ODS Database server is named SQL
Software Requirements
A Sandbox instance of the Ed-Fi ODS / API requires Windows Server 2012 R2 with the Web Server role, Internet Information Server, and Microsoft SQL Server 2012.
The installation procedures for setting up a two-server Sandbox deployment follow. Strap in.
Installation Procedures for a Sandbox Instance
Migrating from a Development Instance
Typically, platform hosts will spin up a Sandbox instance of the ODS / API at some point in the platform development cycle (i.e., after the core development is complete, but before the API surface and operational details are finalized. This section assumes a deployment scenario where developers are moving from the development phase to a production phase, and are thus migrating from a development instance of the ODS / API.
Each of the steps that follow can be done manually, and are described as if a user is deploying their sandbox instance interactively. However, all these steps can be performed automatically on a build or continuous integration server, and it is recommended that platform hosts do so where practical.
Step 1. Run the PowerShell initdev Script. A successful initialize development environment creates each of the required databases.
Step 2. Initialize Security Credentials.
Run the EdFi.Ods.WebApi project locally.
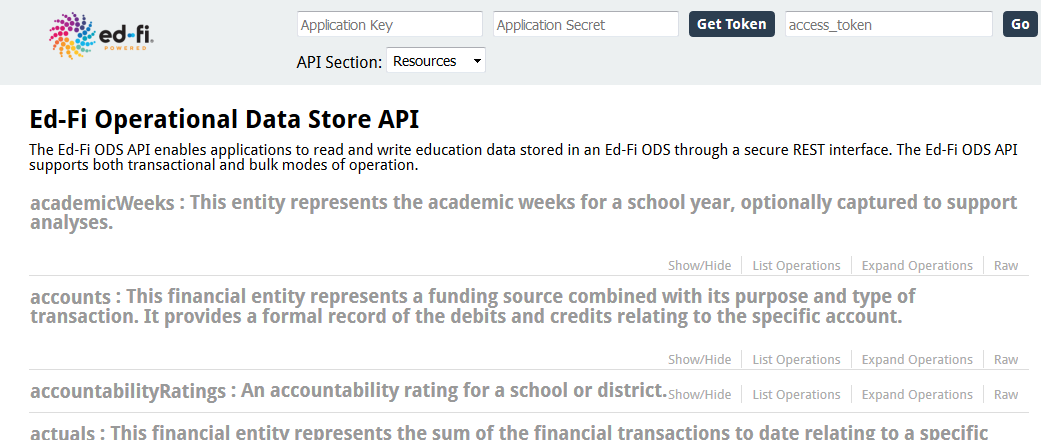
Navigate to the index.html page on the EdFi.Ods.WebApi website, (the page is titled "Explore the Ed-Fi Operational Data Store API").
Click on the Create test users and an administrative user link.
Open the Sandbox Administration website (EdFi.Ods.Admin.Web).
Login as test@edfi.org and change the password.
Do not create any sandboxes or additional users.
Step 3. Backup the ODS databases.
Open Microsoft SQL Server management Studio and backup each of the following databases:
EdFi_Admin
- EdFi_Bulk
EdFi_Ods_Minimal_Template
EdFi_Ods_Populated_Template
EdFi_Security
Step 4. Publish Websites and Services.
Detailed instructions for each of the websites and services are included later in this document. The following steps are provided as a high-level overview. Please see the individual installation and configuration instructions as they pertain to your configuration.
Load the EdFi_ODS solution in Visual Studio and publish the following projects to a local directory with the same name as the project under a common parent directory (like c:\temp):
EdFi.Ods.Admin.Web
EdFi.Ods.SwaggerUI
EdFi.Ods.WebApi
EdFi.Ods.BulkLoad.Services.Windows.BulkWorker
EdFi.Ods.BulkLoad.Services.Windows.UploadWorker
Note: You may encounter file name length limitations when attempting to publish the Bulk Load projects. If this occurs, follow the the "Batch Build" approach that is detailed in the individual instillation and configuration instructions.
Deploy Databases to ODS Database
Step 1. Prerequisites.
Install SQL Server 2012 Standard (or better) with current service packs and updates.
Step 2. Restore Databases.
Copy the database backups to the production server that were created previously.
Using a local instance of Microsoft SQL Server Management Studio, restore each database.
Verify that each database is online and browsable.
Step 3. Create Database Users.
If using Windows Authentication:
The as-shipped configuration uses Windows Authentication.
Add the appropriate app pool identity for each website to the Logins section of Microsoft SQL Server Management Studio and assign permissions to the corresponding databases.
If using SQL Server Authentication:
Enable SQL Server Authentication by using the Properties context menu item for the server. From the Server Properties, Security page, select SQL Server and Windows Authentication mode.
Create Logins for each of the database users in your web.config and application.config settings files for your websites and applications.
- Assign permissions to the corresponding databases.
Deploy Websites to ODS / API
This section describes how to deploy and configure the web applications related to the Ed-Fi ODS / API.
In the following instructions, when deploying web applications, we use C:\inetpub\wwwroot as the default root folder. This is not required. Your root location can be:
- C:\EdFi\Application
- C:\inetpub\web
- … or something else.
The following diagram shows the relationship between the various databases and their corresponding ODS / API websites.
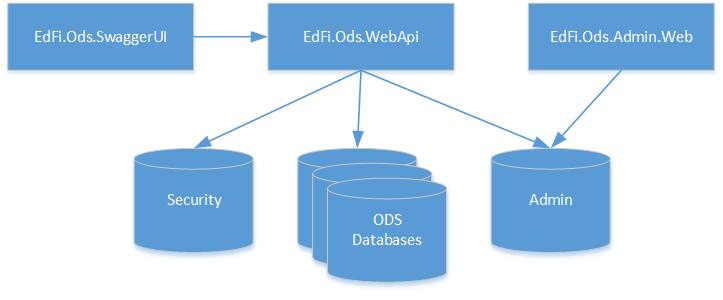
Detailed instructions regarding the installation and configuration of each website are provided in the sections that follow.
EdFi.Ods.WebApi
Type. Web Application
Description. This website provides the main functionality of API over the web. It supports both the transactional and bulk load features of the Ed-Fi ODS / API solution.
Dependencies:
EdFi_Admin (Database)
- EdFi_Bulk (Database)
EdFi_Ods (Database)
EdFi_Security (Database)
Deployment Steps (for an on-premises IIS):
Open the Ed-Fi-Ods solution in Visual Studio.
Right-click on EdFi.Ods.WebApi project and select Publish.
Under Profiles, choose PublishToIIS and click on Connection.
Choose your deployment path in the Target Location textbox. This can be a network path. The default location is C:\inetpub\wwwroot\EdFi.Ods.WebApi.
Click Publish.
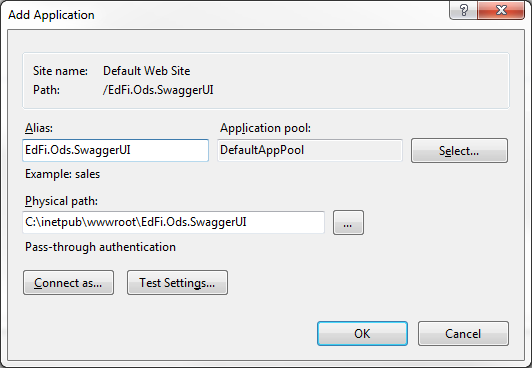
Open IIS in the target machine, expand the Sites, right-click on Default Web Site and select Add Application.
Fill in the application name and the server location that you have published the application:
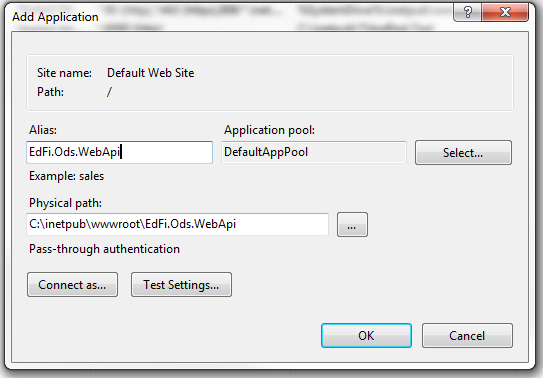
Click OK.
Delete Index.html from the root of your EdFi.Ods.WebApi directory if it exists.
The application is ready to use. However, there is no default landing page, so you won’t be able to browse to this website.
Configuration | ||
| App Settings | ||
| owin:appStartup | The startup class used to configure the web api. There are startup classes provided for the following scenarios:
| The default development value is Sandbox. |
| BulkOperationWorkingFolder | An accessible location for the Bulk Load Operations to temporary save the files. | Default is c:\temp. |
DescriptorNamespacePrefix | Descriptors XML namespace. | Default value is http://www.ed-fi.org. |
| BearerTokenTimeoutMinutes | The amount of time in minutes that an OAuth session token is valid between calls. | Default value is 30. |
| QueuePrefix | The Bulk Load Operation uses MSMQ to manage multiple pieces of a load. The Queue name starts with this prefix. All the manually created Queue are supposed to start with this prefix. | Default value is EdFiOds. |
| QueueAutoCreate | Accepted values are 0 or 1. It indicates if Bulk Load Operations queues are creating automatically or not. Note that if the queues are remote, this setting will be ignored to false and queues should be created manually. | Default value is 1. |
| CommitUploadCommandMessageEndPoint | The server hosting the message queues. | Default value is localhost. |
| Connection Strings | ||
| EdFi_Ods | Points to the main ODS database. | |
| EdFi_Admin | Points to the Admin database. | |
| EdFi_Security | Points to the Security database. | |
| BulkOperationDbContext | Points to the database used for bulk operation temporary storage. | |
EdFi.Ods.Admin.Web
Type. Web Application
Description. Provides and controls security of Web API. Provides administration features to vendor users and developers to manage their own sandboxes.
Dependencies
- EdFi_Admin (Database)
- EdFi_Security (Database)
- EdFi_Ods (Database)
- EdFi_Ods_YYYY (Database)
- EdFi_Ods_Populated_Template (Database)
- EdFi_Ods_Minimal_Template (Database)
- EdFi.Ods.WebApi
Deployment Steps (for an on-premises IIS):
Prerequisites:
IIS must be running on the target machine.
All dependant databases are in place.
Steps to deploy the application:
Open the Ed-Fi-Ods solution in Visual Studio.
Right-click on EdFi.Ods.Admin.Web project and select Publish.
Under Profiles, choose PublishToIIS option and click Connection.
Choose your deployment path in the Target Location textbox. This can be a network path. The default location is C:\inetpub\wwwroot\EdFi.Ods.Admin.Web.
Click Publish.
Open IIS in the target machine, expand the Sites, right-click on Default Web Site and select Add Application.
Fill in the application name and the server location that you have published the application:

Click OK.
The application is ready to use.

Configuration | ||
| App Settings | ||
| SqlSandboxType | The sandbox creation method used.
| Default value is Sql. |
| DefaultApplicationName | The name of the application used for sandbox application clients. | Default value is Default Application. |
| DefaultClaimSetName | The claim set name for the default application for sandbox application clients. | Default value is SIS Vendor. |
| CreateTestUsers* | Set to false for the production environment. | Default value is true. |
| TestUsers* | Set to none for the production environment. | Default value contains test users JoeAdmin, SaraUser, XmlTest. |
| OAuthUrl* | Points to WebApi OAuth controller. | Default value is http://localhost:54746/oauth/ |
| Connection Strings | ||
| EdFi_Admin | Should point to the Sandbox deployment of EdFi_Admin. Note that this database should NOT be shared with Security Tools. | |
| EdFi_Security | Should point to the Sandbox deployment of EdFi_Security. Note that this database should NOT be shared with Security Tools. | |
| EdFi_Master | Connection string template to create other ODS connection strings on the fly. It should point to the proper server upon which you want the ODS databases to be created. | |
| EdFi_Ods_Populated_Template | ODS database populated with sample data This database is not required for a production (i.e., non-sandbox) installation. | |
| EdFi_Ods_Minimal_Template | ODS database empty template with minimum requirement data. This database is not required for a production (i.e., non-sandbox) installation. | |
* Values are not optional and MUST be defined at the deployment time.
EdFi.Ods.SwaggerUI
Type. Web Application
Description. Online documentation for the Ed-Fi REST API is available through Swagger. Swagger is a visual and interactive documentation site providing detailed descriptions for each API resource as well as a simple way to test calls to the Ed-Fi REST API in sandbox environments.
Dependencies
EdFi.Ods.WebApi (Application)
Deployment Steps (for an on-premises IIS):
Open the Ed-Fi-Ods solution in Visual Studio
Right-click on EdFi.Ods.SwaggerUI project and select Publish
Under Profiles, choose PublishToIIS option and click on Connection
Choose your deployment path in the Target Location textbox. This can be a network path. The default location is C:\inetpub\wwwroot\EdFi.Ods.SwaggerUI
Click on the Publish button
Open IIS in the target machine, expand the Sites, right-click on Default Web Site and select Add Application
Fill in the application name and the server location that you have published the application:
Click OK
The application is ready to use.
Configuration | ||
| App Settings | ||
| webApi* | The URL pointing to the ODS Web API. | Sample value: http://server-name/api/v2.0. |
| webApiMetadataUrl* | A template used to construct the location of the swagger metadata files; {section} is replaced by the value in the API Section dropdown of the webpage header. | Sample value: http://server-name/metadata/{section}/api-docs. |
adminUrl* | Points to the WebApi OAuth controller. Used by the UI to acquire a token from a supplied Key / Secret pair in order to make example API calls against the datastore. | Sample value: http://server-name/oauth/ |
* Values are not optional and MUST be defined at the deployment time.
EdFi.Ods.BulkLoad.Services.Windows.BulkWorker
Type. Windows Service
Description. The bulk worker service posts bulk upload files to the ODS Database after they have been assembled.
Dependencies
- EdFi_Ods_* (Database)
- EdFi_Bulk (Database)
- EdFi_Security (Database)
- MSMQ (Framework)
Deployment Steps (for an on-premises server):
Open the Ed-Fi-Ods solution in Visual Studio.
Click on the Build menu and select Batch Build:
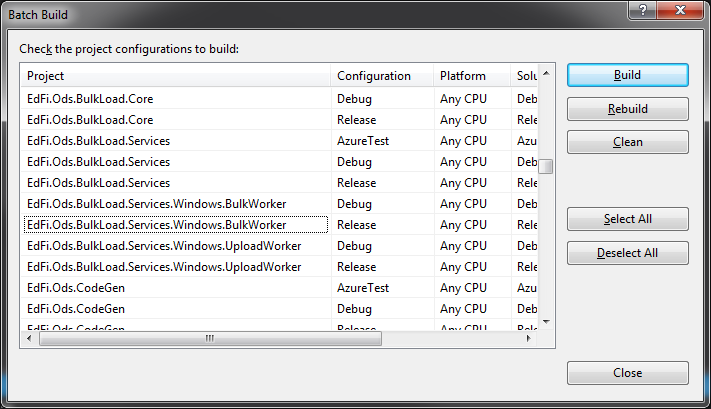
Find Release version of EdFi.Ods.BulkLoad.Services.Windows.BulkWorker and check the checkbox.
Click on Build.
In Windows Explorer, open <project_folder>\bin\Release.
Copy and paste all files to the target server deployment folder.
On the target server, open a command line and navigate to the deployed folder.
- Run the following command: EdFi.Ods.BulkLoad.Services.Windows.BulkWorker.exe install.
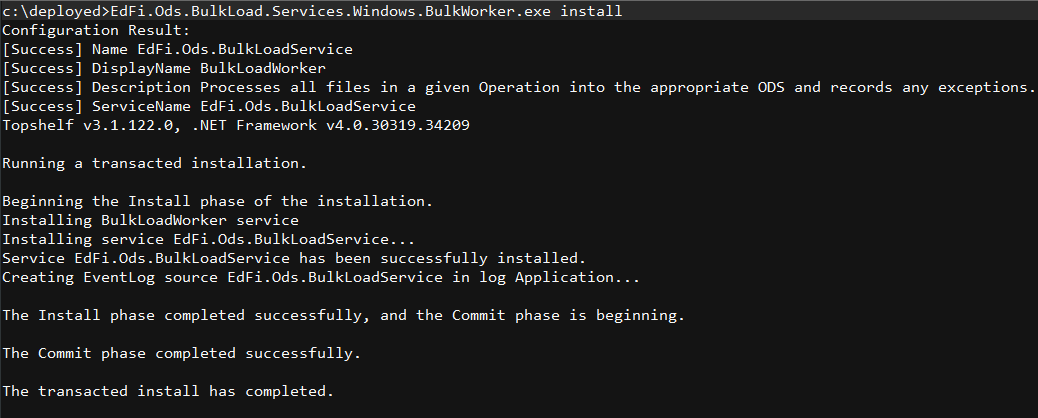
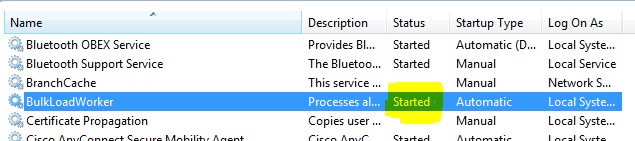
- Open Windows Services (or run services.msc in the command line).
Locate BulkLoadWorker in your services and start it:
Configuration | ||
| App Settings | ||
| QueueAutoCreate | Accepted values are 0 or 1. It indicates if Bulk Load Operations queues are created automatically or not. Note that if the queues are remote, this setting will be ignored (i.e., treated as false) and queues should be created manually. | Default value is 1. |
| StartOperationCommandMessageEndpoint* | The message queue to listen to for signals to begin processing a bulk upload file. | Default value is localhost. |
DescriptorNamespacePrefix | Descriptors XML namespace. | Default value is http://www.ed-fi.org. |
| QueuePrefix | The Bulk Load Operation uses MSMQ to manage multiple pieces of a load. The Queue name starts with this prefix. All manually created Queues must start with this prefix. | Default value is EdFiOds |
| Connection Strings | ||
| NHibernatePlaceholder | Placeholder value required by NHibernate – but the value doesn’t matter. | |
| EdFi_Ods | Points to the main ODS database. | |
| BulkOperationDbContext | Points to the database used to temporarily hold the segments of the bulk files before they are assembled. | |
| EdFi_Security | Points to the EdFi_Security database | |
* Values are not optional and MUST be defined at the deployment time.
EdFi.Ods.BulkLoad.Services.Windows.UploadWorker
Type. Windows Service
Description. The upload worker service assembles the parts of the bulk upload files and then signals its completion for the Bulk Worker service.
Dependencies
MSMQ (Framework)
Deployment Steps (for an on-premises server):
Open the Ed-Fi-Ods solution in Visual Studio.
Click on the Build menu and select Batch Build.
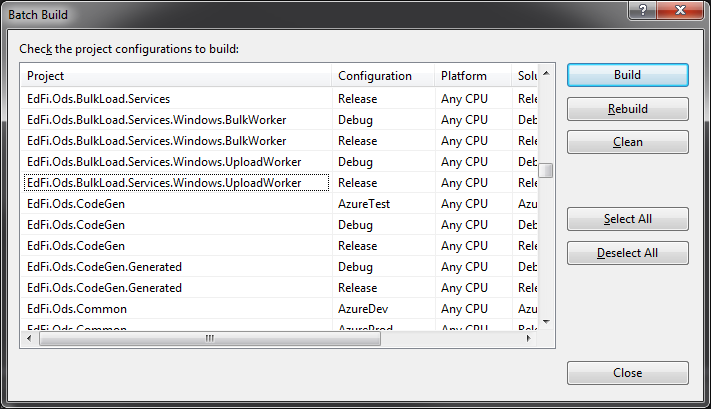
Find Release version of EdFi.Ods.BulkLoad.Services.Windows.UploadWorker and check the checkbox.
Click Build.
In Windows Explorer, open <project_folder>\bin\Release.
Copy and paste all files to the target server deployment folder.
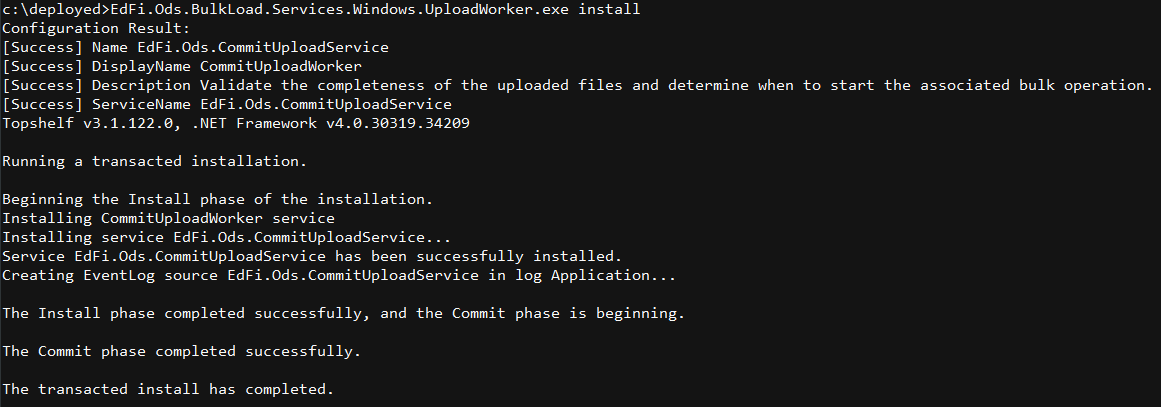
On the target server, open a command line and navigate to the deployed folder.
- Run the following command: EdFi.Ods.BulkLoad.Services.Windows.UploadWorker.exe install:
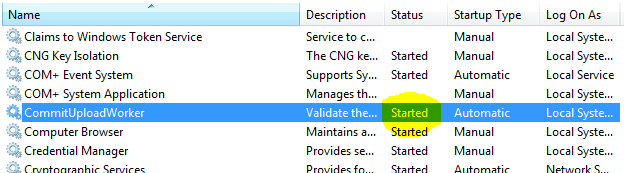
- Open Windows Services (or run services.msc in the command line).
Locate CommitUploadWorker in your services and start it.
Configuration | ||
| App Settings | ||
| QueueAutoCreate | Accepted values are 0 or 1. It indicates if Bulk Load Operations queues are created automatically or not. Note that if the queues are remote, this setting will be ignored (i.e., treated as false) and queues should be created manually. | Default value is 1. |
| StartOperationCommandMessageEndpoint* | The name of the message queue used to signal completion of the file assembly for message processing. | Default value is localhost. |
DescriptorNamespacePrefix | Descriptors XML namespace. | Default value is http://www.ed-fi.org. |
| QueuePrefix | The Bulk Load Operation uses MSMQ to manage multiple pieces of a load. The Queue name starts with this prefix. All manually created Queues must start with this prefix. | Default value is EdFiOds |
| Connection Strings | ||
| BulkOperationDbContext | The location of the bulk load file segments that need to be assembled. | |
* Values are not optional and MUST be defined at the deployment time.
Deploying Other Sandbox Configurations
The steps above describe the configuration for a two-server Sandbox instance. The steps and the configuration details are generally the same for other configurations – but there are a few differences worth noting. The key differences are summarized in the sections that follow.
Single-Server Sandbox Configuration
In a single-server sandbox configuration, the databases reside on the same server as the web server and the bulk services. This is a simpler configuration, but less scalable than a multi-server configuration. For small districts, this configuration represents the highest performance-per-dollar option.
In this configuration, SQL Server should be firewalled from the public internet, and possibly have the TCP/IP protocol disabled.
It is recommended that SQL Server Authentication be disabled in this configuration, and that only NT authentication with local machine service accounts be used as connection criteria from the API.
Azure Sandbox Deployment
Deployment to a Microsoft Azure Cloud Services environment provides several opportunities to take advantage unique capabilities that Azure provides. In this configuration, the EdFi.Ods.WebApi website is a CPU-intensive application, while the administrative and Swagger documentation websites are low volume, and not data- or CPU-intensive. The bulk loader services are also CPU-intensive, but the data to and from the services is buffered using a message queue, so any smaller machines will be capable of loading the data, albeit more slowly.
The databases have been designed to be SQL Azure conformant. The primary consideration for SQL Azure is the Pool Storage size, which should be based on the disk size.
Also worth noting is that in a native Azure deployment, Azure Queues are used instead of the the Microsoft Message Queue.
In each case, it is simple to change machine sizes dynamically under Microsoft Azure Cloud Services to adjust to actual or anticipated load. One recommended example would be to temporarily upgrade the bulk loader services from a minimal size during times that bulk loads are anticipated.
AWS Sandbox Deployment
Amazon Web Services have several specialized platform services available. The Ed-Fi ODS / API currently does not have specialized components that make specific use of these services. Deploying to AWS, therefore, is treated as an (off-site) onsite deployment.
Conclusion
A Sandbox instance of the ODS / API is critical element in the success of a large-scale deployment. This section should have provided you with the information needed to get your Sandbox instance up and running.
Once you’ve done that, you’ll want to look at production deployments which are covered in the next section of this documentation.