This version of the Ed-Fi ODS / API is no longer supported. See the Ed-Fi Technology Version Index for a link to the latest version.
Step 4. Prepare the Development Environment
Preparing the development environment involves the following procedures (which are described below):
Configure MSBuild
Because packages compiled from some of the projects are used during the code generation of later projects, there is a potential for earlier packages to be locked if the solution is recompiled in rapid succession. This is due to the way that MSBuild caches build processes to minimize compile time by default. Build processes are normally held for reuse for approximately 10 minutes.
To turn off this default behavior when compiling in Visual Studio, the “MSBuildDisableNodeReuse” variable must be set. There are two options for setting this variable:
- Setting the variable globally
- Setting the variable per command prompt session
Both options instruct the compiler to create a new process for each build job. As a side effect, this action also releases any resources that may be held by inactive compiler processes.
If these settings are not applied, Visual Studio or MSBuild may lock resources during build. Restarting Visual Studio, or the command prompt session, will resolve the problem for the first build after the restart. Waiting for up to 15 minutes between builds will also achieve this.
The options for setting this variable are described below:
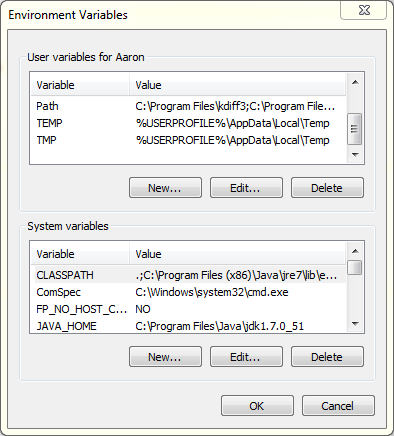
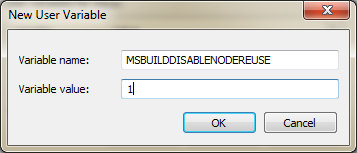
Option 1: Setting “MSBuildDisableNodeReuse” Globally
To set the “MSBuildDisableNodeReuse” variable globally use the “Environment Variables” property page, which is accessed by right-clicking Computer, clicking Properties, and clicking the “Environment Variables” button under the “System Properties” dialog window Advanced tab.
To turn off this behavior when compiling the solution using MSBuild, include the following compiler flag:
/nr:false
Option 2: Setting “MSBuildDisableNodeReuse” per Command Prompt Session
If the "MSBuildDisableNodeReuse” variable is set within a command prompt session, the Visual Studio development environment must be launched using the devenv command (rather than from an icon):
SET MSBUILDDISABLENODEREUSE=1
Restore Any Missing NuGet Packages
The Visual Studio Projects within the Ed-Fi ODS / API solution use many NuGet packages, which may need to be restored for a successful build.
To check for missing NuGet packages and restore any that are missing:
Start Visual Studio and open the Ed-Fi ODS solution file1:
C:\Ed-Fi-ODS-Implementation\Application\Ed-Fi-ODS.sln
- Ensure that the Ed-Fi Alliance NuGet Feed is one of your available NuGet package sources. From the NuGet Package Manager > Package Sources settings dialog box, make sure that https://www.myget.org/F/ed-fi/ is one of the sources; the name doesn’t matter, but should have been automatically added with “Ed-Fi Alliance NuGet Feed” as the name.
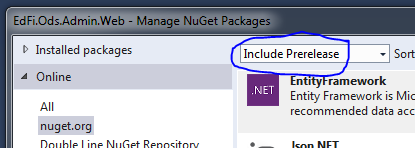
- Ensure that prerelease packages are available for download from NuGet. From within the Manage NuGet Packages dialog box, which is accessible from the context menu of the solution or any of the projects, as well as the Tools > Manage NuGet Packages menu, select Online from the options on the left of the dialog. At the top of the dialog box, select Include Prerelease from the untitled combo box.
- Open Tools > NuGet Package Manager > Package Manager Console and press Restore as shown below. This will download all the packages required to build the solution and configure the environment. Depending on the speed of your internet connection, this may take several minutes.

- Close Visual Studio when all of the missing packages have been downloaded.
Create SQL Logins
Some SQL logins need to be created in SQL Server. These may be added by running the following script from within Microsoft SQL Server Management Studio:
C:\Ed-Fi-ODS-Implementation\Application\DeveloperSetup\CreateLocalLogins.sql
Verify PowerShell Script Permissions
You may need to change the execution policy for unsigned PowerShell scripts to run on your machine to run the scripts. This may be accomplished by opening a powershell console as administrator and typing the following command.
Set-ExecutionPolicy Unrestricted
Initialize PowerShell Scripts for Development
There are several databases that must be successfully deployed. PowerShell scripts that initialize all necessary development databases are included in the Visual Studio solution.
These scripts are enabled for use within Visual Studio when the Ed-Fi-ODS solution is opened2. They may also be loaded for use within a PowerShell console window3 by running the initialize PowerShell for development script4 located at:
C:\Ed-Fi-ODS-Implementation\Initialize-PowershellForDevelopment.ps1
If you are in the C:\Ed-Fi-ODS-Implementation directory, PowerShell will auto-complete the script for you if you type "Init" and then press Tab.
In either case, when the scripts are loaded, a series of “sourcing” statements and other information will indicate that the appropriate scripts have been loaded.
Sourcing: 01_SolutionPaths.ps1
Using repositories from environment variable: Ed-Fi-Common;Ed-Fi-Ods;Ed-Fi-ODS-Implementation
Sourcing: 02_DeploymentSettings.ps1
Sourcing: 03_ModuleImports.ps1
Sourcing: 04_GlobalFunctions.ps1
Sourcing: Add-MigrationToAdminDatabase.ps1
Sourcing: Add-MigrationToRestApiWorkingDatabase.ps1
Sourcing: Clean-BuildOutput.ps1
Sourcing: Initialize-DevelopmentEnvironment.ps1
Sourcing: Initialize-IIS.ps1
Sourcing: Initialize-LocalTestSettings.ps1
Sourcing: Initialize-MessageQueues.ps1
Sourcing: Migrate-EntityFrameworkDatabase.ps1
Sourcing: Publish-DatabaseToAzure.ps1
Sourcing: PublishLocal.ps1
Sourcing: Rebuild-Solution.ps1
Sourcing: Remove-Sandboxes.ps1
Sourcing: Reset-Databases.ps1
Sourcing: Reset-GeneratedArtifacts.ps1
Sourcing: Set-DeveloperSetting.ps1
The script may not finish with a command prompt when it is automatically loaded with the solution in Visual Studio in some circumstances. Simply press Enter and ignore any messages that appear in the console window.
Install a Development Certificate
A development certificate needs to be installed as a prerequisite to initializing the databases. The certificate is used to encrypt and decrypt connection strings in configuration files as well as database user names and passwords. This certificate is installed by issuing the Initialize-ProjectCredentials command from within your PowerShell environment after the "Initialize-PowershellForDevelopment.ps1" script has been run.
Installing a certificate requires elevated privileges, so the PowerShell session for this particular step must be “Run as administrator.” This script will install the certificate for use by administrators and the user who runs the script on the local machine. If you have a build agent or other users who use the same machine, they must be added to the certificate by using the All Tasks > Manage Private Keys… dialog from the context menu of the “Development_Encryption” certificate in the Certificates MMC snap-in for the local computer.
Initialize-ProjectCredentials
The provided certificate has an empty password. If you are prompted for a password, press Enter.
Alternatively, you can install the certificate manually to the Local Computer Personal Certificates store using the Certificates snap-in to the Microsoft Management Console (mmc.exe). The certificate is located in the Ed-Fi-ODS-Implementation/logistics/certificates directory and is named “Development.pfx”.5
Initialize the Development Environment
Once the PowerShell development scripts have been loaded and a development certificate has been installed, the development environment may be initialized by typing the initdev command in a PowerShell console. This command creates databases, generates code templates, and compiles projects in the solution.
initdev
Initializing the development environment will take several minutes to complete. Some developers report encountering an error during the initialization process the first time it is run. This is due to an intermittent timing issue. The issue generally resolve itself by running the initdev process a second time.
1When starting Visual Studio, it is recommended that you “Run as administrator.”
2To Initialize the Development Environment within Visual Studio, you must close and reopen the solution after restoring the NuGet packages.
3When starting a PowerShell session, it is recommended that you “Run as administrator.” In particular, installing a certificate usually requires elevated privileges.
4In order to run the scripts from a PowerShell console, the solution must be loaded at least once from Visual Studio in order to retrieve the required NuGet packages – as described in an earlier step.
5If you would prefer to generate your own certificate for your development environment, instructions are contained in Appendix B of this documentation.