Docker Deployment 2.x
Overview
The Ed-Fi ODS Docker deployment scripts install and configure components of the Ed-Fi ODS / API on Docker containers. The example Docker Compose files automate the numerous configuration steps required to get the ODS / API up and running on Linux containers backed by PostgreSQL or an external SQL Server. These scripts can be used for scenarios where a default ODS / API is needed without extensions or customizations.
Please see Ed-Fi Docker Compose Architecture for more information on the components and configuration options provided by the Ed-Fi Docker solution.
The Ed-Fi Alliance does not have expertise in production deployments. Before deploying into a production environment, please review and adjust the orchestration as appropriate for your requirements.
If running in a cloud provider, it might be wise to use native services to host the containers. In such situations, it might not be necessary or advisable to use the provided NGiNX container as a reverse proxy. Similarly, PgBouncer might not be necessary in some situations. The roles played by NGiNX and PgBouncer are explained in the following section.
Running in Docker Desktop
Docker Containers have the added benefit of running anywhere (e.g., VMs, on premises, in the cloud), which is a huge advantage for both development and deployment. It has been adopted by leading cloud providers, including, Google Cloud, Amazon Web Services (AWS), and Microsoft Azure. For simplicity, the steps below describe how to use Docker Compose to deploy the Ed-Fi ODS/API and related tools on Docker Desktop.
Setup
Step 1. Download the Source Code or Clone the Repo
The Ed-Fi ODS Docker deployment source code is contained in the Ed-Fi repository hosted by GitHub. A link to the repository is provided in the download panel on the right. You can either clone the repository or download the source code as a ZIP file.
Step 2. Setup Runtime Environment
2a. Docker Desktop
To work with the material in this repository, set up a Docker environment by referring to the article Set Up Your Docker Environment.
2b. Microsoft SQL Server
Experimental - this is not a widely tested deployment path.
The default configurations use PostgreSQL. The Ed-Fi Alliance does not currently distribute pre-configured Microsoft SQL Server (MSSQL) containers. To run with MSSQL instead of PostgreSQL, whether MSSQL is running in Docker, as a managed cloud service, or on "bare metal" / on-prem virtual machine, you must install the databases yourself. The following notes will help guide a decision and approach,
- Run installations from the official binary distributions and documentation:
 PRO: can get minimal or populated template
 CON: con only run on localhost - requires a migration process CON: installs the full Admin App web application
- Follow steps 1 and 2 in Sandbox Installation Steps: Step 2, only downloading the EdFi.Suite3.RestApi.Databases package (ignore the package links for WebApi, SwaggerUI, and SandboxAdmin).
- Install Admin App for Suite 3 v3.1.
- Export data-tier applications (bacpac) for each of the created databases.
- Import the data-tier applications onto your destination server.
- Use experimental EdFi-MSSQL-Install-Scripts for a lighter-weight deploy process. This set of scripts uses the same installation files, but orchestrates them differently to avoid installing Admin App and to allow remote deployments. PRO: should be able to install into any destination MSSQL database you can reach CON: no sample data (minimal or populated template)
Before starting the Docker containers, make sure that the database user that you plan to use for the connection has permission to create objects in the ODS database(s), either as a ddl admin or db owner. This is because AdminApp installs additional reports into the ODS database on startup. It may be possible to change that access back to read/write only after first time startup, but this has not been robustly tested.
Step 3. Setup Your Environment Variables
Configure your deployments using an environment file. The repository includes .env.example, which lists the supported environment variables. Copy .env.example file and name it .env. Update the values as desired.
Sample .env files for a PostgreSQL and SQL Server are provided below. ![]() Please change these values to more secure settings before using in a deployed environment.
Please change these values to more secure settings before using in a deployed environment.
The LOGS_FOLDER is a local directory for permanent storage of log files, and thus the file path is on the Docker Desktop host, not inside a container. In Windows, use forward slashes rather than backslashes.
Values containing tokens such as ${xyz} are variable insertions that you do not need to change.
When including the Admin App in your deployment, such as with the Shared Instance Configuration:
API_HOSTNAMEvalue is required for successfully connecting to ODS/API. This should be the full host (server) name for public access to the API, not including protocol (e.g., "https") or path (e.g., "/api"). For example, if running on a virtual machine called "edfi" on network "my-district.edu" then this value would be "API_HOSTNAME=edfi.my-district.edu"ENCRYPTION_KEYmust be set to a newly generated AES encryption key for the deployment environment. Such a unique value can be generated using the following code snippet at a Linux command prompt or using Git Bash, if deploying on local Windows host.Generate key on Linuxopenssl rand -base64 32
API_INTERNAL_URLneeds to be set to specify the ODS / API endpoint for admin app to internally connect.- If you choose direct connection between ODS / API and admin app within docker network, then set
API_INTERNAL_URL = http://${ODS_VIRTUAL_NAME} - If you choose to connect to ODS / API from admin app through reverse proxy (nginx = our gateway host name), then follow the steps below.
- STEP 1: Update the CA certificate to include
subjectAltName = DNS:nginx; please refer Step 4. Provide SSL certificate for more details. - STEP 2: After the CA certificate update, set
API_INTERNAL_URL = https://nginx/${ODS_VIRTUAL_NAME}
- STEP 1: Update the CA certificate to include
- If you choose direct connection between ODS / API and admin app within docker network, then set
ADMINAPP_HEALTHCHECK_TESTmust be set to specify a health check url for admin app.- RECOMMENDED: To use the default internal Admin App health check endpoint, set
ADMINAPP_HEALTHCHECK_TEST="curl -f http://${ADMINAPP_VIRTUAL_NAME}/health" - To disable the health check, remove the above and instead set
ADMINAPP_HEALTHCHECK_TEST=/bin/true - To add a custom health check, consult the documentation at https://docs.docker.com/compose/compose-file/compose-file-v3/#healthcheck
- RECOMMENDED: To use the default internal Admin App health check endpoint, set
Step 4. Provide SSL certificate
The deployments require a valid SSL certificate to function. A self-signed certificate can be used for a Non-Production environment. The repository includes generate-cert.sh script that can be used to generate a self-signed certificate and place it in ssl folder under root directory to be used by the running Gateway container.
If deploying on local Windows host, you will either need Git Bash or WSL to run generate-cert.sh.
To allow Admin app to communicate with the ODS / API via reverse proxy/ gateway (nginx), generate-cert.sh file was updated to include subjectAltName with value DNS:nginx as follows:
openssl req -subj '/CN=localhost' -x509 -newkey rsa:4096 -nodes -keyout ssl/server.key -out ssl/server.crt -days 365 -addext "subjectAltName = DNS:nginx"
"nginx" is the default gateway host name in the Docker Compose files.
Regenerate your certificate if you are upgrading from a previous version. If not using generate-cert.sh for generating the certificate, then consider providing "subjectAltName = DNS:nginx" when creating CA certificate.
If you prefer not to update your certificate at this time, please refer to Step 3: Setup Your Environment Variables for details on an alternate way to set up the API_INTERNAL_URL to fallback to not using reverse proxy for communication between Admin App and ODS / API.
Step 5. Run Docker Compose
In this step, you need to choose between deploying a Sandbox, Shared Instance, Year Specific, or District Specific environment, as described in Docker Compose Architecture: ConfigurationModes. The source code repository contains two Docker compose orchestration files for each mode: one that downloads images from Docker Hub, and one that has the word "build" in the file name. The latter builds a local version of the image instead of downloading from Docker Hub. The sample commands below show the use of the pre-built images from Docker Hub. These commands can be run from any shell terminal that supports Docker commands (e.g. PowerShell in Windows).
If you are upgrading from a previous version, make sure to cleanup local copies of images using rmi command before installing new version.
Using SQL Server Instead of PostgreSQL
SQL Server databases are not created by the Docker Compose file; this means that EdFi_Admin and EdFi_Security databases should already exist within the server defined by SQLSERVER_ADMIN_DATASOURCE in the .env file. Similarly, the ODS databases for desired school years should already exist with the correct naming convention, which is described for each configuration below.
Sandbox Environment
Shared Instance Environment
Year Specific Environments
Notice that the compose file provided in the repository is an example that defines ODS for years 2022 and 2023. You can generate the compose file for desired school years.
District Specific Environments
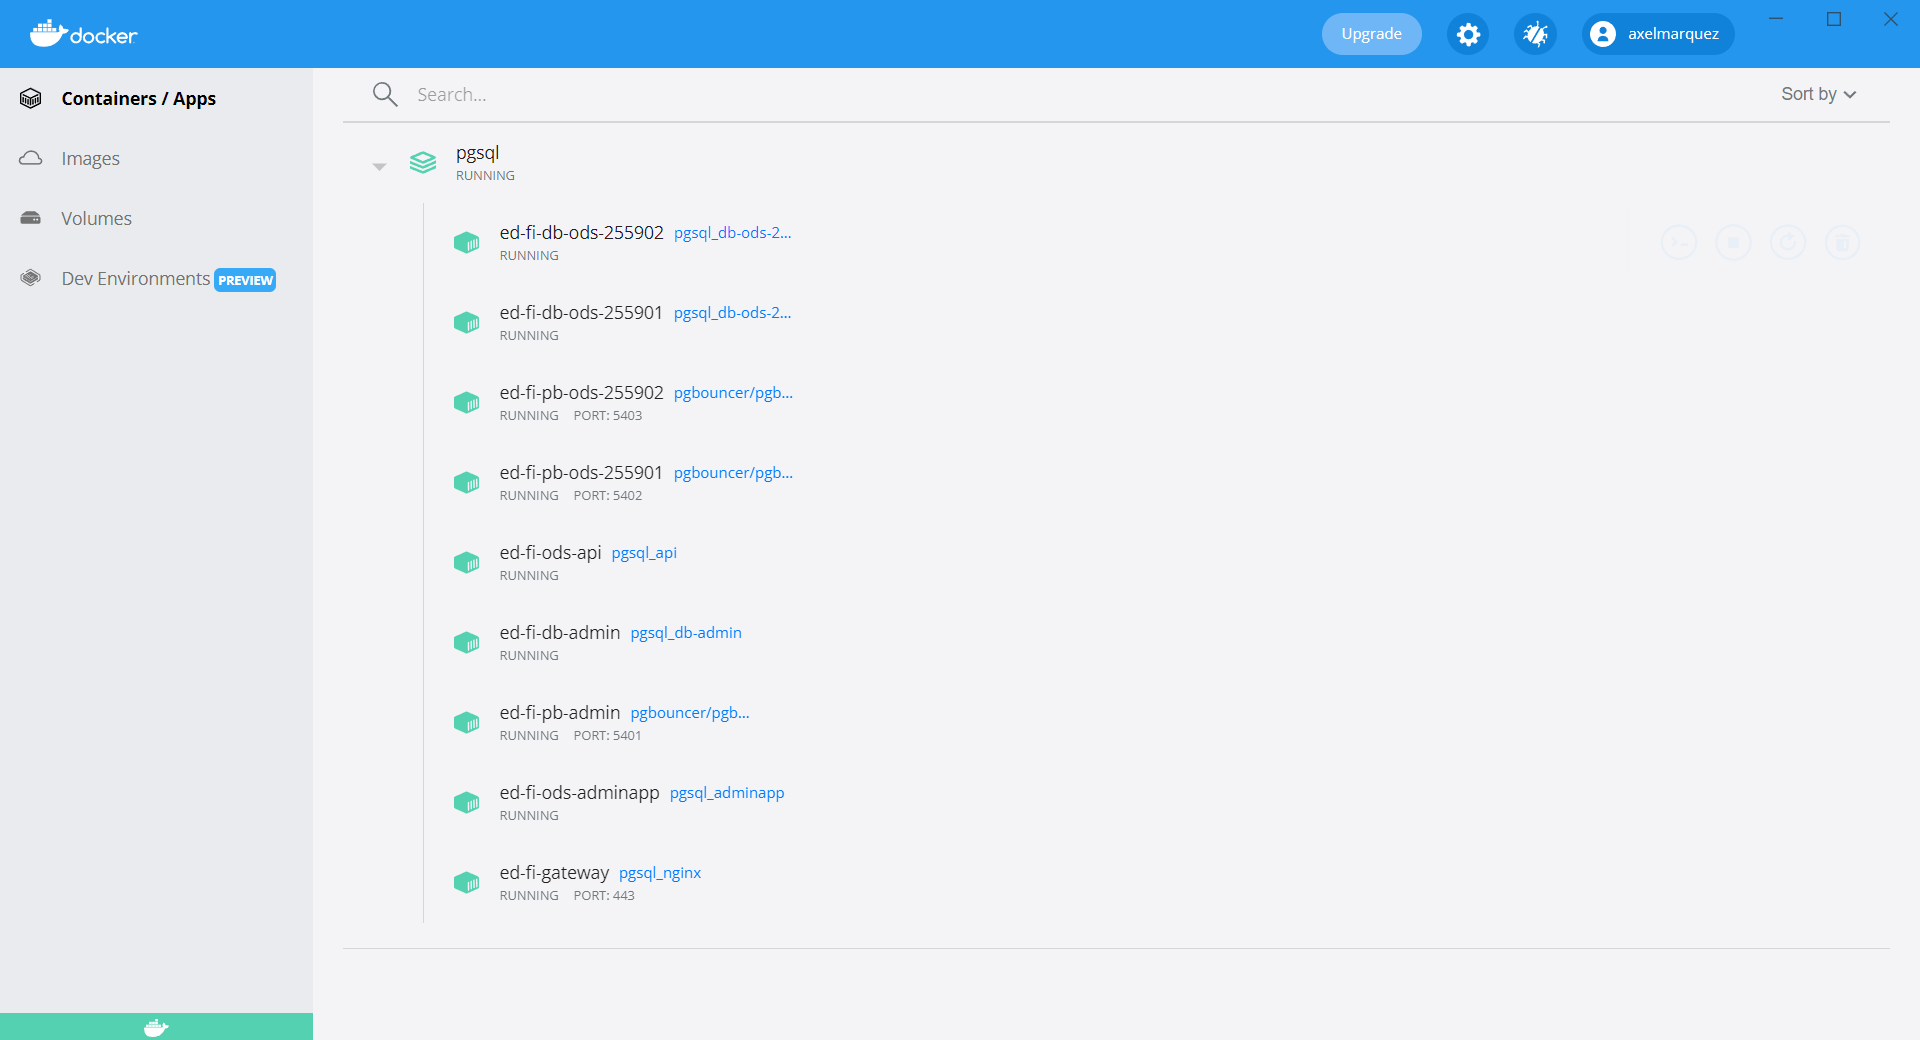
Notice that the compose file provided in the repository is an example that defines ODS for district 255901 and 255902. You can generate the compose file for desired districts.
Step 6. Verify Your Deployments
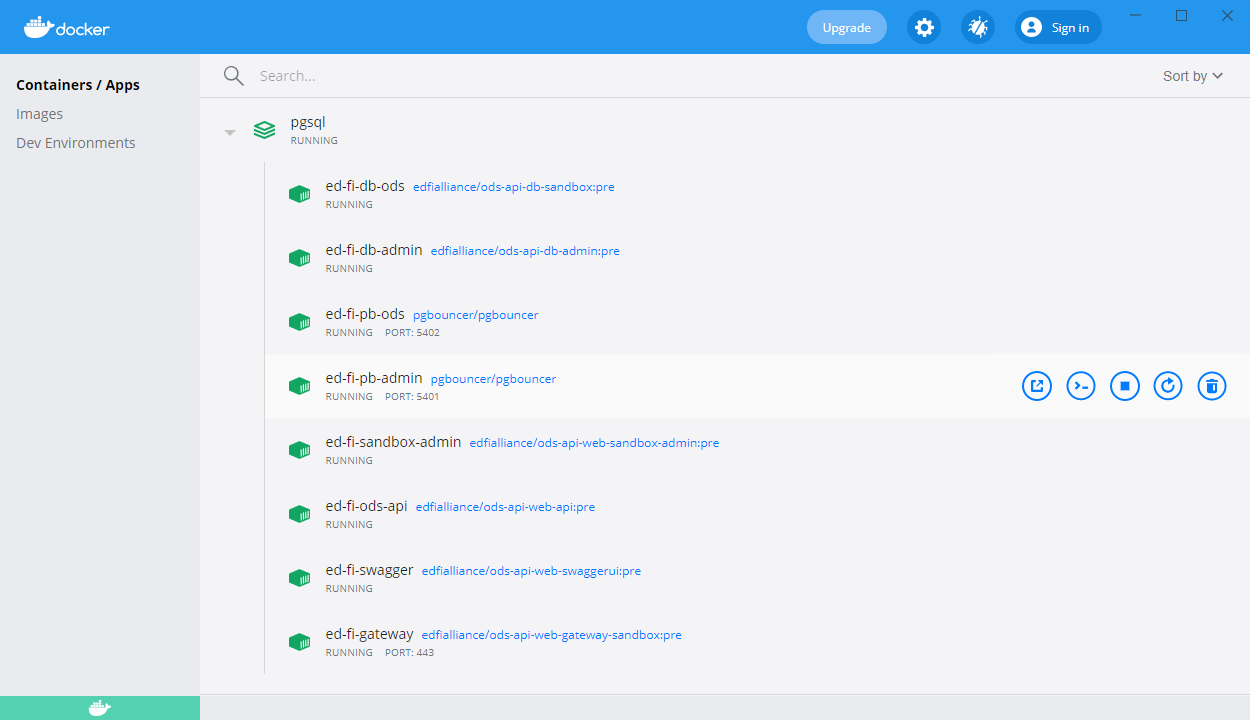
Open your Docker Desktop instance and view running container instances.
The following image shows sandbox Postgres deployment:
You can also verify deployed applications by browsing to:
- Swagger UI : https://localhost/docs
- ODS / API : https://localhost/api
- Sandbox Admin : https://localhost/admin
![]() The exact virtual name for each site, after "https://localhost/", depends on your
The exact virtual name for each site, after "https://localhost/", depends on your .env file settings.
The following image shows shared instance Postgres deployment: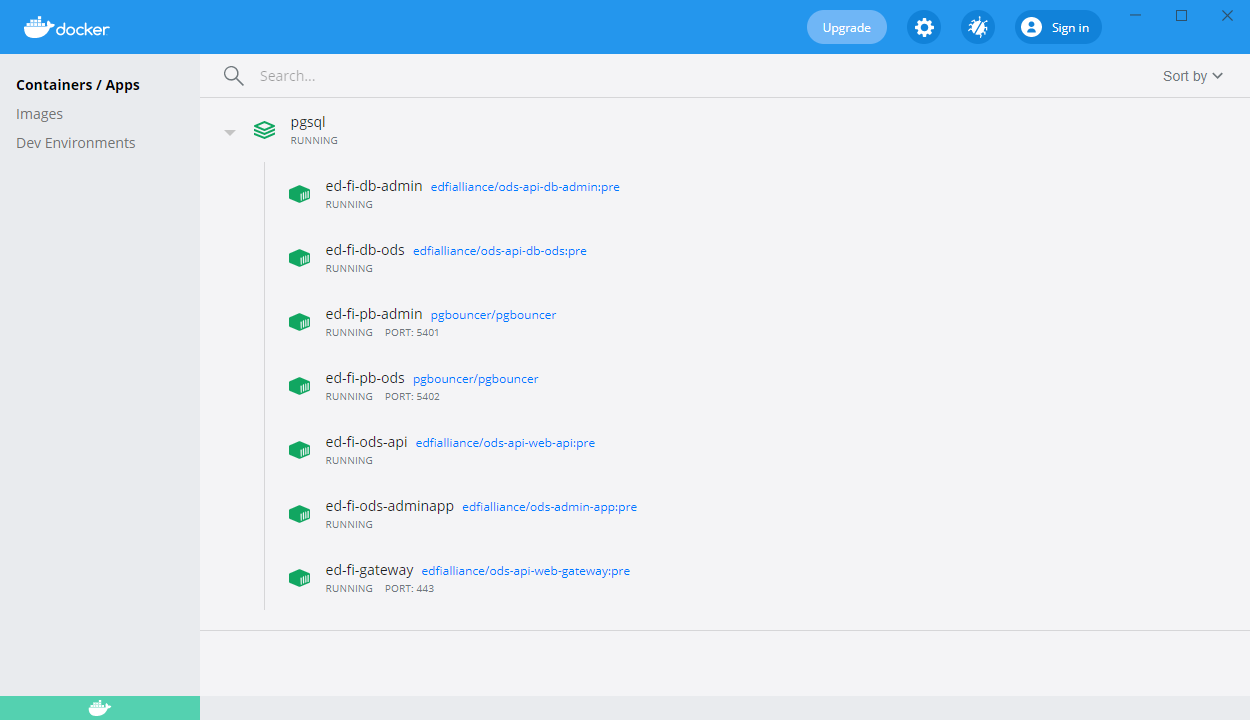
You can also verify deployed applications by browsing to:
- ODS / API : https://localhost/api
- Admin App : https://localhost/adminapp
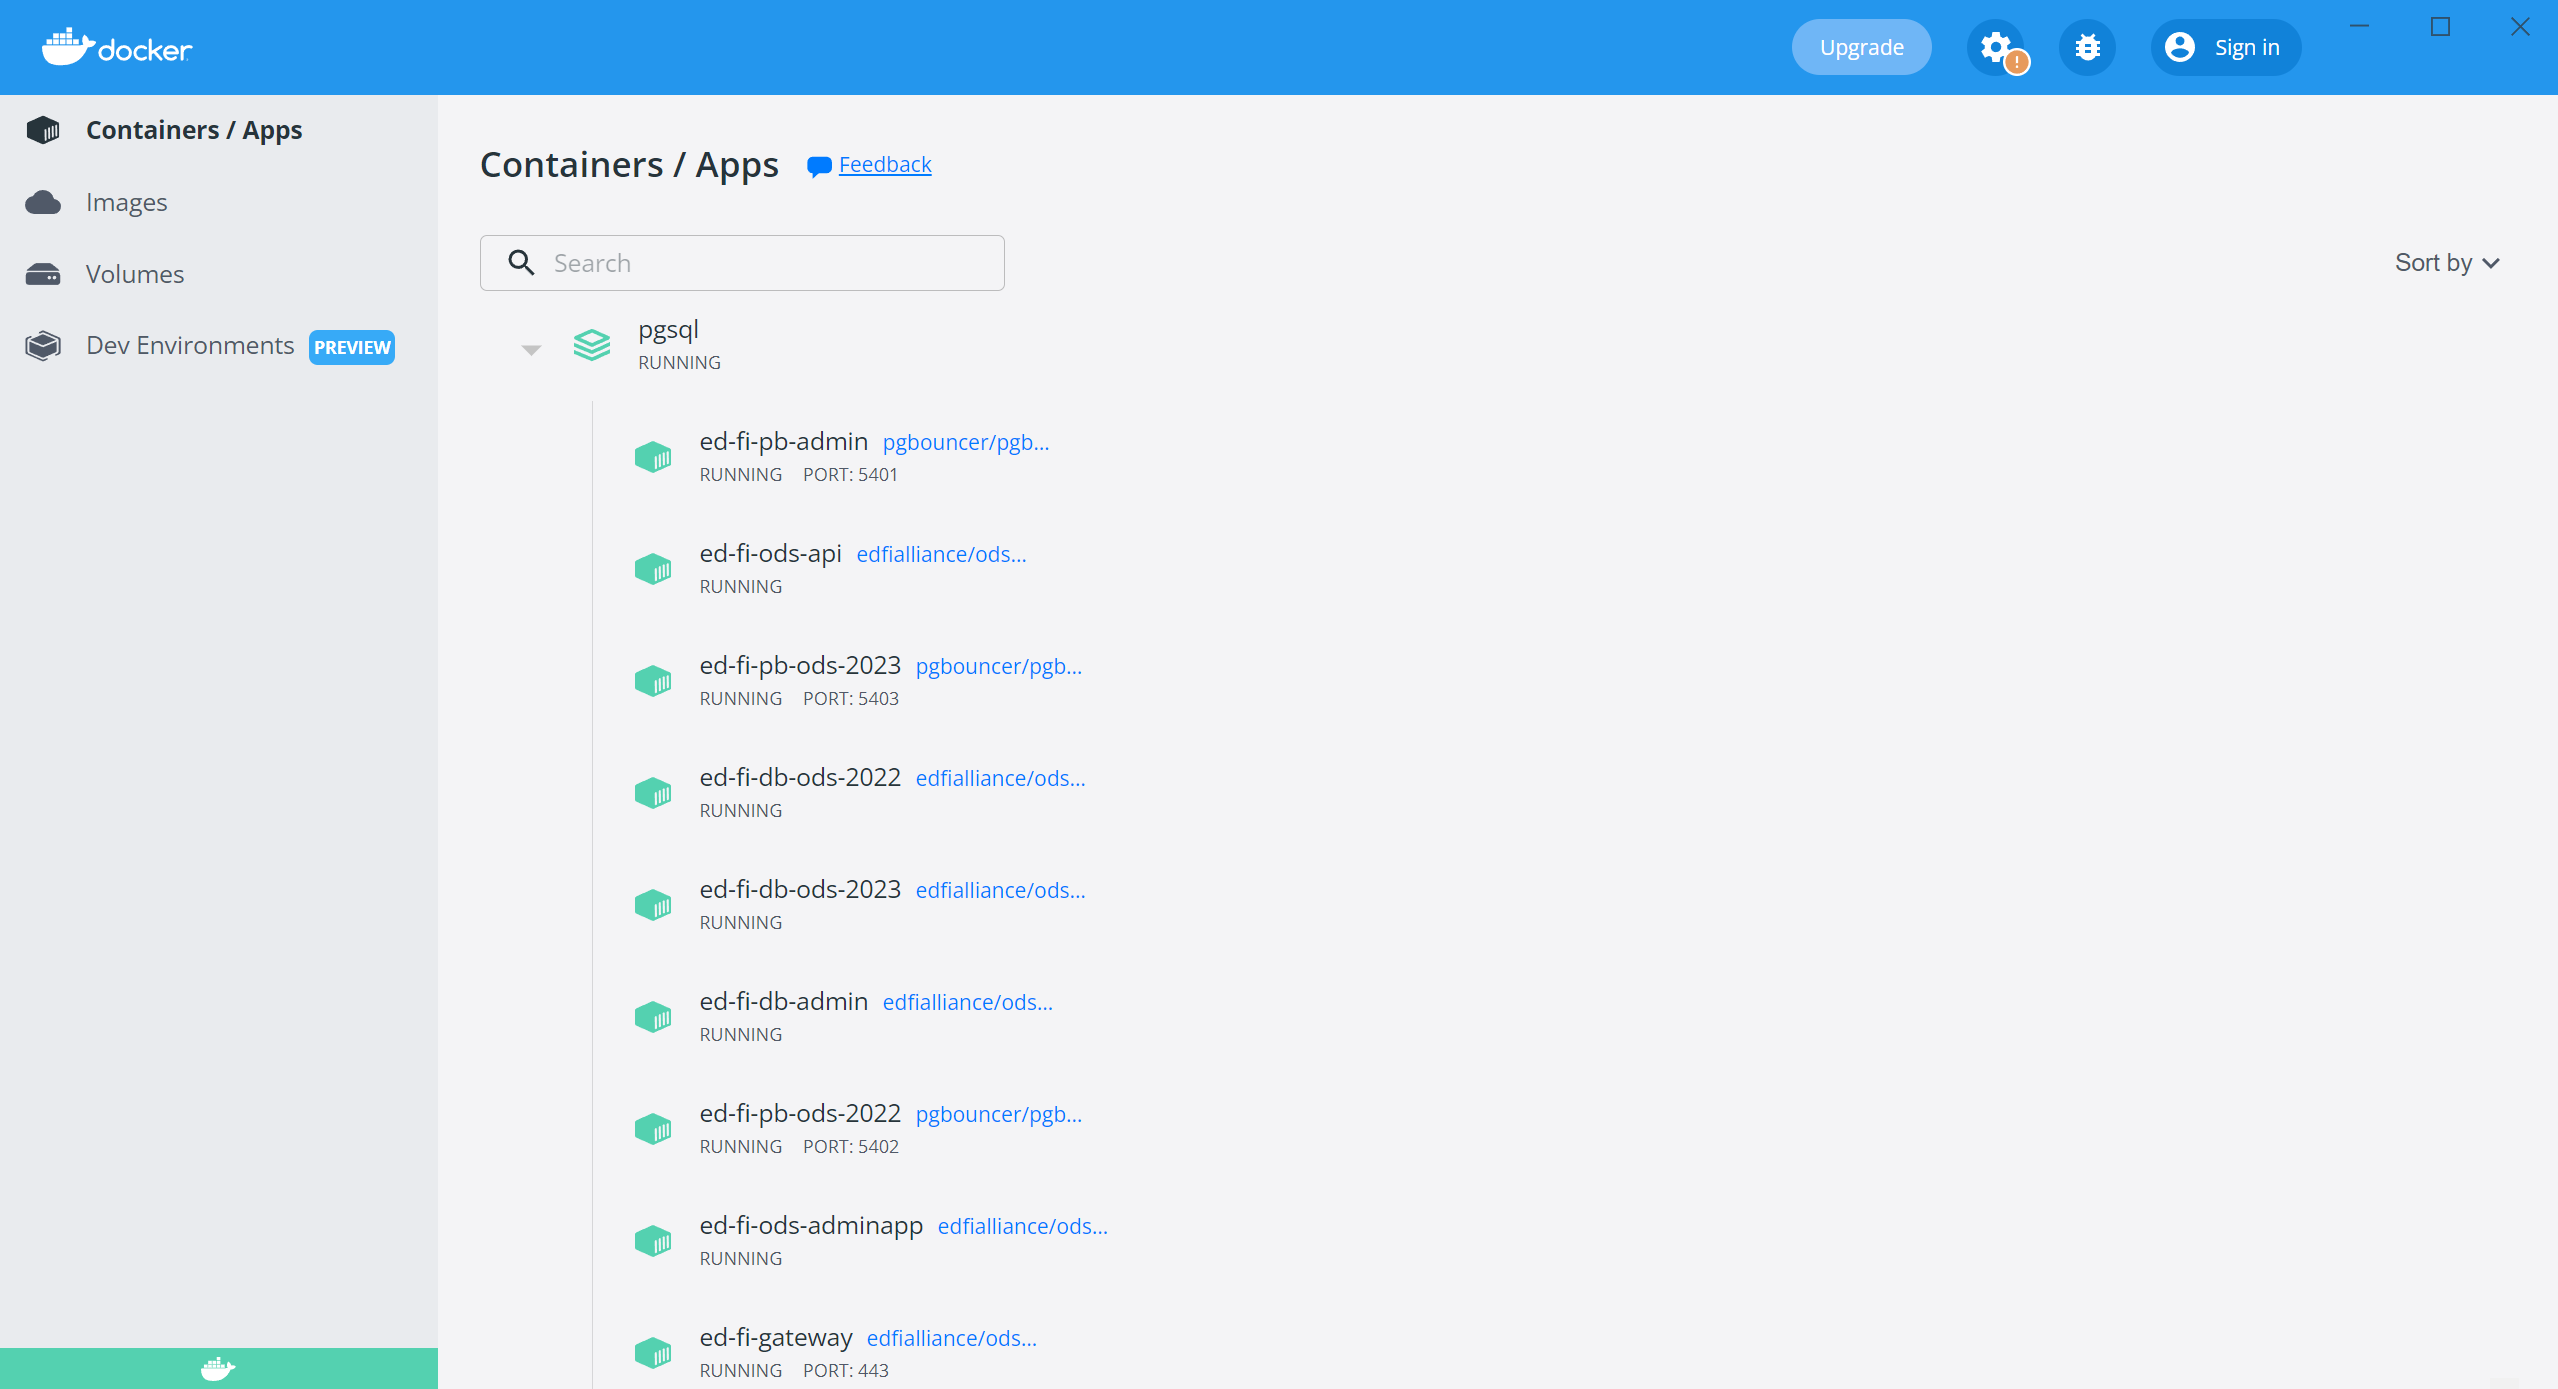
The following image shows year specific Postgres deployment:
You can also verify deployed applications by browsing to:
- ODS / API : https://localhost/api
- Admin App : https://localhost/adminapp
The following image shows district specific Postgres deployment:
You can also verify deployed applications by browsing to:
- ODS / API : https://localhost/api
- Admin App : https://localhost/adminapp
Step 7. Restarting the ODS/API
This step is only for ODS / API versions is 3.4 through 5.2. ODS / API versions 5.3 and higher do not require a service restart.
After the first time setup for Admin App, the user is prompted to restart the ODS/API. For Docker deployments, the ODS/API can be restarted by clicking on the restart button (see image) next to the ODS/API container on your Docker Desktop instance.

Step 8. Accessing Application Log Files
The ODS/API, Admin App and Sandbox Admin write their internal log entries to a mounted folder within their docker containers. The environment file described in the Step 3 lets you configure log location for easy access. For example, you could set LOGS_FOLDER variable to c:/tmp/logs for windows hosts or to ~/tmp/logs for Linux and MacOS hosts.
(Optional) Step 9. Install Analytics Middle Tier
The Analytics Middle Tier (AMT) installer application is available as a Docker image. Run the following to see the full set of command line options:
docker run -t edfialliance/analytics-middle-tier --help
Do not use "localhost" in the connection string, as that will refer only to the docker instance itself - which does not have a running database. If you wish to install AMT views in a database engine running on your local workstation, or running in another Docker container with a port mapped on the workstation, then use host name host.docker.internal (credit: How to connect to the Docker host from inside a Docker container?). The following example will install on a PostgreSQL-hosted shared instance database that is hosted using this page's instructions, with two options (extra indexes, and the chronic absenteeism collection).
![]() Note the case sensitivity on the database name - do not use "EdFi_ODS" instead of "EdFi_Ods", for example.
Note the case sensitivity on the database name - do not use "EdFi_ODS" instead of "EdFi_Ods", for example.
$ConnString="host=host.docker.internal; port=5402; user id=postgres; password=P@ssw0rd; database=EdFi_Ods"
$Options="indexes,chrab"
$Engine="postgresql"
docker run -t edfialliance/analytics-middle-tier --connectionString $ConnString --options $Options --engine $Engine
ConnString="host=host.docker.internal; port=5402; user id=postgres; password=P@ssw0rd; database=EdFi_Ods"
Options="indexes,chrab"
Engine="postgresql"
docker run -t edfialliance/analytics-middle-tier --connectionString "$ConnString" --options $Options --engine $Engine
Tear Down
If deployed as a sandbox environment, navigate to the root directory of Docker deployment scripts, and run the following command:
If deployed as a shared instance environment, navigate to the root directory of Docker deployment scripts and run the following script:
If deployed as a year specific environment, navigate to the root directory of Docker deployment scripts and run the following script:
If deployed as a district specific environment, navigate to the root directory of Docker deployment scripts and run the following script:
Additional Docker Tips
- Add the argument
--remove-orphansif the Docker Compose file has changed and you want to clear out old images that are no longer in use. - If you also wish to remove the local volumes used for persistent storage, add
-vto thedocker compose ... downcommand. - Use rmi command to cleanup local copies of images if you do not expect to use them again, and what to reclaim disk space.
Known Issues
The table below identifies known issues in this release.
Issue | Tracker Ticket* |
|---|---|
| POSTGRES_USER variable is not configurable with current release and only works with default 'POSTGRES_USER=postgres' setting. | ODS-4991 - Getting issue details... STATUS |
Issue: Learning standard process on Admin App failing intermittently. Temporary solution: Please reload/ rerun the Learning standards process for fixing the issue. | AA-1407 - Getting issue details... STATUS |