The Ed-Fi “Classic Dashboards” are no longer supported through the Ed-Fi Alliance. You can still receive support and maintenance through the Ed-Fi vendor community. Please look at any of the vendors’ dashboard solutions on the Registry of Ed-Fi Badges or the Ed-Fi Starter Kits if you are looking for a visualization solution to use with the Ed-Fi ODS. This documentation will remain available to assist existing Classic Dashboard implementers.
UI Developers' Guide - Extensibility and Configuration
The customization and extensibility of the Ed-Fi Dashboards is easily accomplished by various mechanisms provided throughout the application. The code provides ways to extend the application for implementation-specific needs. This section provides an overview of the various extension points.
General Extension Conventions
Any customization or extension should adhere to the following conventions:
- Use the extension Visual Studio projects taking into account the following naming conventions:
For extensions regarding Core Services and Providers the naming conventions are: “EdFi.Dashboards.Extensions.Resources”, “EdFi.Dashboards.Extensions.Resources.Models” and “EdFi.Dashboards.Extensions.Resources.Tests”.
For extensions regarding Metric Services and Providers the naming conventions are: “EdFi.Dashboards.Extensions.Metric.Resources”, “EdFi.Dashboards.Extensions.Metric.Resources.Models” and “EdFi.Dashboards.Extensions.Metric.Resources.Tests”.
- Use marker classes to reach the assemblies in an easy fashion. Following this convention:
- They should be in the root of the project.
The naming convention is: Project name separated by underscores (e.g., Marker_EdFi_Dashboards_Extensions_Resources.cs).
public interface class Marker_EdFi_Dashboards_Extensions_Resources
{
}
Register the components in your extension projects by updating the web project’s Web.config file so that the installers for the services, repositories, etc., are configured to process your assemblies at application startup. Castle Windsor (our IoC container) operates uses a “first-in wins” strategy during component resolution, so make sure you register your extension assemblies before the Ed-Fi core assemblies to enable your components to override the out-of-the-box functionality.
<!-- IMPORTANT: The Extensions assemblies have to be registered first so that if there are any overrides they will be registered with the IoC container first -->
<inversionOfControl>
	<installers>
      	<add name="Configuration-Specific Installer" typeName="EdFi.Dashboards.Presentation.Web.Utilities.CastleWindsor.Development.ConfigurationSpecificInstaller, EdFi.Dashboards.Presentation.Web" />
		<add name="Presenters" typeName="EdFi.Dashboards.Common.Utilities.CastleWindsorInstallers.PresenterInstaller`1[[EdFi.Dashboards.Presentation.Web.Application.Marker_EdFi_Dashboards_Presentation_Web, EdFi.Dashboards.Presentation.Web]], EdFi.Dashboards.Common" />
		<add name="Controllers" typeName="EdFi.Dashboards.Presentation.Web.Utilities.CastleWindsor.ControllerInstaller`1[[EdFi.Dashboards.Presentation.Web.Application.Marker_EdFi_Dashboards_Presentation_Web, EdFi.Dashboards.Presentation.Web]], EdFi.Dashboards.Presentation.Web" />
		<add name="Extensions - Services" typeName="EdFi.Dashboards.Resources.CastleWindsorInstallers.GenericServiceInstaller`1[[EdFi.Dashboards.Extensions.Resources.Marker_EdFi_Dashboards_Extensions_Resources, EdFi.Dashboards.Extensions.Resources]], EdFi.Dashboards.Resources" />
		<add name="Extensions - Repositories" typeName="EdFi.Dashboards.Resources.CastleWindsorInstallers.RepositoryInstaller`1[[EdFi.Dashboards.Extensions.Data.Marker_EdFi_Dashboards_Extensions_Data, EdFi.Dashboards.Extensions.Data]], EdFi.Dashboards.Resources" />
		<add name="EdFi Domain Security Components" typeName="EdFi.Dashboards.Resources.Security.CastleWindsorInstallers.SecurityComponentsInstaller, EdFi.Dashboards.Resources.Security" />
		<add name="EdFi Domain Services" typeName="EdFi.Dashboards.Resources.CastleWindsorInstallers.GenericServiceInstaller`1[[EdFi.Dashboards.Resources.Marker_EdFi_Dashboards_Resources, EdFi.Dashboards.Resources]], EdFi.Dashboards.Resources" />
		<add name="EdFi Metric Services typeName="EdFi.Dashboards.Resources.CastleWindsorInstallers.MetricServiceInstaller, EdFi.Dashboards.Resources" />
		<add name="EdFi Domain Repositories" typeName="EdFi.Dashboards.Resources.CastleWindsorInstallers.RepositoryInstaller`1[[EdFi.Dashboards.Data.Marker_EdFi_Dashboards_Data, EdFi.Dashboards.Data]], EdFi.Dashboards.Resources" />
		<add name="EdFi Metric Repositories" typeName="EdFi.Dashboards.Resources.CastleWindsorInstallers.RepositoryInstaller`1[[EdFi.Dashboards.Metric.Data.Entities.Marker_EdFi_Dashboards_Metric_Data_Entities, EdFi.Dashboards.Metric.Data.Entities]], EdFi.Dashboards.Resources" />
		<add name="EdFi Domain Repositories (Persisting)" typeName="EdFi.Dashboards.Resources.CastleWindsorInstallers.InfrastructureBasedRepositoryInstaller, EdFi.Dashboards.Resources" />
		<add name="EdFi Domain Queries" typeName="EdFi.Dashboards.Data.CastleWindsorInstallers.QueryInstaller`1[[EdFi.Dashboards.Data.Marker_EdFi_Dashboards_Data, EdFi.Dashboards.Data]], EdFi.Dashboards.Data" />
	</installers>
</inversionOfControl>
For extensions regarding UI Components (controllers, models and views) the conventions paths are “rootAppFolder/Extensions/**PathToOriginalResource**” with the exception of style sheets which have a unique convention explained below.
The following are a series of extension implementation examples.
Extending the Style Sheets
Cascading Stylesheets (CSS) uses a strategy of “last-in wins.” The Dashboards use that mechanism in conjunction with the approach listed below to provide an extensibility mechanism for styles:
- The contents of the App_Themes/Theme1 folder is inspected to obtain all the .css files.
- The files are sorted alphabetically and added to the web pages through the _SiteLayout.cshtml partial view.
The easiest way to override, extend, or enhance the styles used by the application is to add a custom stylesheet in the Theme1 folder that is named using a “z_” prefix. This will result in that stylesheet being included in the pages after the out-of-the-box stylesheets, effectively enabling the default Dashboard styles to be overridden.
Extending Views
The out-of-the-box Razor views are located in the EdFi.Dashboards.Presentation.Core project and are precompiled to C# code using a Visual Studio custom tool each time the view source file is modified and saved.
Additionally, the ASP.NET MVC architecture has been modified to look first within the main web project using standard MVC conventions for the views, but secondarily to expand the search using the same conventions within the Presentation.Core assembly.
The PrecompiledMvcEngine is created by the RazorGeneratorEngine class, which is located in the EdFi.Dashboards.Presentation.Architecture.Mvc.Core namespace.
When you have the need to extend how things are represented on a page or view, the general approach is as follows:
- Identify the view requiring extension.
- Create a copy of an existing view or create a new view in the same folder used when following standard MVC conventions.
- Modify the view to meet the extension requirements.
- Try it out.
For the example below, assume you have a requirement to modify the “Student Information View” and change the label “Age as of September 1st" to “Current Age”.
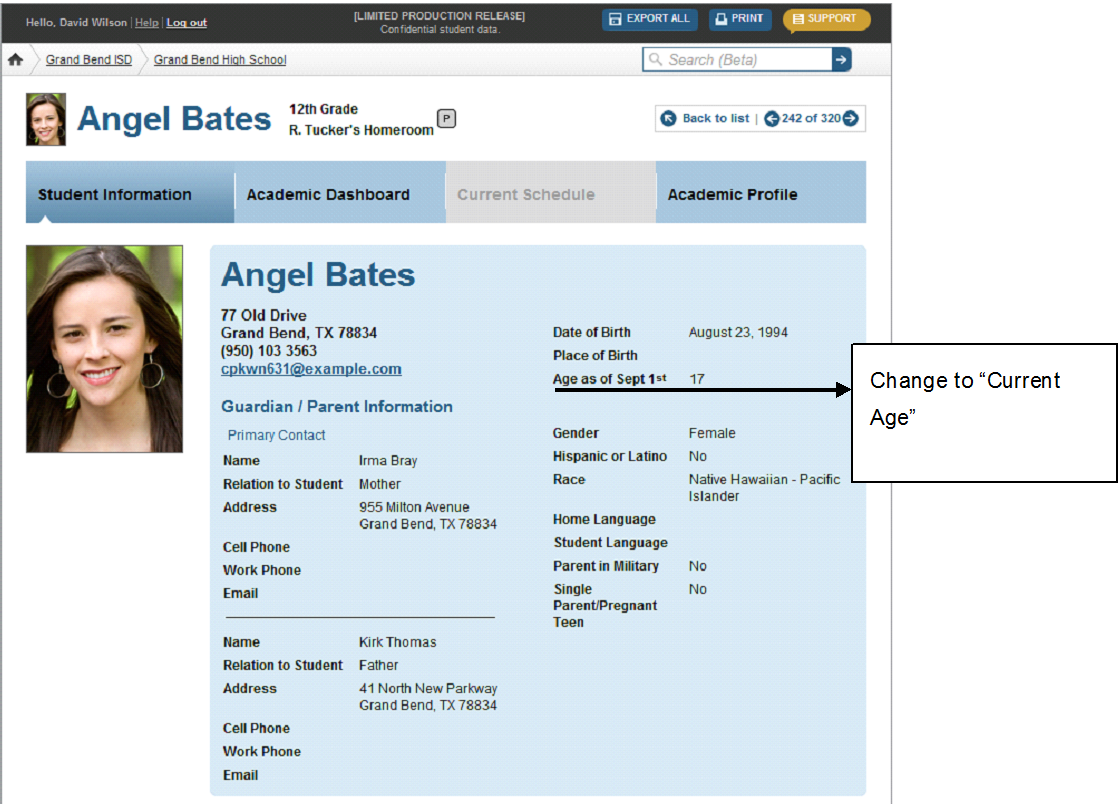
The modification steps for this example are as follows:
- Locate this view. This view can be found in “Areas/StudentSchool/Views/Information/Get.cshtml” in the EdFi.Dashboards.Presentation.Core project.
- Copy this view to the “/Areas/StudentSchool/Views/Information/” path in the main web project. If this path does not exist, create it.
- Open the file in Visual Studio and modify the label to meet the requirement.
- Run the application and navigate to that page.
Extending Controllers
Similar to extending views, you can extend controllers.
To extend a controller you should copy or create a controller to the /Areas/**PathToOriginalResource**/Controllers path.
As part of the architecture, the Dashboards have built-in functionality that resolves controller dependency based on IoC conventions. The default convention supplied for the registration of the controllers is as follows: registration of the controllers that belong in the extensions namespace first (if any) and then register the controllers that are part of the base. For more detail regarding the registration of controllers, please review the ControllerInstaller.cs located in the EdFi.Dashboards.Presentation.Web.Utilities.CastleWindsor namespace.
Extending Providers
Another point of extension provided in this application is “extension by composition.” This means that we are composing software by creating pluggable, interchangeable components. An example illustrating this can be seen in the MetricFlagProvider. The base implementation that is provided out-of-the-box simply returns the value that is found in the data loaded from the database.
Provided code:
public class MetricFlagProvider : IMetricFlagProvider
{
	public bool GetMetricFlag(MetricBase metricBase, MetricMetadataNode metadataNode, MetricData metricData)
	{
		var metricInstance = metricData.MetricInstances.SingleOrDefault(x => x.MetricId == metricBase.MetricId);

		if (metricInstance == null)
 			return false;

		return metricInstance.Flag.GetValueOrDefault();
	}
}
You can easily change this behavior (and that of any other provider) by doing the following:
- If you do not already have an extensions resource project, create one as follows:
- Create Metric.Resources and Metric.Resources.Tests extension projects in the solution following the naming convention (e.g., “EdFi.Dashboards.Extensions.Resources” and “EdFi.Dashboards.Extensions.Resources.Tests”).
- Using the same path of the provider to be extended, create your own provider implementing the logic you need. For this example the MetricFlagProvider lives in the EdFi.Dashboards.Metric.Resources.Providers namespace so we would create a new one in EdFi.Dashboards.Extensions.Metric.Resources.Providers.
Extended code (for this example, we will have the provider set a flag if a trend is bad):
public class ExtendedMetricFlagProvider : IMetricFlagProvider
{
    public bool GetMetricFlag(MetricBase metricBase, MetricMetadataNode metadataNode, MetricData metricData)
    {
        Return (metricBase.Trend.Evaluation == TrendEvaluation.Bad);
    }
}
Register your newly implemented Provider so it gets resolved by the container instead of the default implementation. You do this by looking for the method in the Utilities/CastleWindsor/ConfigurationSpecificInstallerBase.cs and overriding it in your own Extensions/Utilities/CastleWindsor/ConfigurationSpecificInstallerBase.cs. Note that if you don’t have a Extensions/Utilities/CastleWindsor/ path, you will have to create it.
Core ConfigurationSpecificInstallerBase:public abstract class ConfigurationSpecificInstallerBase : RegistrationMethodsInstallerBase { ... protected virtual void RegisterIMetricFlagProvider(IWindsorContainer container) { container.Register(Component .For<IMetricFlagProvider>() .ImplementedBy<MetricFlagProvider>()); } ... }Extended ConfigurationSpecificInstallerBase:
public abstract class ConfigurationSpecificInstallerBase : ConfigurationSpecificInstallerBase { ... protected override void RegisterIMetricFlagProvider(IWindsorContainer container) { container.Register(Component .For<IMetricFlagProvider>() .ImplementedBy<ExtendedMetricFlagProvider>()); } ... }- Try it out.
Extending and Creating Custom Services
Extending Services
When you have the need to extend a model and reuse functionality that is already given by the application, the best way of doing this is by extending through inheritance. The as-shipped code provides services that are very flexible and tolerant to extension and reuse.
The best way to see this in action is by going through an example covering the entire process. In the following example, we will show you how to extend a service, a model, and a view.
Sample Requirement: The sample requirement is to add an “Emergency Contact” property to the student information view.
Extending the Model
To accomplish this, the first thing you need to do is prepare your extended model. Create a model that inherits from the base InformationModel for students and adds the new Emergency Contact property specified in the requirement.
Extended Student Information Model:
namespace EdFi.Dashboards.Extensions.Resources.Models.Student.Information
{
   public class InformationModel : EdFi.Dashboards.Resources.Models.Student.Information.InformationModel
   {
       public string EmergencyContact { get; set; }
   }
}
Extending the Service
Now that we have our extended model containing the extra property, we'll create the base structure of our service inheriting from the Base InformationServiceBase. You will provide the extended model that you created in the previous step as the Resource Model.
Extended Student Information Service:
namespace EdFi.Dashboards.Extensions.Resources.Student.Information
{
   public class InformationService
    : InformationServiceBase<
            InformationRequest,
            Extensions.Resources.Models.Student.Information.InformationModel,
            SchoolInformationDetail,
            ParentInformation,
            StudentProgramParticipation,
            OtherInformation,
            SpecialService>
   {
   }
}
Extending the Unit Test
To maintain the quality of your application it is important to also extend and provide logic that tests that new code complies with the behavior specified by the requirement – which in the context of the Ed-Fi Dashboards means adding a Unit Test.
In the Unit Test we are testing both the extended model and the service.
Extended Student Information Service Test Fixture:
namespace EdFi.Dashboards.Extensions.Texas.Resources.Tests.Student
{
   public class When_requesting_student_information_from_the_EdFi_Student_Information_Service
        : When_requesting_student_information<
            InformationRequest,
            Extensions.Texas.Resources.Models.Student.Information.InformationModel,
            Extensions.Texas.Resources.Student.InformationService,
            SchoolInformationDetail,
            ParentInformation,
            StudentProgramParticipation,
            OtherInformation,
            SpecialService>
    {
        private string suppliedEmergencyContact = "John Doe";

        protected override void EstablishContext()
        {
            base.EstablishContext();
            StudentInformation suppliedExtendedStudentInformation = Builder<StudentInformation>.CreateNew().Build();
            suppliedExtendedStudentInformation.StudentUSI = studentUSI0;
            suppliedExtendedStudentInformation.EnsureNoDefaultValues();
            suppliedExtendedStudentInformation.EmergencyContact = suppliedEmergencyContact;
            suppliedStudentInfo = suppliedExtendedStudentInformation;

            Expect.Call(service.StudentInformationRepository.GetAll())
                .Return((new List<Extensions.Texas.Data.Entities.StudentInformation>
                       { suppliedExtendedStudentInformation }).AsQueryable());

        }

        [Test]
        public virtual void Should_have_emergency_contact_bound_to_model()
        {
            Assert.That(actualModel.EmergencyContact, Is.EqualTo(suppliedEmergencyContact));
        }
    }
}
Extending the Database
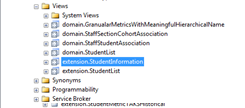
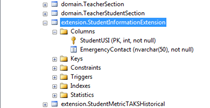
The next step is to prepare the database to hold this information for us. The convention for this is to add a table in the extension schema that holds the required extended properties. This table should be named schema.TableNameExtension so in this case its extension.StudentInformationExtension. We will also need a database view that will join both tables (i.e., the base table and the extended table). The view will act like an "override" for the base table. The convention for this table name is schema.BaseTableName, so in our example we'll name this extension.StudentInformation. The extended table can now be populated through an ETL (Extract, Transform, and Load) job.
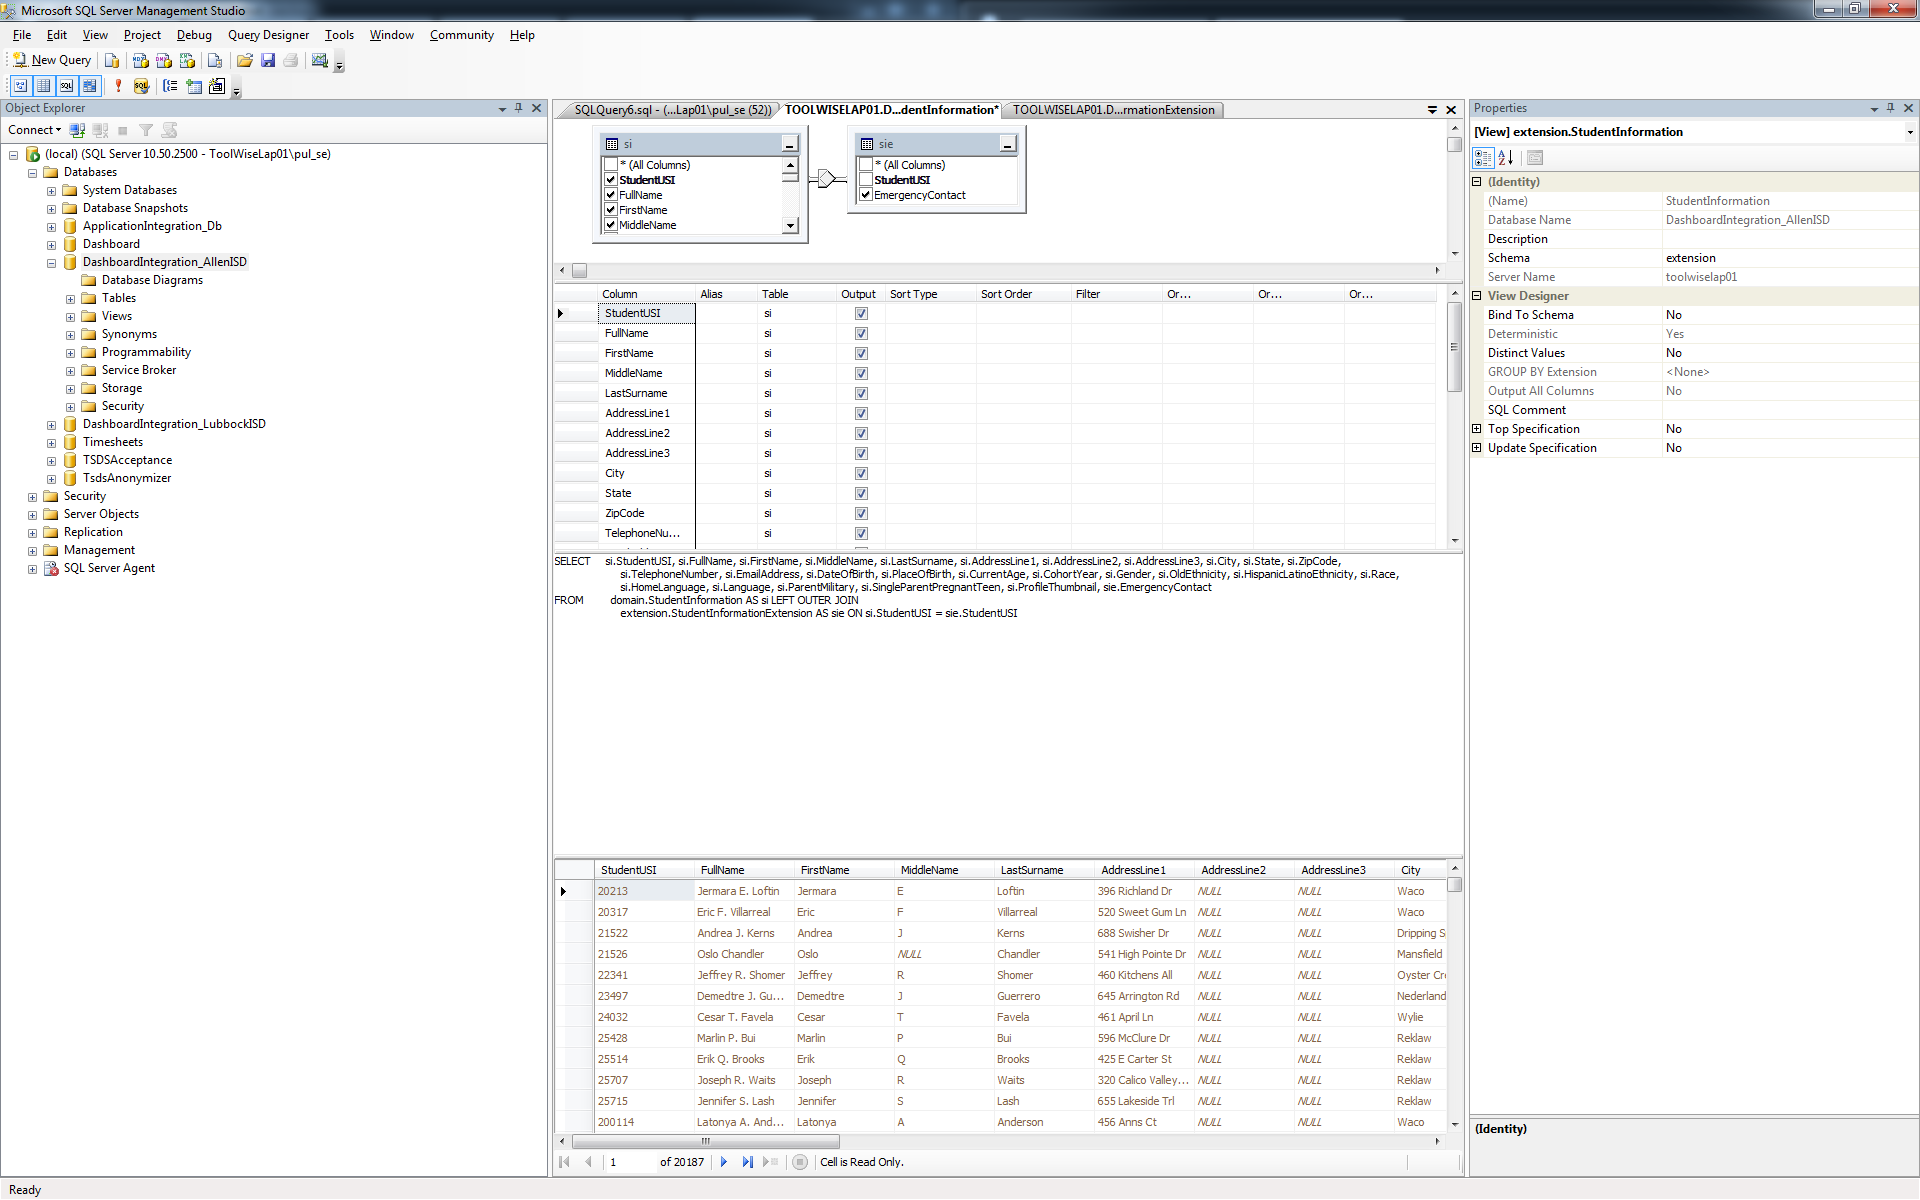
Extending the Data Layer
As a final step for this example, run the Visual Studio T4 template on your extended Data project. This will generate the POCOs (Plain Old CLR Objects) required to pull the data out of the database.
Resulting Extended Student Information POCOS:
namespace EdFi.Dashboards.Extensions.Data.Entities
{

   ...

   public class StudentInformation : EdFi.Dashboards.Data.Entities.StudentInformation
   {
       public string EmergencyContact {get; set;}
   }

   ...

}
Run your tests and confirm that they pass.
Additional properties added to the Student Information Model that rely on other tables or different logic can be built as normal services. You would include the repository dependencies on the constructor and add logic to fulfill your requirement.
Creating Custom Services
The detail and example walkthrough above shows how to extend an existing service. The Ed-Fi Dashboard architecture also allows implementers to extend functionality by adding new features. To do this, you will need to create the following components in the extension paths:
- A Service that implements IService<ServiceRequestObject,ServiceResponseModel>.
Path: EdFi.Dashboards.Extensions.Resources - A model that will satisfy the requirements of the view and that will be returned by the service above.
Path: EdFi.Dashboards.Extensions.Resources.Models - A unit test that will give you the certainty that your service complies with the requirements that were provided.
Path: EdFi.Dashboards.Extensions.Resources.Tests - Optional: A controller that does specific logic to present the model for the view.
Path: /Areas/areaName/Controllers/ - A Razor view to display the model.
Path: /Areas/areaName/Views/