This version of the Ed-Fi Dashboards is no longer supported. See the Ed-Fi Technology Version Index for a link to the latest version.
How To: Load Ed-Fi Dashboards v1.4 from an Ed-Fi ODS v2.0 Data Store
Previous Version
This is a previous version of the Ed-Fi Dashboards. Visit the Ed-Fi Tech Docs home page for a link to the current version, or the Ed-Fi Technology Version Index for links to all versions.
SQL Server Update Warning
Recent versions of SQL Server contain a breaking bug in SSIS. Do not install any version of SQL Server newer than SQL Server 2012, Service Pack 2, Cumulative Update 6. Cumulative Update 7 introduced a bug in SSIS that was not fixed in Service Pack 3. Microsoft has acknowledged the error, but has not yet released a timeline for fix.
This documentation covers the steps required for loading the Dashboard v1.4 for implementations using the Ed-Fi ODS v2.0.
The steps can be summarized as follows:
Step 1. Install and Configure Required Software
- Follow the instructions in the Ed-Fi ODS / API v2.0 - Getting Started Guide.
- Follow the instructions in the Ed-Fi Dashboards v1.4 - Getting Started Guide.
- Download the Dashboard Compatibility Views for Ed-Fi ODS v2.0 from the Ed-Fi Exchange, and follow the instructions for applying them to your Ed-Fi ODS v2.0 instance.
Step 2. Restore ODS Database
Restore a backup of an Ed-Fi v2.0 ODS that is populated with sample data and has the dashboard compatibility views applied.
Download the sample database attached to this page (EdFi_ODS_Populated_Template.zip) and extract the contents to a folder on your local machines (C:\Ed-Fi-ODS-Implementation\Database\Data\EdFi).
Restore the downloaded database to replace EdFi_ODS_Populated_Template.
USE [master]
GO
RESTORE DATABASE [EdFi_Ods_Populated_Template]
FROM  DISK = N'C:\Ed-Fi-ODS-Implementation\Database\Data\EdFi\EdFi_Ods_Populated_Template.bak'
WITH  FILE = 1,  NOUNLOAD,  REPLACE,  STATS = 5
GO
It is important to follow this step. The EdFi_ODS_Populated_Template DB required for powering dashboards is different from the database backup restored during the "initdev" process.
Step 3. Configure SQL Server Integration Services
Configure the SQL Server Integration Services Catalog
- Ensure that "Integration Services" are installed for SQL Server. If not, then re-run SQL Server 2012 Setup, and select Integration Services.
- Start SQL Server Management Studio.
- If the SQL Server Agent is not started, right-click and select Start.
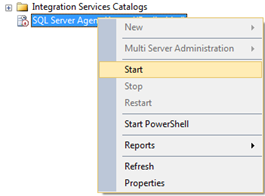
- Right-click on Integration Services Catalog and select Create Catalog.
- The Create Catalog prompt will appear. Select Enable automatic execution of Integration Services stored procedures at SQL Server startup, enter a password for the encryption key, then click OK.
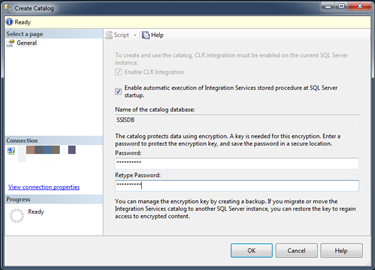
- SSISDB will be created for the new project deployments.

Install Additional Software Components
Install the following software components (used during SSIS ETL):
- 2007 Office System Driver: Data Connectivity Components, https://www.microsoft.com/download/en/details.aspx?displaylang=en&id=23734.
The 2007 Office System Driver: Data Connectivity Components install is required for executing the SSIS packages that load data from Excel spreadsheets. Installation may not be necessary if Microsoft Office is already installed.
- SSIS Multiple Hash v1.4.1 (2012), provided as a ZIP file in the Downloads Panel.
For convenience, this document uses SQL Server 2012 for both the Ed-Fi Operational Database and SQL Server Integration Services. You can also use SQL Server 2008 R2 for the database if you choose; however ETL support requires the Integration Services delivered as part of SQL Server 2012.
Install the EdFiException Component
- Download the EdFiComponent zip folder from the download section.
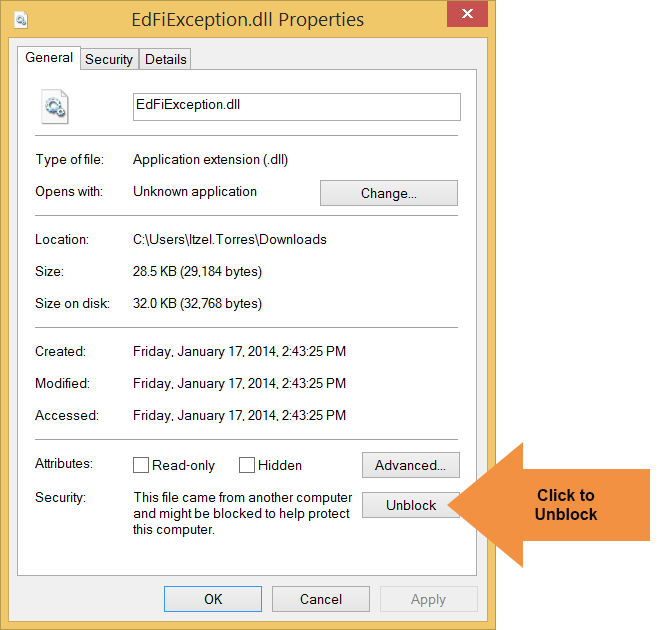
- Unzip the file and check if it has been marked as blocked. If it has been blocked, click Unblock and Apply.
- Copy EdFiException.dll to the following location: C:\Program Files (x86)\Microsoft SQL Server\110\DTS\PipelineComponents.
Install EdFiException.dll using Developer Command Prompt (Running as Administrator) found under Visual Studio Tools by executing the following commands:
gacutil -i "C:\Program Files (x86)\Microsoft SQL Server\110\DTS\PipelineComponents\EdFIException.dll"

At this point the assembly is now installed, providing a data flow component, EdFiException, in the Visual Studio SSIS Toolbox.
You can also install The EdFiException handler through an installer, by building and executing the “EdFiExceptionInstaller” project if you are using Visual Studio 2010. For newer versions of Visual Studio, the Solution file is not compatible.
Step 4. Build SSIS Projects and Deploy to the SSIS Catalog
Build the SSIS Projects
To use the SSIS Catalog, a project file (.ispac) must be created for the EdFi.Etl.Dashboard and EdFi.Etl.DW projects. This step stores the ETL Packages, connection strings and project configurations for the SSIS Catalog.
- Build the C:\Ed-Fi-Core\Etl\EdFi.Etl.Dashboard\ EdFi.Etl.Dashboard.sln project:
- Use SQL Server Data Tools (Visual Studio 2010 Shell) to open the solution C:\Ed-Fi-Core\Etl\EdFi.Etl.Dashboard\ EdFi.Etl.Dashboard.sln.
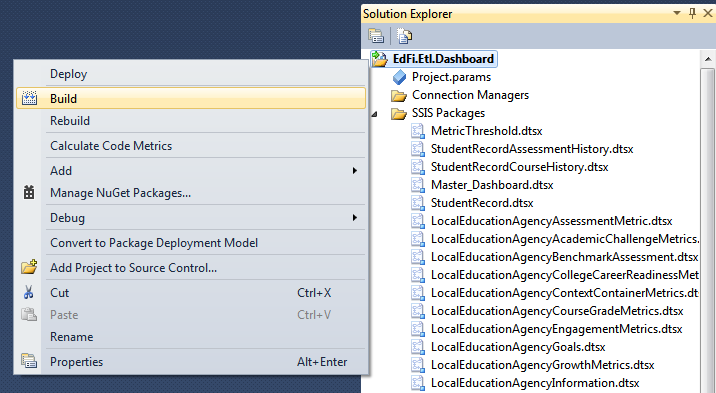
- When the project completely opens, go to the Solution Explorer, right-click on the project, and select Build.
- After the build completes, you should now have the created .ispac file. This will be in the project folder for each project. For example, in the C:\Ed-Fi-Core\Etl\EdFi.Etl.Dashboard\bin\Development folder is the .ispac file for the XML Loaders.
- Repeat these steps for the C:\Ed-Fi-Core\Etl\EdFi.Etl.DW\ EdFi.Etl.DW.sln project.
Deploy the .ispac files to the SSIS Catalog
The two .ispac files created in the previous step must be deployed to the SSIS Catalog that was previously created. To support the ease of deploying to the SSIS Catalog, PowerShell scripts have been provided that setup the SSIS Catalog with the new projects and deploy the SSIS packages. These scripts will also create environment variables used to store the necessary connections strings to manage the project. The packages will reference the new environment variables and will execute with those connection strings. The PowerShell script has variable fields that must be populated for the deployment.
Deploy the Dashboard packages
- Navigate to the C:\Ed-Fi-Samples\Tools\SSIS Catalog Execution folder.
- Open DeployDashboardPackages.ps1 (using Notepad or Windows Powershell ISE).
In the File Variables section, populate the variables according to the following:
#*********File Variables*********************************************************************************************************
$ProjectFilePath = "C:\Ed-Fi-Core\Etl\EdFi.Etl.Dashboard\bin\Development\EdFi.Etl.ispac" #The path to the ispac file from the SSIS project. Must build the project solution first.
$ProjectName = "EdFi.Etl.Dashboard" #Project name from the SSIS Project
$FolderName = "Dashboard" #The folder name in the SSIS Catalog
$EnvironmentName = "Dashboard" #The name of the environment the packages will use
$ISServerName = "(local)" #The name of the server where the SSIS Catalog has been created
$EnvDatabaseName = "InitialCatalog" #Name of the property that the environment will store the EdFi Database name in
$Server = "(local)"  #The server where the EdFi Database is stored
$EdFi = "EdFi_Ods_Populated_Template" #The EdFi (ODS) database name. For this how-to, we will be using the Ed-Fi v2.0 ODS Populated Template
$Dashboard = "EdFi_Dashboard"  #The Dashboardboard Database name
$DashboardDW = "EdFi_DashboardDW"  #The Dashboard DW name
$Application = "EdFi_Application"  #The Application Database name
$DBUserName = "edfiAdmin"
$DBUserPassword = "edfiAdmin"
#********************************************************************************************************************************
- Save and execute the PowerShell script.
- After DeployDashboardPackages.ps1 has completed executing, the project will be deployed in the SSIS Catalog. To verify this, do the following:
- Navigate to the Integration Services Catalogs in SQL Server Management Studio.
- Expand the Integration Services Catalogs to drill down to SSISDB > Dashboard > Projects > EdFi.Etl.Dashboard > Packages. When you expand the Packages your view should look similar to the image below:
- Navigate to SSISDB > Dashboard > Environments and expand to see the Dashboard environment.
- Double-click the Dashboard environment and select Variables in the “Select a page” pane to the left. The data in the Value column will be used as the connections strings. It should look similar to the image below:
Deploy the DashboardDW Packages
- Navigate to the C:\Ed-Fi-Samples\Tools\SSIS Catalog Execution folder.
- Open DeployDWPackages.ps1 (using Notepad or Windows Powershell ISE).
In the File Variables section, populate the variables according to the following:
#********** File Variables*****************************************************************************************************
$ProjectFilePath = "C:\Ed-Fi-Core\Etl\EdFi.Etl.DW\bin\Development\EdFi.Etl.ispac"  #The path to the ispac file from the SSIS project. Must build the project solution first.
$ProjectName = "EdFi.Etl.DW"  #Project name from the SSIS Project
$FolderName = "DashboardDW"  #The folder name in the SSIS Catalog
$EnvironmentName = "DashboardDW"  #The name of the environment the packages will use
$ISServerName = "(local)"  #The name of the server where the SSIS Catalog has been created
$EnvDatabaseName = "InitialCatalog"  #Name of the property that the environment will store the EdFi Database name in
$Server = "(local)"   #The server where the EdFi Database is stored
$EdFi = "EdFi_Ods_Populated_Template"  #The EdFi (ODS) database name. For this how-to, we will be using the Ed-Fi v2.0 ODS Populated Template
$Dashboard = "EdFi_Dashboard"  #The Dashboardboard Database name
$DashboardDW = "EdFi_DashboardDW"  #The Dashboard DW name
$Application = "EdFi_Application"  #The Application Database name
$DBUserName = "edfiAdmin"
$DBUserPassword = "edfiAdmin"
#********************************************************************************************************************************
- Save and execute the PowerShell script.
- After DeployDWPackages.ps1 has completed executing, the project will be deployed in the SSIS Catalog. Verify this using the same approach as described in "Deploy the Dashboard packages" above.
Step 5. Setup SQL Server Agent Job
Create the SQL Server Agent Job
- Download EdFiSQLAgentv2.0.sql.
- In SQL Server Management Studio, open the downloaded file.
- Once open, navigate to Query > Specify Values for Template Parameters… (or click CTRL+SHIFT+M).
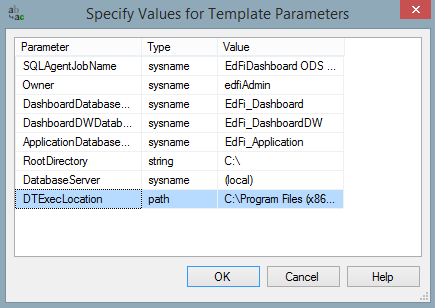
- Enter in the values for the parameters:
| Parameter | Value |
|---|---|
| SQLAgentJobName | The name of the SQL Agent Job, (EdFiDashboard ODS v2.0) |
| Owner | The SQL User that will be the owner of the job: edfiAdmin |
| DashboardDatabaseName | The name of the Dashboard Data Store database, (EdFi_Dashboard) |
| DashboardDWDatabaseName | The name of the Dashboard Data Warehouse database, (EdFi_DashboardDW) |
| ApplicationDatabaseName | The name of the Application Database, (EdFi_Application) |
| RootDirectory | The root directory of the extracted repository, (C:\) |
| DatabaseServer | The SQL Server Instance the Ed-Fi Dashboards Databases will be created on, (local) |
| DTExecLocation | C:\Program Files (x86)\Microsoft SQL Server\110\DTS\Binn\DTExec.exe |
- Once the parameter values have been entered, click OK. The values will now be inserted in the SQL Agent script. Below is an example of the parameters filled in.
- After the SQLAgent script has been updated, execute the script to create a new SQL Server Agent Job.
Step 6. Load Dashboard Databases
Once the SQL Server Agent script has been executed (in Step 5 above), the SQL Server Agent Job will be available to use to load the Ed-Fi Dashboard databases.
- To execute the job, navigate to the SQL Server Agent in SQL Server Management Studio and drill down into Jobs and right-click on the job named EdFiDashboard ODS v2.0 and select Start Job at Step...
- The Start job screen will now open. Select Step ID 1.
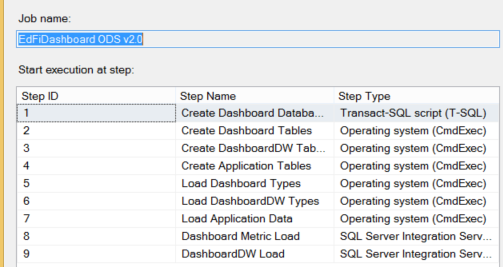
- Click Start. This will start the process to load and create the databases to power the Ed-Fi Dashboards.
- Upon successful execution of the SQL Agent job, data will be loaded into the Dashboard databases.
The following links are required to complete installation:
EdFiException Component Assembly:
EdFiException.zip
SSIS Multiple Hash v1.4.1 (SQL 2012):
SetupMultipleHash2012_V1.4.1.zip
EdFiDashboard ODS v2.0 Job Creation Script:
EdFiSQLAgentv2.0.sql
EdFi ODS v2.0 Database Backup:
EdFi_ODS_Populated_Template.zip