This version of the Ed-Fi ODS / API is no longer supported. See the Ed-Fi Technology Version Index for a link to the latest version.
Security Configuration Tool
The Security Configuration Tool allows designated administrator users to manage vendor access and permission levels for an instance of the Ed-Fi ODS / API. This document walks through the use and deployment of the Security Configuration Tool.
Note that the Security Configuration Tool is designed to work in a production instance environment and is not used in a sandbox deployment. The Sandbox Administration Portal is instead used to administer sandbox access. See the Deployment section of this documentation for more information about sandbox and production environments.
Security Configuration Tool Walkthrough
This section provides a walkthrough of the Security Configuration Tool application and its key features.
Managing Vendors
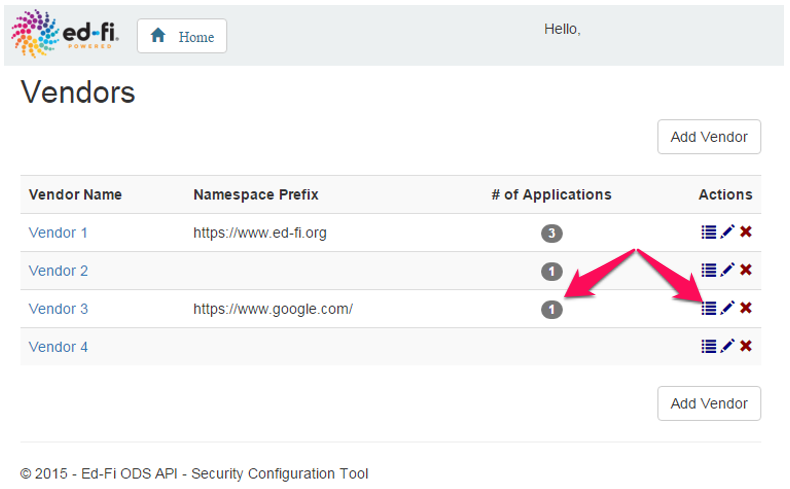
The Security Configuration tool allows the administrator to control which vendors have access to the API and manage vendor accounts. The home page shows an alphabetical list of vendors in the system.
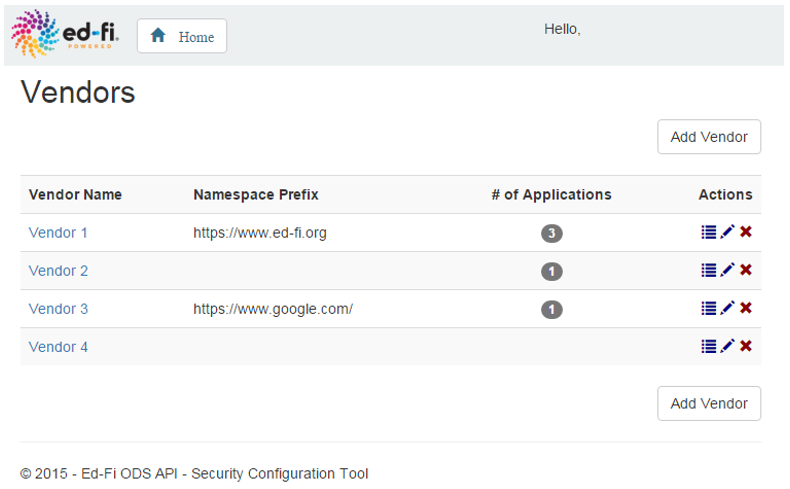
For each vendor, the following information will be displayed:
Vendor Name. The name of the vendor.
Namespace Prefix. A namespace for the vendor, which takes the form of the URL for the vendor's website.
# of Applications. The number of applications that have been added for the vendor.
The icons in the Actions column allow the user to view the applications for the vendor, edit the vendor information or delete the vendor
Adding a Vendor
To add a vendor, click on the Add Vendor button either above or below the list of vendors.

The following pop-up screen will appear:
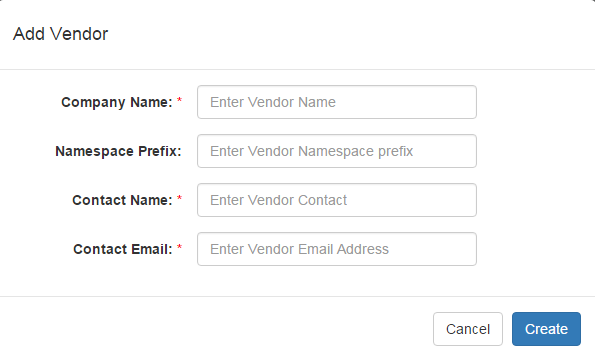
Enter the appropriate information in each field and click Create.
The Namespace Prefix is the URL for the vendor and, if entered, must begin with http://.
Editing a Vendor
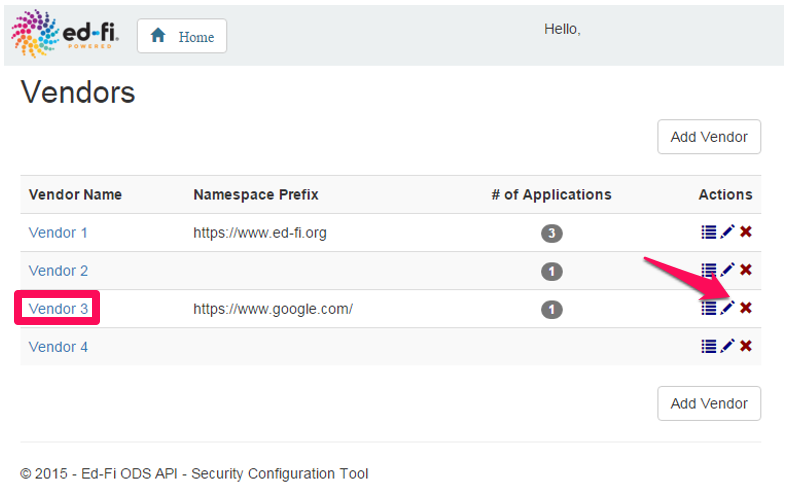
To edit vendor information, click on either the hyperlinked name in the Vendor Name column or the edit icon in the Actions column.
Change the appropriate fields and click Apply.

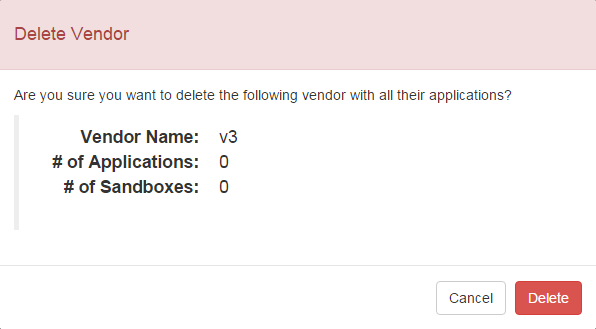
Deleting a Vendor
To delete a vendor, click on the delete icon in the Actions column.

A message will pop up confirming the intent to delete the vendor. To confirm, click Delete.
Note
Deleting a vendor also deletes the associated application records for the vendor.
Managing Applications
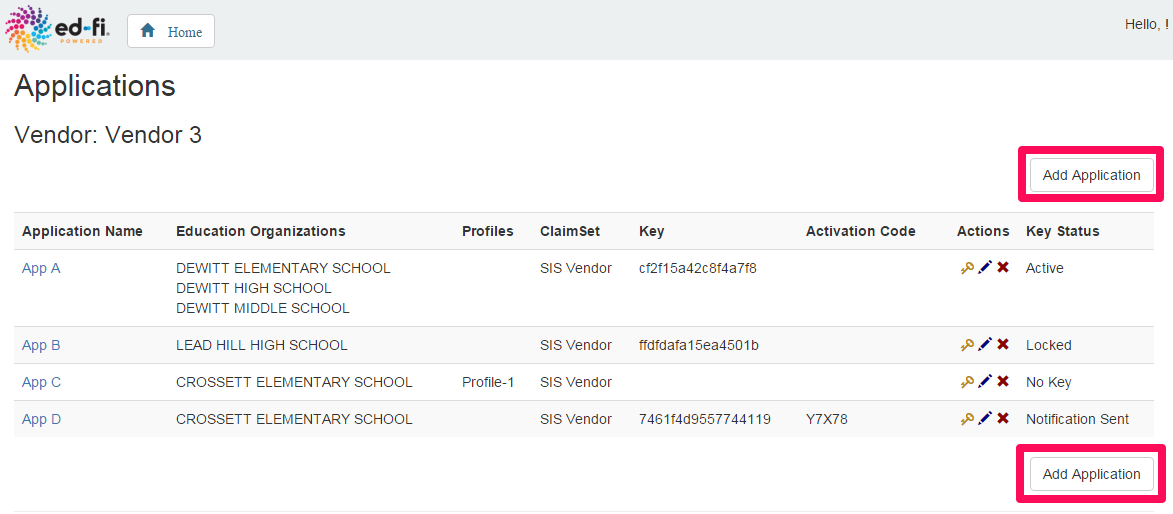
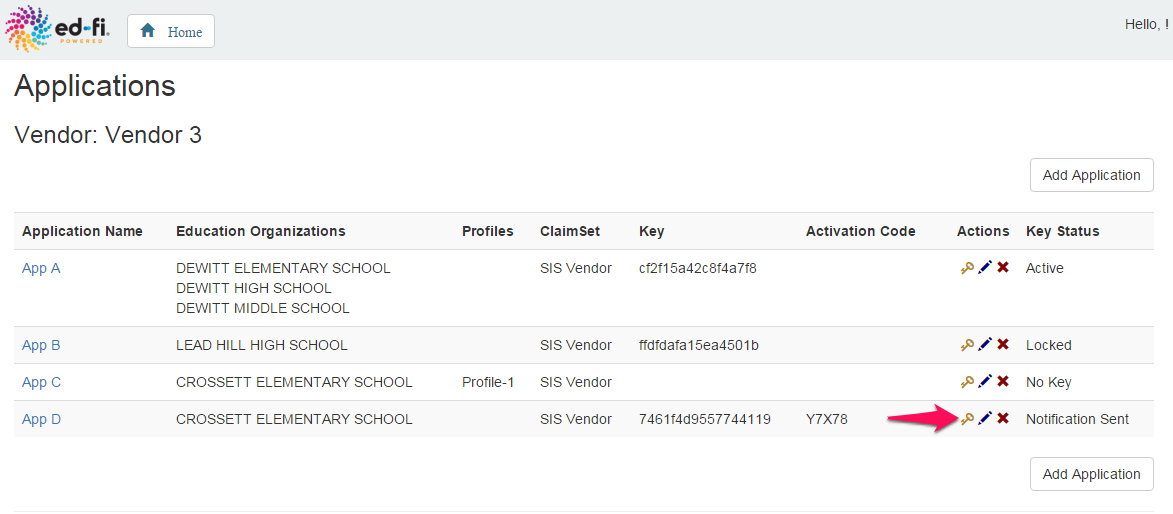
The Security Configuration tool allows you to create and manage application records for each vendor. To access a list of a vendor's applications, click on either the number in the # of Applications column or the manage application icon in the Actions column.
These links will bring up an alphabetical list of all the applications associated with the selected vendor:
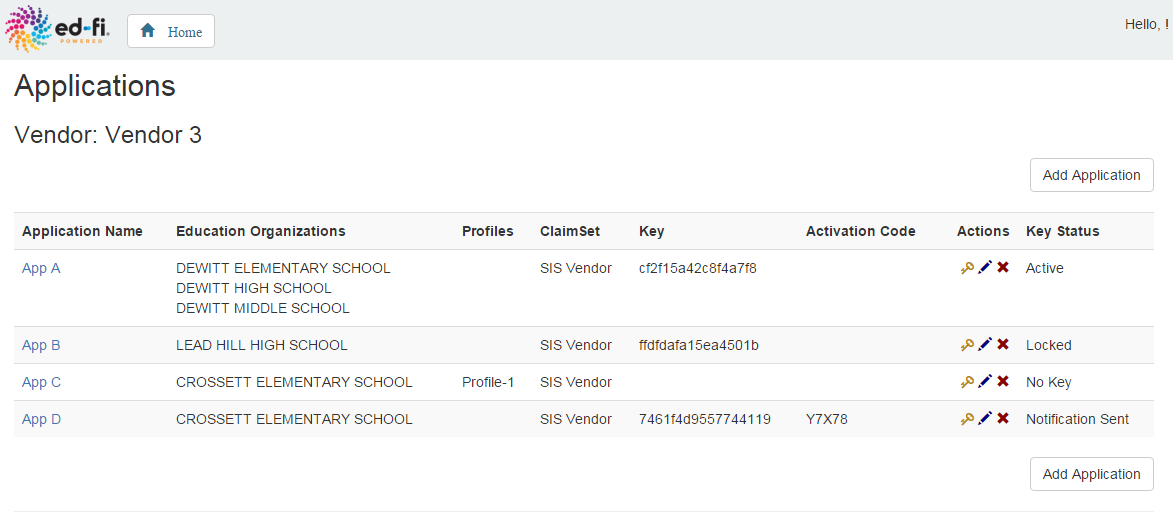
For each application, the following information will be displayed:
Application Name. The name of the application.
Education Organizations. The schools and/or districts applicable to the application.
Profiles. The profile associated with the application. Profiles dictate what API resources are available to an application.
ClaimSet. The claim set associated with the application. Claim sets define the specific actions (e.g., view, edit) applications can take on resources.
Key. Vendors use this key to gain access to the API.
Activation Code. A code used by the vendor to obtain their OAuth key and secret.
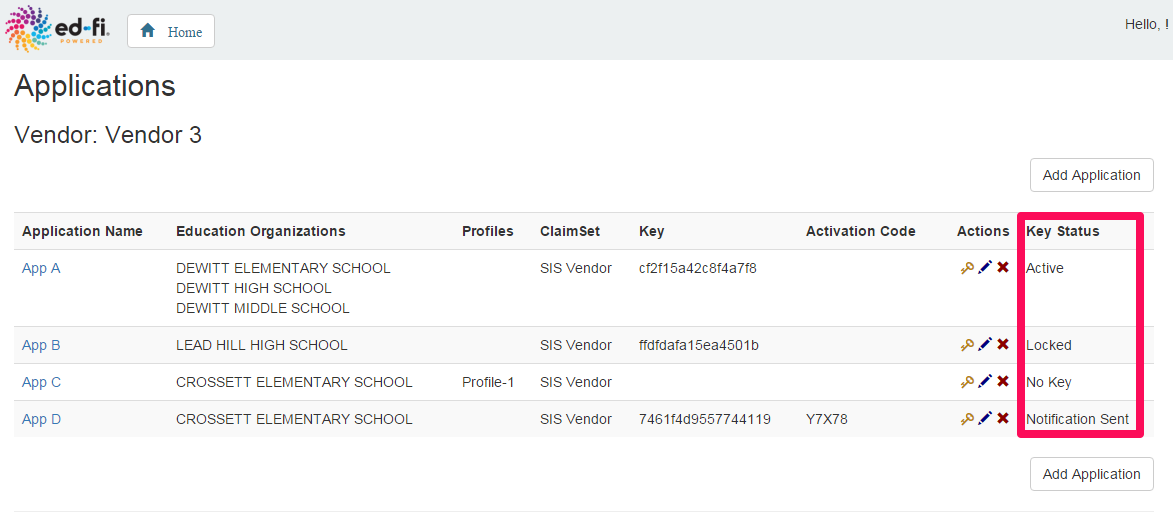
Key Status. The status of the key for each application. The following is a list of key statuses an application can have:
No Key: A key has yet to be generated for the application.
Notification Sent: A key has been generated and the vendor has been notified via e-mail, but the correct activation code has yet to be entered.
Active: The application has an active key.
Locked: The incorrect activation code has been entered 3 times, a new key will need to be generated. (Note that 3 is the default number of tries to enter the correct activation code. This number can be configured (see Tool Deployment and Setup).)
- Expired: the activation code was not entered in the specified period of time, the code has expired. (Note that the length of time before the activation code expires is configurable (see Tool Deployment and Setup).)
The icons in the Actions column allow the user to generate a key and secret for the application, edit the application information, or delete the application. The sections that follow describe each action.
Adding an Application
To add an application, click on the Add Application button either above or below the list of applications.
The following pop-up screen will appear:

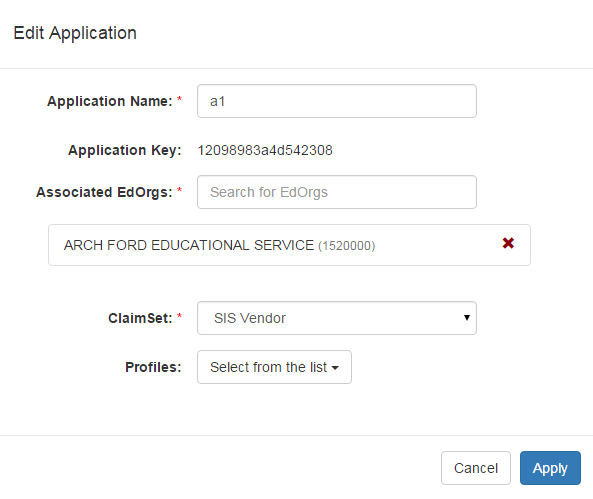
Enter the appropriate information in each field and click Create. The Associated Education Organizations field will auto-complete search results as the user types in the name of the organization. Select the appropriate one once it populates. Multiple education organizations may be selected, however, they can only be selected one at a time. The ClaimSet field must be selected from the list. (See How To: Configure Claim Sets for information on creating and editing claim sets for the ODS / API.) API Profiles must also be selected from the list. (See the API Profiles section of the Platform Developers' Guide for information on managing profiles.)
Editing an Application
To edit information for an application, click on either the hyperlinked name in the Application Name column or the edit icon in the Actions column.
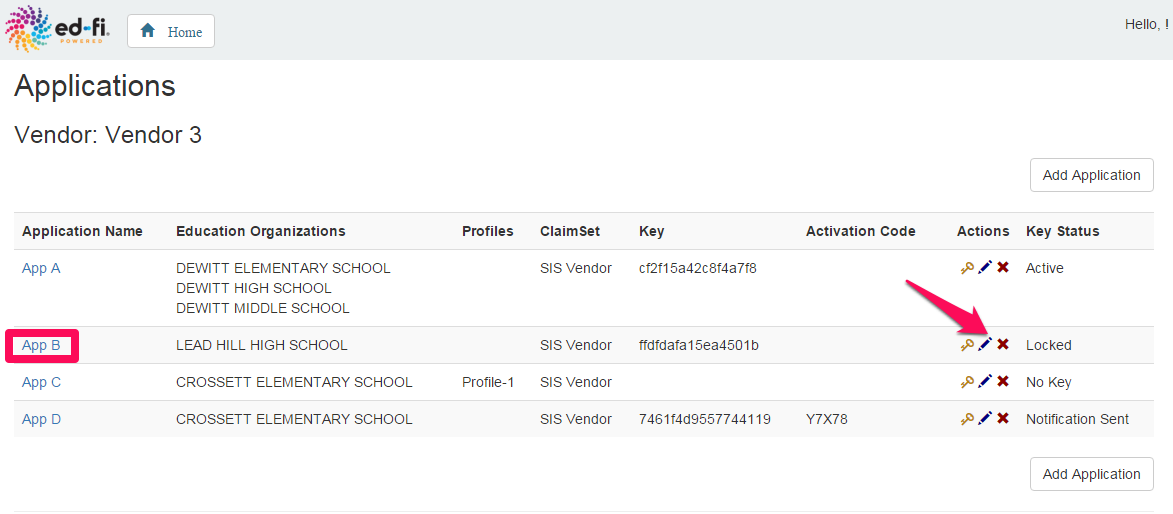
Change the appropriate fields and click Apply.
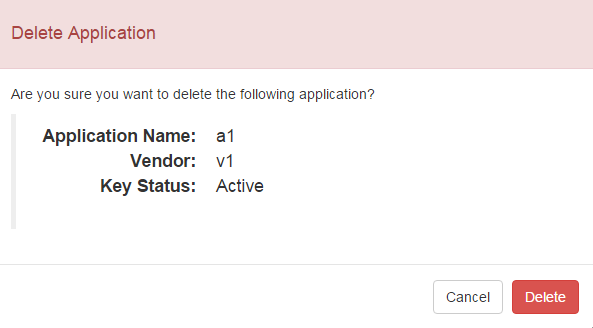
Deleting an Application
To delete an application, click on the delete icon in the Actions column.
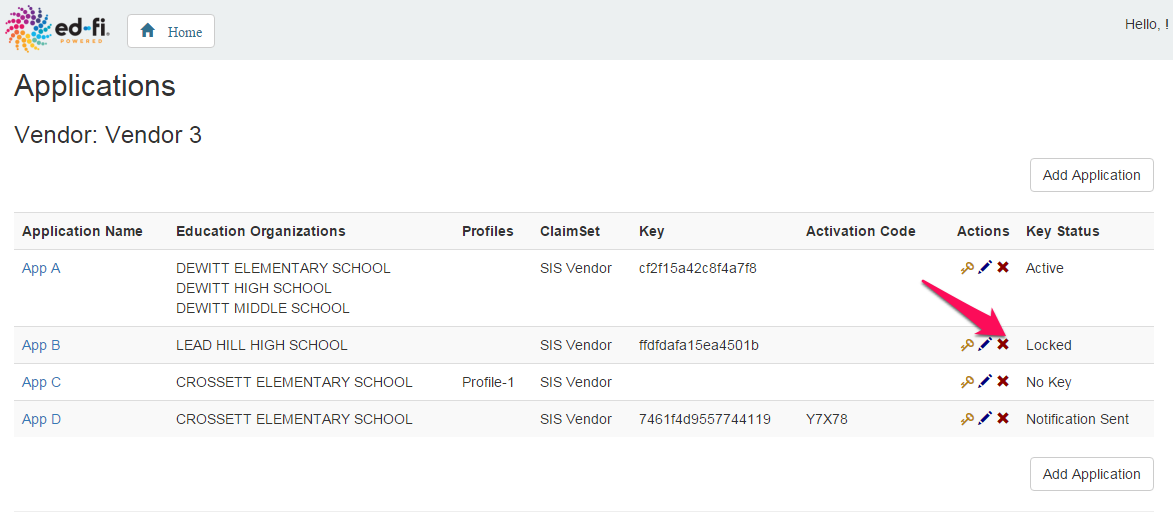
A message will pop up confirming the intent to delete the application. To confirm, click Delete.
From the Applications page, the platform administrator has the ability to manage keys and secrets for a vendor's applications. The following is a list of things they can do:
Generate a new key and secret for an application
Re-generate a key and secret for an application
Generating a Key and Secret
To generate a new key and secret, click on the key icon in the Actions column.
The following pop-up screen will appear:
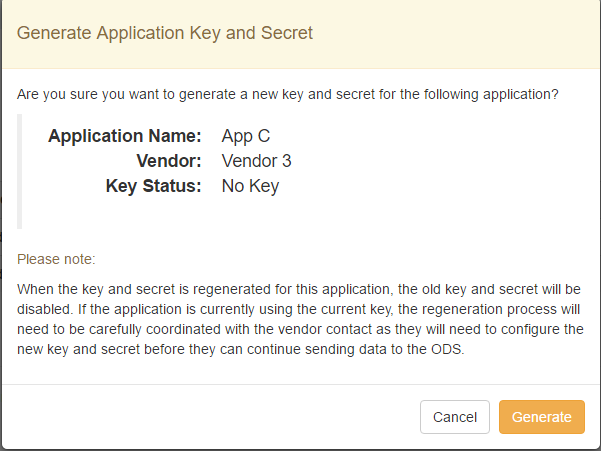
To generate the key and secret, click Generate. A new pop-up screen will show the activation code.
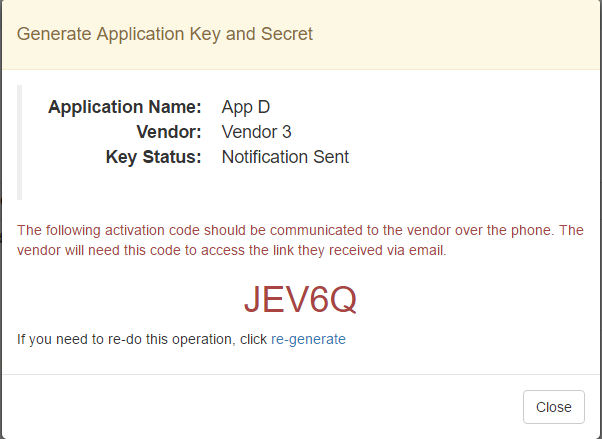
This activation code should be communicated to the vendor via a secure means such as over the phone or secure e-mail.
Note
If you get an error when attempting to generate the key and secret, ensure that you have the SMTP folder path available on your machine (see SMTP configuration). The development default is c:\temp\smtp.
Note
The default length of the activation code is 5 characters. This length is configurable (See Tool Deployment and Setup).
Retrieving the Key and Secret
Once a new key and secret is generated, an e-mail will automatically be sent to the vendor with a link. The e-mail will be similar to the following:
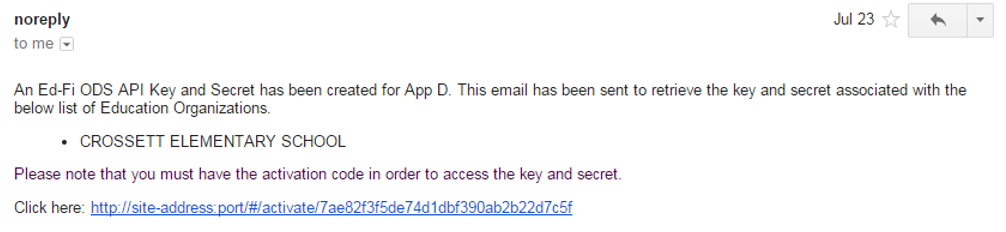
The link will take the vendor to the Key Retrieval Tool.
The vendor will have up to 3 tries to enter the correct activation code.
The activation code must be entered within 24 hours of receiving the e-mail.
Note
These are default settings. Both the number of attempts to enter the correct activation code and the length of time the vendor has to enter the correct activation code are configurable. The e-mail address from which the link to the Key Retrieval Tool is sent is also configurable. See Tool Deployment and Setup for more details.
On the following screen, the vendor will enter the activation code they received from the administrator.

Once the vendor enters the activation code, they will click Activate. The vendor will then see the following screen, showing the key and secret that was generated for the application:
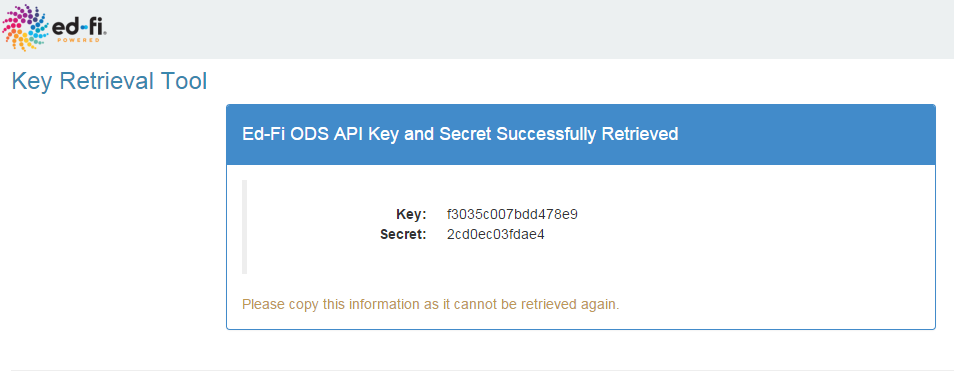
These are the OAuth key and secret the vendor will use to access the ODS / API.
These instructions are based on deploying to IIS. The specific Instructions will vary when deploying to other environments, but the principles are generally the same.
There are 2 web applications that are used for this tool:
Web API Security Configuration Tool (EdFi.Ods.SecurityConfiguration.Web). This allows the administrator to manage the vendors and applications.
Web API Security Configuration Key Retrieval Tool (EdFi.Ods.SecurityConfiguration.KeyRetrieval.Web). This allows vendors to obtain keys and secrets to use for the API.
Each tool is described below.
Web API Security Configuration Tool
This is a Windows Authentication-enabled web application. Note the following lines in the web.config file.
<system.web>
	<authentication mode="Windows" />
	<authorization>
		<deny users="?" />
	</authorization>
</system.web>
In order for the tool to work, the Windows Authentication needs to be enabled and the Form Authentication needs to be disabled. If you are deploying to IIS, make sure you apply these changes.
Application-Related Settings
The Web API Security Configuration Tool has 3 web application settings that are configurable:
ActivationCodeLength. This is the number of characters the activation code has.
ChallengeExpiryHours. This is the number of hours the activation link is valid. After this time has passed, the link is no longer valid and the Key Status will change to “Expired”.
KeyRetrievalSite. Points to the Key Retrieval tool server. The link in the e-mail body uses this address as the root address of the Key Retrieval Tool site.
The following lines in the web.config file refer to these settings:
<appSettings>
	<!- Indicates number of characters in the activation code to be generated by Random generator -->
	<add key="ActivationCodeLength" value="5" />
	<!-- Indicates number of hours an activation link would be valid -->
	<add key="ChallengeExpiryHours" value="24" />
	<!-- Used to generate a link to the KeyRetrieval tool to be inserted in the email body-->
	<add key="KeyRetrievalSite" value="http://site-address:port/" />
</appSettings>
To change either of the settings, edit the value in the appropriate line in the web.config file to the desired setting.
Integration
This section describes key configuration and database connection settings.
Database Connections
This web application has dependencies to the following databases:
EdFi_Admin
EdFi_Security
EdFi_ODS_xxx (naming convention for ODS databases)
Make sure to set up the connection strings appropriately. There must be a database connection to each of the databases listed above.
Integration Details:
Profiles are stored in the EdFi_Admin database, Profiles table. Profiles are not mandatory. If the table is empty, the tool will not display any profiles.
This tool allows you to associate existing profiles to an application. However, it does not allow you to create a new profile or delete one. Creating or deleting profiles can be done directly in the database.
- If a new profile is created in the database, the tool will pull the latest information from the database once the page is refreshed.
ClaimSets are stored in the EdFi_Security database, ClaimSets table. Since ClaimSet is a mandatory item to define an application, there must be at least one ClaimSet in this table for the tool to work.
This tool allows you to assign an existing claimset to an application. However, it does not allow you to create a new claimset or delete one. Creating or deleting claimsets can be done directly in the database.
- The "SIS Vendor" claimset is pre-populated any time the EdFi_Security database is created (by Entity Framework Migration).
- If a new claimset is created in the database, the tool will pull the latest information from the database once the page is refreshed.
There needs to be at least one ODS database connection, but there could be multiple. All ODS database connection names need to start with “EdFi_ODS_”. ODS databases are used to prepare the Education Organization List. The tool uses the following tables to get the necessary data:
edfi.EducationOrganization
edfi.LocalEducationAgency
edfi.School
The following lines in the web.config file refer to the connection strings:
<connectionStrings>
	<add name="EdFi_Admin" connectionString="…" providerName="System.Data.SqlClient" />
	<add name="EdFi_Security" connectionString="…" providerName="System.Data.SqlClient" />
	<add name="EdFi_ODS_2014" connectionString="…" providerName="System.Data.SqlClient" />
	<add name="EdFi_ODS_2015" connectionString="…" providerName="System.Data.SqlClient" />
</connectionStrings>
Logging
The tool uses log4net to log statements. The logging level and targets can be managed in the web.config file.
SMTP (Mail Server)
The Web API Security Configuration Tool has an e-mail setting that determines the e-mail address from which messages are sent to vendors.
The e-mail setting is configured in the following lines in the web.config file:
<system.net>
	<mailSettings>
		<smtp from="education_organization.com">
			<network host="smtp_name_or_ip_address" userName="smtp_username" password="smtp_password" port="smtp_port" />
		</smtp>
	</mailSettings>
</system.net>
During development and testing, the tool is configured to save the e-mail into a file located in a specific existing folder, instead of sending it out. This was done for ease of testing. A valid SMTP server will need to be configured in production environments.
<smtp deliveryMethod="SpecifiedPickupDirectory" from="education_organization.com">
	<specifiedPickupDirectory pickupDirectoryLocation="c:\temp\smtp"/>
</smtp>
Web API Security Configuration Key Retrieval Tool
The Web API Security Configuration Key Retrieval Tool is a public-facing web application. It is safe for anyone to access it. In order for the tool to work, the Anonymous Authentication needs to be enabled and the Form Authentication needs to be disabled.
The Web API Security Configuration Key Retrieval Tool has 1 web application setting that is configurable:
MaxChallengeRetries. This is the number of tries a vendor is allowed to enter the correct activation code to retrieve the key and secret.
The following lines in the web.config file refer to these settings:
<appSettings>
	<!-- Indicates number of retries a vendor is allowed to activate an application -->
	<add key="MaxChallengeRetries" value="3" />
</appSettings>
To change the setting, edit the value in the appropriate line in the web.config file to the desired setting.
Database Connections
This application has dependencies to the following database:
EdFi_Admin
Make sure to set up the connection strings appropriately. There must be a database connection to the database listed above.
The following lines in the web.config file refer to the connection strings:
<connectionStrings>
	<add name="EdFi_Admin" connectionString="…" providerName="System.Data.SqlClient" />
</connectionStrings>
Logging
The tool uses log4net to log statements. It can be configured in the web.config file.
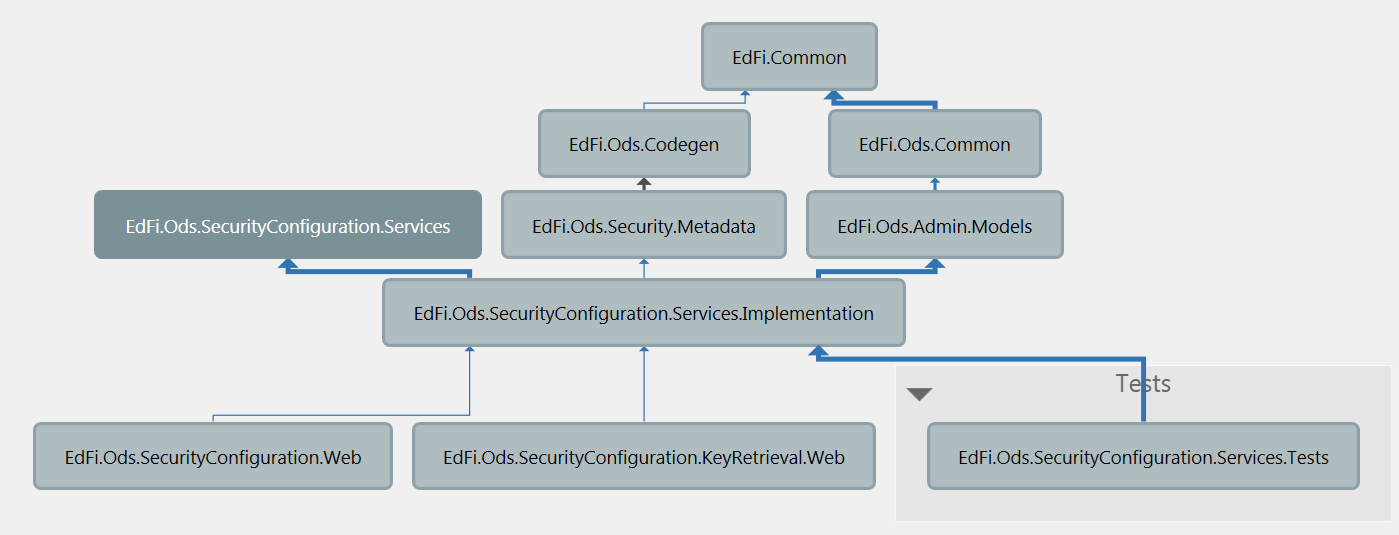
Solution Structure
This API Security Configuration Tool uses the same solution and repository as the Web API (Ed-Fi ODS). The following diagram shows the two applications and their dependencies to the other projects in the solution: